Action-based delivery
Action-based delivery campaigns or event-triggered campaigns are effective for transactional or achievement-based messages. Instead of sending your campaign on certain days, you can trigger them to send after a user completes a certain event.
Setting up a triggered campaign
Step 1: Select a trigger event
Select a trigger event. Events are organized by category and are available depending on your workspace and enabled channels.
- eCommerce
- Place Order
- Update Cart
- Perform Back in Stock Event
- Perform Price Drop Event
- Start Checkout
- View Product
- Cancel Order
- Refund Order
- Make Purchase
- General activity
- Interact With Campaign
- Interact With Step
- Interact with Landing Page
- Perform Conversion Event
- Perform Custom Event
- Perform Exception Event For Campaign
- Start Session
- Inbound messaging
- Send an SMS inbound message
- Send a WhatsApp inbound message
- Send a LINE inbound message
- Location
- Enter a Location
- Trigger a Geofence
- Profile updates
- Add an Email Address
- Change Custom Attribute Value
- Update Subscription Status
- Update Subscription Group Status
Start Checkout, View Product, Cancel Order, and Refund Order are recommended eCommerce events that use Perform Custom Event with the event name pre-filled.
Place Order and Update Cart accept property filters, so a trigger fires only for the orders or carts you want. Basic filters match a top-level property such as total_value; nested filters look inside the products array, so products[].metadata.category matches when any product qualifies. For details, see Property filters.
In-app message campaigns support a smaller set of triggers: Make Purchase, Place Order, Start Session, Perform Custom Event, and Interact With Campaign. On an in-app message, Place Order applies to any order and supports basic property filters only. It can’t target a specific product or filter on nested properties. For in-app message campaigns, Interact With Campaign only covers opening a push from any campaign or a specific campaign. It doesn’t include the following campaign interaction list.
For non-in-app-message campaigns, when you select Interact With Campaign, Interact With Step, or Interact with Landing Page, choose the interaction to trigger on. Each of these triggers offers its own interactions, and the interactions available to you depend on your enabled channels.
Interactions for Interact With Campaign
- View in-app message
- Click in-app message
- Click in-app message button 1
- Click in-app message button 2
- Submit in-app message survey
- Click email
- Open email
- Open email (machine opens)
- Open email (other opens)
- Click alias in email
- Clicked Alias in any campaign or canvas step
- Directly open push notification
- Click push notification button
- Click push story page
- Perform conversion event
- Receive email
- Receive push notification
- Receive webhook
- Receive SMS
- Click shortened SMS link
- View content card
- Click content card
- Dismiss content card
- View banner
- Click banner
- Dismiss banner
- Click tracked WhatsApp link
- Click tracked LINE link
- Click tracked KakaoTalk link
- Are enrolled in control group
Interactions for Interact With Step
- View in-app message
- Start in-app message availability window
- Submit in-app message survey
- Click email
- Open email
- Open email (machine opens)
- Open email (other opens)
- Click alias in email
- Clicked Alias in any campaign or canvas step
- Directly open push notification
- Click push notification button
- Click push story page
- Receive email
- Receive push notification
- Receive webhook
- Receive SMS
- Click shortened SMS link
- View content card
- Click content card
- Dismiss content card
- View banner
- Click banner
- Dismiss banner
- Click tracked WhatsApp link
- Click tracked LINE link
- Click tracked KakaoTalk link
Interactions for Interact with Landing Page
- Submit form
- Submit survey
You can also further filter trigger events through Braze custom event properties, allowing for customizable event properties for custom events and in-app purchases. This feature allows you to further tailor which users receive a message based on the specific attributes of the custom event, allowing for greater campaign personalization and more sophisticated data collection.
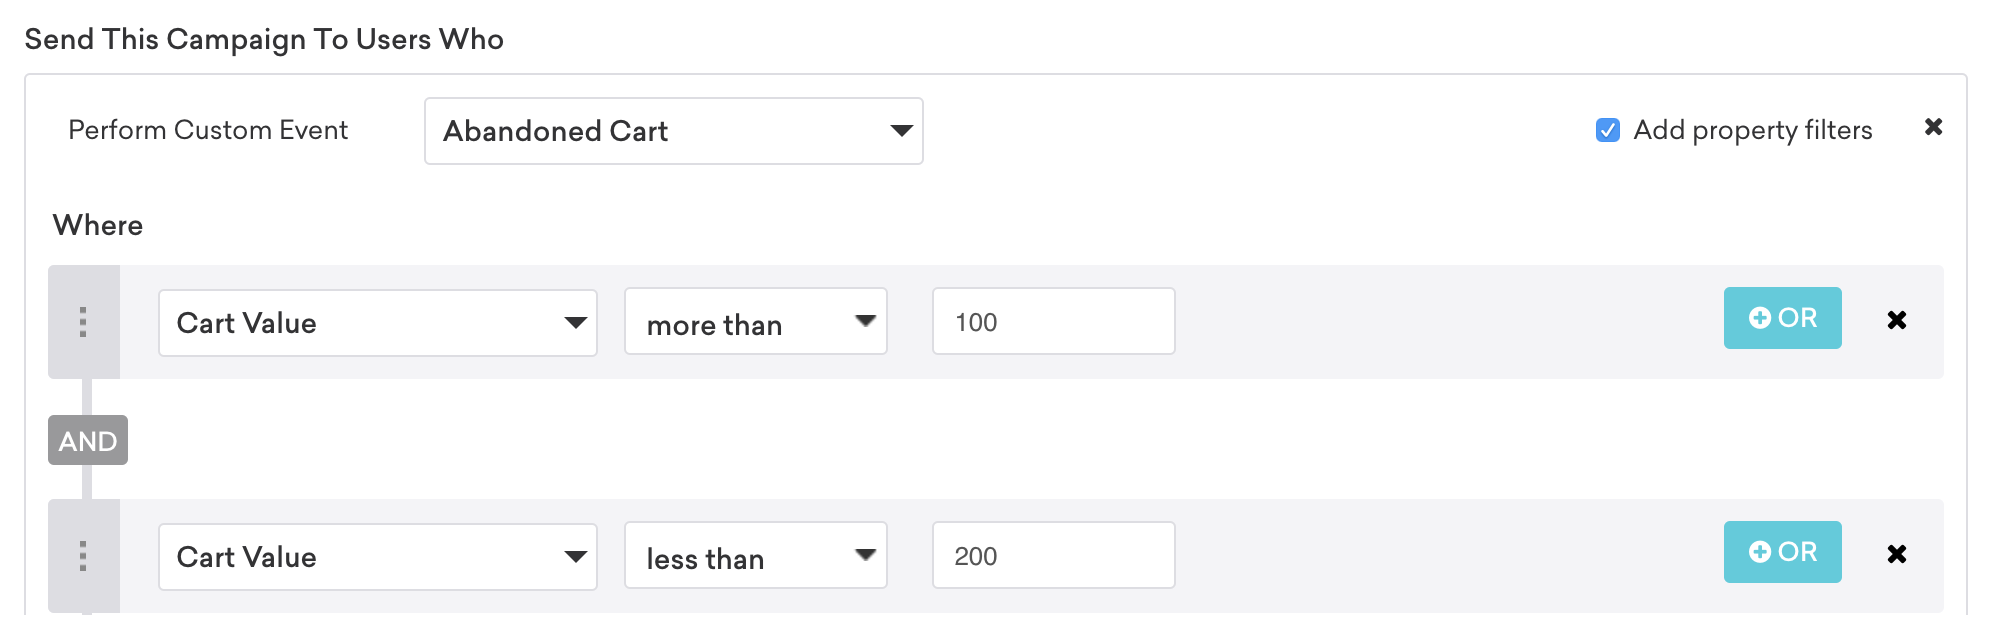
For example, let’s say we have a campaign with an abandoned cart custom event that is further targeted by the “cart value” property filter. This campaign only reaches users who’ve left between $100 and $200 worth of goods in their carts.

The trigger event Start Session can be the user’s very first app open if your campaign’s segment applies to new users (for example, if your segment consists of those with no sessions).
Keep in mind that you can still send a triggered campaign to a specific segment of users, so users who aren’t a part of the segment don’t receive the campaign even if they complete the trigger event.
With respect to the trigger event for when a user adds an email address to their profile, the following rules apply:
- The trigger event fires after the user profile attribute updates. This means that the evaluation of the campaign’s segments and filters happens after any attribute updates. This is beneficial because it enables you to set up filters like “email address matches gmail.com” to create a trigger campaign that only sends to Gmail users and fires as soon as they add their email address.
- The trigger event fires when an email address is added to a user profile. If you have multiple user profiles that you create with the same email address, the campaign may fire multiple times, once for each user profile.
In addition, triggered in-app messages still abide by in-app message delivery rules and appear at the beginning of an app session.
Step 2: Select delay length
Select how long to wait before sending the campaign after the trigger criteria are met. If the delay length chosen is longer than the message’s duration for sending, no users receive the campaign.
In-app message campaigns can delay delivery after the trigger event by up to two hours (7,200 seconds). The delay options are Immediately and After a delay. For a longer wait, add a Delay step before an in-app message step in a Canvas.

Braze uses the timestamp sent with the custom event to evaluate the delay for an action-based campaign. If that timestamp is backdated, Braze may treat the delay as already elapsed and send the message immediately or earlier than expected. To avoid unintended delivery timing, send the custom event timestamp with the current time.
Additionally, users who complete the trigger event after your campaign is launched are the first to receive the message after the delay has passed. Users who completed the trigger event before the campaign launches don’t qualify to receive the campaign.
You can also send the campaign on a specific day of the week by selecting On the next day of the week, or a set number of days in the future by selecting After a number of calendar days. Alternatively, you can send your message using Intelligent Timing instead of manually selecting a delivery time.
Step 3: Select exception events
Select an exception event that disqualifies users from receiving this campaign. You can only do this if your triggered message sends after a time delay. Exception events can be making a purchase, starting a session, performing one of a campaign’s designated conversion events, or performing a custom event.
If a user completes the trigger event but then completes your exception event before the message sends due to the time delay, they don’t receive the campaign. Users who do not receive the campaign due to the exception event are automatically eligible to receive it in the future, the next time they complete the trigger event, even if you do not elect for users to become re-eligible.
For more information about using exception events, see Examples.
If you send a campaign with a trigger event that matches the exception event, Braze cancels the campaign and automatically reschedules a new campaign based on the exception event’s message delivery time. For example, if your first trigger event starts at five minutes and the exception event starts at 10 minutes, you rely on the exception event’s 10 minutes as the official campaign’s message delivery time.
You cannot make a “session start” both the trigger event and exception event for a campaign. However, you always have the choice to select any other custom event outside of this option.
Step 4: Assign duration
Assign the campaign’s duration by specifying a start time and optional end time.
If a user completes a trigger event during the specified time frame but qualifies for the message outside of the time frame due to a scheduled delay, then they don’t receive the campaign. Therefore, if you set a time delay longer than the message’s time frame, no users receive your campaign. In addition, you can elect to send the message in users’ local time zones.
Step 5: Select time frame
Select whether the user receives the campaign during a specific portion of the day. If you give the message a time frame and the user either completes the trigger event outside the time frame or the message delay causes them to miss the time frame, then by default, the user doesn’t receive your message.
In the case where a user completes the trigger event within the time frame, but the message delay causes the user to fall out of the time frame, you can select the Send at the next available time if the delivery time falls outside the specified portion of the day checkbox so that these users still receive the campaign.
If a user doesn’t receive the message because they miss the time frame, then they’re still qualified to receive it the next time they complete the trigger event, even if you did not elect for users to become re-eligible. If you do elect for users to become re-eligible, then users can receive the campaign each time they complete the trigger event, assuming they qualify during the specified time frame.
If you have also assigned the campaign a certain duration, then a user must qualify within both the duration and the specific portion of the day to receive the message.
Step 6: Determine re-eligibility
Determine whether users can become re-eligible for the campaign. If you allow users to become re-eligible, you can specify a time delay before the user can receive the campaign again. This prevents your triggered campaigns from becoming “spammy”.
Examples
Triggered campaigns are very effective for transactional or achievement-based messages.
Transactional campaigns include messages sent after the user completes a purchase or adds an item to their cart. The latter case is a great example of a campaign that benefits from an exception event. Say your campaign reminds users of items in their cart that they haven’t purchased. The exception event, in this case, is the user buying the products in their cart. For achievement-based campaigns, you can send a message five minutes after the user completes a conversion or beats a game level.
In addition, when creating welcome campaigns, you can trigger messages to send after the user registers or sets up an account. Staggering messages to be sent on different days following registration allows you to create a thorough onboarding process.
Frequently asked questions
What is the maximum delay after a trigger for in-app message campaigns?
Two hours (7,200 seconds). For the available delay options and how to set a longer wait, see Step 2: Select delay length.
Why did a user not receive my triggered campaign?
Any of these things prevents a user who has completed the trigger event from receiving the campaign:
- The user completed the exception event before the time delay had fully elapsed.
- Liquid
abort_messagelogic was used and the message was aborted based on theabort_messagelogic or rules. - The time delay caused the user to become qualified to receive the campaign after the duration has ended.
- The time delay caused the user to become qualified to receive the campaign outside of the specified portion of the day.
- The user has already received the campaign (including attribution through shared channel identifiers—for example, if they share an email with someone who received, opened, or clicked it), and users do not become re-eligible.
- While users are re-eligible to receive the campaign, they can only re-trigger it after a certain period of time, and that period of time has not yet elapsed.
Segmenting a triggered campaign on user data recorded at the time of the event may cause a race condition. This happens when the user attribute on which the campaign is segmented gets changed, but the change hasn’t been processed for the user when the campaign is sent. Since campaigns check for segment membership on entry, this can lead to the user not receiving the campaign.
For example, imagine you want to send an event-triggered campaign to male users who just registered. When the user registers, you record a custom event registration and simultaneously set the user’s gender attribute. The event may trigger the campaign before Braze has processed the user’s gender, preventing them from receiving the campaign.
As a best practice, ensure that the attribute on which the campaign is segmented is flushed to Braze servers before the event. If this isn’t possible, the best way to guarantee delivery is to use custom event properties to attach the relevant user properties to the event and apply a property filter for the specific event property instead of a segmentation filter. For our example, add a gender property to the custom event registration so that Braze is guaranteed to have the data you need when your campaign is triggered.
Additionally, if a campaign is action-based and has a delay, you can check the option to Re-evaluate segment membership at send-time to ensure users are still part of the target audience when the message is sent.
Audience criteria evaluation
For campaigns that involve a delay before sending (including rate limiting, local time zone, Intelligent Timing, or a trigger schedule), when the segment is re-evaluated depends on campaign type and settings.
In action-based campaigns with a delay, if you select Re-evaluate segment membership at send-time, users are re-evaluated before the message is sent, so only users who still meet the segment criteria at send time receive the message.
If your campaign is triggered by a specific custom event and you select a segment as the audience, users must perform the same custom event to be included in the segment. This means users need to be part of the audience before an action-based campaign can be triggered. The general workflow for a triggered campaign is as follows:
- Join the audience: When a user performs the custom event, they’re added to the campaign’s target audience.
- Trigger the email: A user must perform the custom event again to trigger the email, as they need to be part of the audience before the email can be sent.
We recommend either changing the target audience to include all users, or checking that the users expected to perform the event are already part of the campaign’s audience for the message to be triggered.

Troubleshooting custom events
First, confirm that the custom event is being passed to Braze. Go to Analytics > Custom Events Report, and then select the respective custom event and date range. If the event doesn’t display, confirm that it’s set up correctly and that the user performed the correct action.
If the custom event displays, further troubleshoot by doing the following:
- Check the user’s profile download to confirm they triggered the event and when they did it. If the event was triggered, compare the timestamp for when the event was triggered to the time the campaign went live. The event may have been triggered before the campaign went live.
- Review changelogs for the campaign and any segments used in targeting to determine if the user was in the segment when their custom event was triggered. If they weren’t in the segment, they wouldn’t have received the campaign.
- Verify whether the user was entered into a control group through segmentation and consequently prevented from receiving the campaign.
- If there is a scheduled delay, check if the user’s custom event was triggered before the delay. If the event was triggered before the delay, they wouldn’t have received the campaign.
In-app messages can only be triggered by events sent through the SDK, not the REST API.
When do action-based campaigns evaluate audience membership?
Braze evaluates audience membership when it processes the trigger event, before the message is sent. By default, Braze checks whether the user matches the target audience at enqueue time. If the campaign has a delay, you can select Re-evaluate segment membership at send-time to check audience criteria again immediately before send—for example, when a user could perform the trigger action and then exit the audience before the send completes.
For more information, see Audience criteria evaluation.