Conversational Agents
Conversational Agents is a channel that lets your users talk with an AI agent to complete tasks you define. You create conversational workflows that describe what the agent should do for your brand. For example, a workflow can help a user purchase items based on their preferences.

Conversational Agents is currently in beta. Contact your Braze account manager if you’re interested in participating in this beta.
Before you deploy to production, consult your legal team about the implications of using conversational AI.
How it works
A conversational workflow is a task you want an agent to complete. Each workflow includes a purpose, channel settings, a target audience, and natural-language steps. In a step, add tools so the agent can search catalogs, set attributes, log events, or call webhooks.
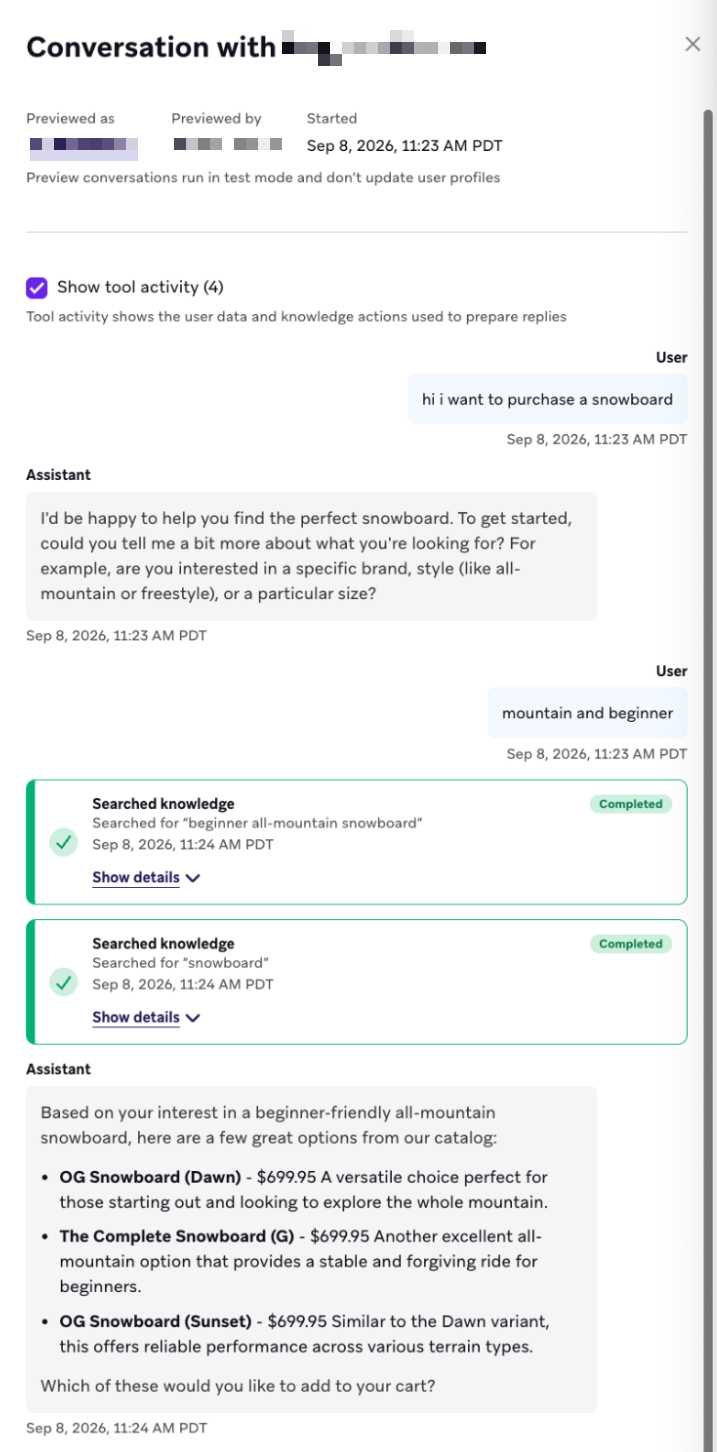
After you create workflows, see Update settings for brand guidelines and channel behavior. Use Preview a conversation and Review conversation history to test the experience and review tool calls.
Set up the web chat widget
To show the Conversational Agents chat widget on your site, complete the following steps in the Braze Web SDK.
Step 1: Set up SDK authentication
Enable SDK authentication for your web app.
Step 2: Install the Web SDK
Install either of the following:
| Option | Details |
|---|---|
| npm | Install the latest @braze/web-sdk package. |
| CDN | Load the conversational build: https://js.appboycdn.com/web-sdk/latest/braze.conversational.min.js |
Step 3: Initialize with user-supplied JavaScript enabled
In your initialize call, set allowUserSuppliedJavascript: true:
braze.initialize("{YOUR_API_KEY}", {
baseUrl: "{YOUR_SDK_ENDPOINT}",
allowUserSuppliedJavascript: true
});
Replace {YOUR_API_KEY} with your Web SDK API key and {YOUR_SDK_ENDPOINT} with your SDK endpoint.
Step 4: Enable the chat widget
Before you open a session, call braze.automaticallyManageChat():
braze.automaticallyManageChat();
braze.openSession();
Create a conversational workflow
Use a conversational workflow to define a task, choose channels and an audience, and tell the agent what to do in each step.
Step 1: Open Conversational Agents
Go to Agent Console > Conversational Agents. From this page, create conversational workflows for your workspace.
Step 2: Set up workflow details
Enter the following fields for the workflow:
| Field | Description |
|---|---|
| Name | The name of the workflow. |
| Purpose | What this workflow does, so the agent knows when to use it. |
| Channel settings | The channels this workflow is enabled for. Supported channels are SMS, RCS, WhatsApp, and Web. |
| Target audience | The segments a user must belong to in order to access this workflow. |
- For web, select which web apps this workflow is enabled for. First set up the web chat widget in your Web SDK.
- For SMS, RCS, and WhatsApp, select which subscription groups this workflow is enabled for.

For SMS and RCS, the agent is not invoked if the user response matches an existing keyword trigger.
Step 3: Write workflow steps
Add the steps the agent should take to complete the workflow. Write each step clearly.
End each step with an explicit action so the agent knows how to phrase its next response to the user.
Step 4: Add tools to steps
Steps can include tools the agent uses while it works. In the instruction text box, enter / and select a tool.
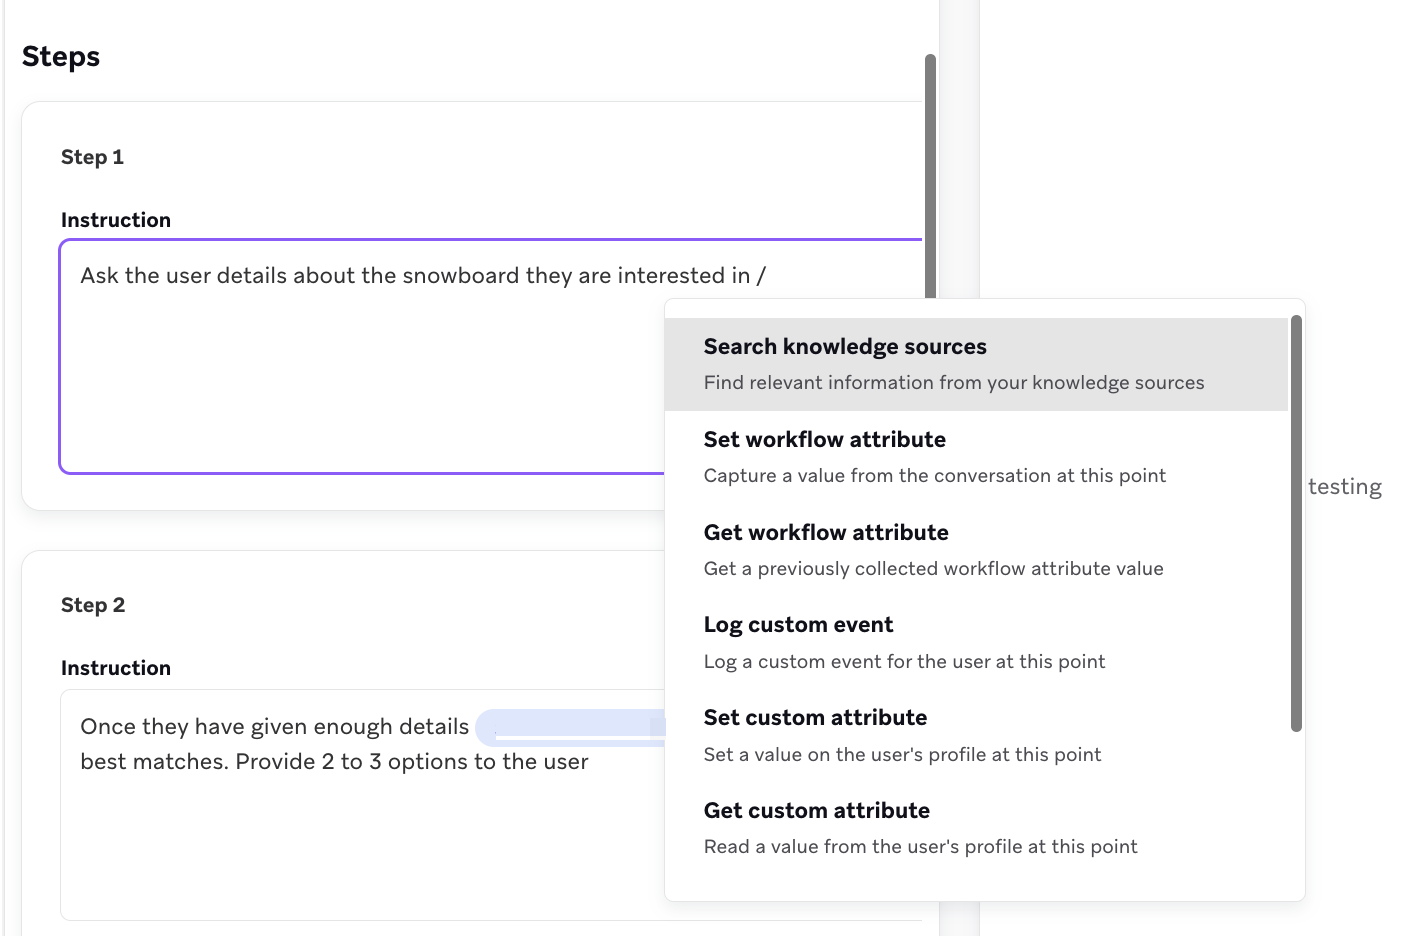
Tools
You can add any of these tools to a step:
| Tool | Description |
|---|---|
| Search knowledge sources | Query a catalog through a knowledge source. |
| Set workflow attribute | Store a value that is scoped to this workflow. |
| Get workflow attribute | Retrieve a workflow attribute set in an earlier step. |
| Log custom event | Log a Braze custom event. |
| Set custom attribute | Set a custom attribute on the user. |
| Get custom attribute | Retrieve a custom attribute from the user. |
| Call webhook | Send an HTTP request to an external endpoint. |
| Get webhook response | Retrieve a field extracted from a previous webhook response. |
Search knowledge sources
Use this tool to help the agent query and understand a Braze catalog. Create knowledge sources for catalogs such as:
- Product catalog
- FAQ
- Size charts
First, create the knowledge source on the Knowledge sources page. Then, in the instruction text box, enter / and select Search knowledge sources. Select an existing conversational knowledge source tool, or select Create new search tool.
When you create a new tool, a drawer opens. Enter a name and description, then select a knowledge source. After you select a knowledge source, choose which fields the agent can access.
Set a workflow attribute
Use this tool to set an attribute the agent can reuse later in the same workflow. Workflow attributes are scoped to the workflow they are set in. Use them as custom event properties, custom attribute values, and webhook parameters.
Set a workflow attribute in one of two ways:
- Let the agent decide the value based on the instruction.
- Give the agent a list of allowed values to choose from.
In the instruction text box, enter / and select Set workflow attribute. Select an existing workflow attribute, or select Create new attribute.
When you create a new attribute, a drawer opens. Enter a name and description, then select the type. After you select the type, choose whether to use allowed values.
Get a workflow attribute
Use this tool to retrieve the value of a workflow attribute set in an earlier step.
Log a custom event
Use this tool to log a Braze custom event. In the instruction text box, enter / and select Log custom event. Select an existing log custom event tool, or select Create new custom event tool.
When you create a new tool, a drawer opens. Select the custom event, then enter a name and description. Choose the event properties to send with the custom event. Each custom event property can use one of the following sources:
| Source | Description |
|---|---|
| Agent | The agent decides the value based on the instructions and tool description. |
| Workflow attribute | The property uses a workflow attribute the agent set in an earlier step. |
| Custom attribute | The property uses a custom attribute on the user. |
You don’t have to set a value for every property. Some property types aren’t supported.
Select Required if the tool should fail when the property value is blank.
To send a user into a Canvas, log a custom event that the Canvas uses as an entry property.
Set a custom attribute
Use this tool to set a custom attribute on the user. In the instruction text box, enter / and select Set custom attribute. Select an existing set custom attribute tool, or select Create new custom attribute tool.
When you create a new tool, a drawer opens. Enter a name and description, then select the custom attribute the tool should set. A custom attribute can use one of the following sources:
| Source | Description |
|---|---|
| Agent | The agent decides the value based on the instructions and tool description. |
| Workflow attribute | The user attribute uses a workflow attribute the agent set in an earlier step. |
Custom attributes are set asynchronously. If the agent reads a custom attribute after setting it, the value may still be stale.
Get a custom attribute
Use this tool to retrieve a custom attribute.
Call a webhook
Use this tool to call a webhook. In the instruction text box, enter / and select Call webhook. Select an existing webhook tool, or select Create new webhook.
When you create a new tool, a drawer opens. Enter a name and description, then add variables. Variables let you include personalized values in the webhook URL, body, or headers.
A variable can use one of the following sources:
| Source | Description |
|---|---|
| Agent | The agent decides the value based on the instructions and description. |
| Workflow attribute | The variable uses a workflow attribute the agent set in an earlier step. |
| Custom attribute | The variable uses a custom attribute on the user. |
| User profile | The variable uses a user profile field: external ID, Braze ID, email, first name, last name, or phone. |
After you set variables, choose the request method. The following request methods are supported:
GETPOSTPUTPATCHDELETE
Then enter the URL. To use variables in the URL, reference them with {{variable_name}} syntax. For example:
https://myurl.com/create/{{user_id}}
Next, set the request body. Leave the body empty, or enter a string that parses as JSON. For example:
{
"user": {
"id": "{{external_id}}",
"favorite_color": "{{favorite_color}}",
"is_called_by_agent": true
}
}
You can also set headers using variables. For credentials, create Connected Content credentials in the dashboard and reference them in this tool.
Webhook responses can be large, so you can extract only the fields the workflow needs. Create response fields with a JMESPath expression that points to a value in the response body. Reference those fields later with the Get webhook response tool.
Get a webhook response
Use this tool to reference a webhook response field extracted from a previous Call webhook step.
Update settings
Go to Agent Console > Conversational Agents, then select Settings. Set your brand guidelines and manage channel settings.
Web supports an opening message that you set on this page. SMS, RCS, and WhatsApp don’t include additional settings on this page. Review the keywords set for each subscription group.
Preview a conversation
There are two ways to preview:
- When you create a workflow, preview that workflow only.
- On the Settings page, preview the experience for a web app or subscription group.
In both cases, preview as a specific user.
Preview mode does not log custom attributes or custom events.
Review conversation history
On the Conversational Agents page, select Conversation history. This page shows conversations with real users and conversations from preview.
Use conversation history to review tool calls and confirm the agent behaves as expected.