Setting up the Braze MCP server
Learn how to set up the Braze MCP server, so you can interact with your Braze data through natural language using tools like Claude and Cursor. For more general information, see Braze MCP server.

The locally hosted Braze MCP server (beta) is sunsetting this summer. It will continue to work, but we’re no longer adding endpoints or supporting the beta. A remote, Braze-hosted MCP server is coming to Early Access this summer.
Prerequisites
Before you start, you’ll need the following:
| Prerequisite | Description |
|---|---|
| Braze API Key | A Braze API key with the required permissions. You’ll create a new key when you set up your Braze MCP server. |
| MCP client | Claude, Cursor, and Google Gemini CLI are officially supported. You must have an account for one of these clients to use the Braze MCP server. |
| Terminal | A terminal app so you can run commands and install tooling. Use your preferred terminal app or the one that’s pre-installed on your computer. |
Setting up the Braze MCP server
Step 1: Install uv
First, install uv—a command-line tool by Astral for dependency management and Python package handling.
Open your terminal application, paste the following command, then press Enter.
1
curl -LsSf https://astral.sh/uv/install.sh | sh
The output is similar to the following:
1
2
3
4
5
6
7
8
$ curl -LsSf https://astral.sh/uv/install.sh | sh

downloading uv 0.8.9 aarch64-apple-darwin
no checksums to verify
installing to /Users/Isaiah.Robinson/.local/bin
  uv
  uvx
everything's installed!
Open Windows PowerShell, paste the following command, then press Enter.
1
irm https://astral.sh/uv/install.ps1 | iex
The output is similar to the following:
1
2
3
4
5
6
7
8
PS C:\Users\YourUser> irm https://astral.sh/uv/install.ps1 | iex

Downloading uv 0.8.9 (x86_64-pc-windows-msvc)
no checksums to verify
installing to C:\Users\YourUser\.local\bin
  uv.exe
  uvx.exe
everything's installed!
Step 2: Create an API key
The Braze MCP server includes both read-only and write endpoints. They don’t return data from Braze user profiles. Write endpoints let agents create or update content in your workspace.
To create your API key:
- Go to Settings > APIs and Identifiers > API Keys.
- Create a new key.
- Assign some or all of the following permissions to your key.
Only assign the permissions you want your agent to use. To prevent your agent from making changes in Braze, leave any write permissions off when you create your API key.
List of supported permissions
Campaigns
| Endpoint | Required permission |
|---|---|
/campaigns/data_series |
campaigns.data_series |
/campaigns/details |
campaigns.details |
/campaigns/list |
campaigns.list |
/sends/data_series |
sends.data_series |
Canvas
| Endpoint | Required permission |
|---|---|
/canvas/data_series |
canvas.data_series |
/canvas/data_summary |
canvas.data_summary |
/canvas/details |
canvas.details |
/canvas/list |
canvas.list |
Catalogs
| Endpoint | Required permission |
|---|---|
/catalogs |
catalogs.get |
/catalogs/{catalog_name}/items |
catalogs.get_items |
/catalogs/{catalog_name}/items/{item_id} |
catalogs.get_item |
Cloud Data Ingestion
| Endpoint | Required permission |
|---|---|
/cdi/integrations |
cdi.integration_list |
/cdi/integrations/{integration_id}/job_sync_status |
cdi.integration_job_status |
Content Blocks
The content_blocks.create and content_blocks.update permissions are write permissions. Add them only if you want your agent to create or update content blocks in your workspace.
| Endpoint | Required permission |
|---|---|
/content_blocks/list |
content_blocks.list |
/content_blocks/info |
content_blocks.info |
/content_blocks/create |
content_blocks.create |
/content_blocks/update |
content_blocks.update |
Custom Attributes
| Endpoint | Required permission |
|---|---|
/custom_attributes |
custom_attributes.get |
Events
| Endpoint | Required permission |
|---|---|
/events/list |
events.list |
/events/data_series |
events.data_series |
/events |
events.get |
KPIs
| Endpoint | Required permission |
|---|---|
/kpi/new_users/data_series |
kpi.new_users.data_series |
/kpi/dau/data_series |
kpi.dau.data_series |
/kpi/mau/data_series |
kpi.mau.data_series |
/kpi/uninstalls/data_series |
kpi.uninstalls.data_series |
Media Library
The media_library.create permission is a write permission. Add it only if you want your agent to upload assets to your media library.
| Endpoint | Required permission |
|---|---|
/media_library/create |
media_library.create |
Messages
| Endpoint | Required permission |
|---|---|
/messages/scheduled_broadcasts |
messages.schedule_broadcasts |
Preference Center
| Endpoint | Required permission |
|---|---|
/preference_center/v1/list |
preference_center.list |
/preference_center/v1/{preferenceCenterExternalID} |
preference_center.get |
Purchases
| Endpoint | Required permission |
|---|---|
/purchases/product_list |
purchases.product_list |
/purchases/revenue_series |
purchases.revenue_series |
/purchases/quantity_series |
purchases.quantity_series |
Segments
| Endpoint | Required permission |
|---|---|
/segments/list |
segments.list |
/segments/data_series |
segments.data_series |
/segments/details |
segments.details |
Sends
| Endpoint | Required permission |
|---|---|
/sends/data_series |
sends.data_series |
Sessions
| Endpoint | Required permission |
|---|---|
/sessions/data_series |
sessions.data_series |
SDK Authentication Keys
| Endpoint | Required permission |
|---|---|
/app_group/sdk_authentication/keys |
sdk_authentication.keys |
Subscription
| Endpoint | Required permission |
|---|---|
/subscription/status/get |
subscription.status.get |
/subscription/user/status |
subscription.groups.get |
Templates
The templates.email.create and templates.email.update permissions are write permissions. Add them only if you want your agent to create or update email templates in your workspace.
| Endpoint | Required permission |
|---|---|
/templates/email/list |
templates.email.list |
/templates/email/info |
templates.email.info |
/templates/email/create |
templates.email.create |
/templates/email/update |
templates.email.update |

Don’t reuse an existing API key. Create one specifically for your MCP client. Assign only the permissions your agent needs. Agents may try to use any permission you grant, so leave any write permissions off if you don’t want your agent to make changes in Braze.
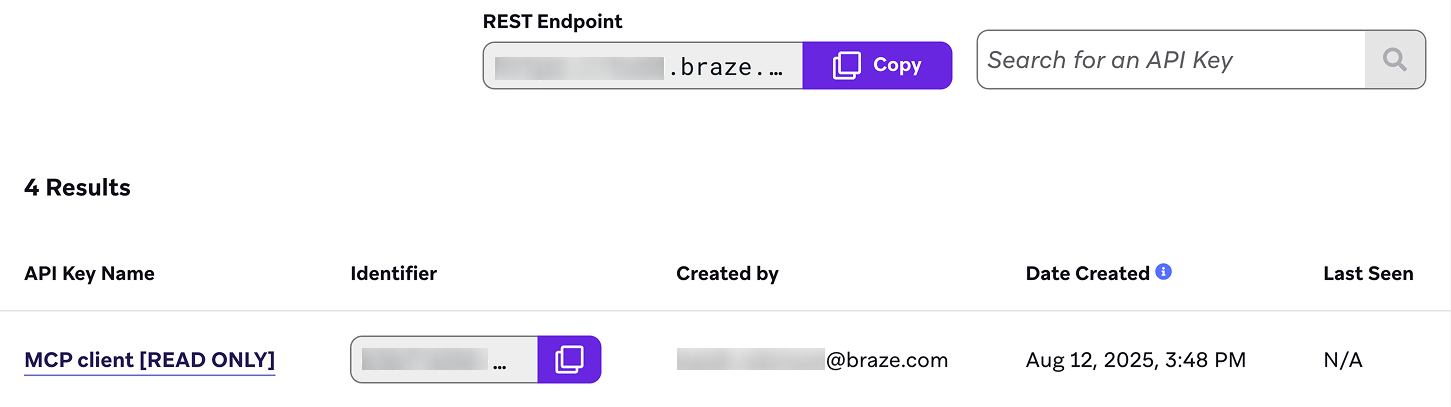
Step 3: Get your identifier and endpoint
When you configure your MCP client, you’ll need your API key’s identifier and your workspace’s REST endpoint. To get these details, go back to the API Keys page in the dashboard—keep this page open, so you can reference it during the next step.
Step 4: Configure your MCP client
Configure your MCP client using the pre-provided configuration file.
Set up your MCP server using the Claude Desktop connector directory.
- In Claude Desktop, go to Settings > Connectors > Browse Connectors > Desktop Extensions > Braze MCP Server > Install.
- Enter your API key and base URL.
- Save the configuration and restart Claude Desktop.
In Cursor, go to Settings > Tools and Integrations > MCP Tools > Add Custom MCP, then add the following snippet:
1
2
3
4
5
6
7
8
9
10
11
12
{
  "mcpServers": {
    "braze": {
      "command": "uvx",
      "args": ["--native-tls", "braze-mcp-server@latest"],
      "env": {
        "BRAZE_API_KEY": "your-braze-api-key",
        "BRAZE_BASE_URL": "your-braze-endpoint-url"
      }
    }
  }
}
Replace key-identifier and rest-endpoint with the corresponding values from the API Keys page in Braze. Your configuration should be similar to the following:
1
2
3
4
5
6
7
8
9
10
11
12
{
  "mcpServers": {
    "braze": {
      "command": "uvx",
      "args": ["--native-tls", "braze-mcp-server@latest"],
      "env": {
        "BRAZE_API_KEY": "2e8b-3c6c-d12e-bd75-4f0e2a8e5c71",
        "BRAZE_BASE_URL": "https://torchie.braze.com"
      }
    }
  }
}
When you’re finished, save the configuration and restart Cursor.
Gemini CLI reads user settings from ~/.gemini/settings.json. If this doesn’t exist, you can create it by running the following in your terminal:
1
2
mkdir -p ~/.gemini
nano ~/.gemini/settings.json
Next, replace yourname with the exact string before @BZXXXXXXXX in your terminal prompt. Then, replace key-identifier and rest-endpoint with the corresponding values from the API Keys page in Braze.
Your configuration should be similar to the following:
1
2
3
4
5
6
7
8
9
10
11
12
{
  "mcpServers": {
    "braze": {
      "command": "/Users/yourname/.local/bin/uvx",
      "args": ["--native-tls", "braze-mcp-server@latest"],
      "env": {
        "BRAZE_API_KEY": "2e8b-3c6c-d12e-bd75-4f0e2a8e5c71",
        "BRAZE_BASE_URL": "https://torchie.braze.com"
      }
    }
  }
}
When you’re finished, save the configuration and restart Gemini CLI. Then, in Gemini, run the following commands to verify that the Braze MCP server is listed and that the tools and schema are available for use:
1
2
3
4
gemini
/mcp
/mcp desc
/mcp schema
You should see the braze server listed with the tools and schema available for use.
Step 5: Send a test prompt
After you set up the Braze MCP server, try sending a test prompt to your MCP client. For other examples and best practices, see Using the Braze MCP server.
Example prompt: What are my available Braze functions?
Example response: Used list_functions and returned the available Braze MCP function categories.
Example prompt: What are my available Braze functions?
Example response: Queried list_functions and listed functions such as get_canvas_list.
Example prompt: What are my available Braze functions?
Example response: Queried list_functions in Gemini CLI and returned available Braze MCP function categories and sample functions.
Troubleshooting
Terminal errors
uvx command not found
If you receive an error that uvx command not found, reinstall uv and restart your terminal.
1
curl -LsSf https://astral.sh/uv/install.sh | sh
spawn uvx ENOENT error
If you receive a spawn uvx ENOENT errors, you may need to update the filepath in your client’s config file. First, open your terminal and run the following command:
1
which uvx
The command should return a message similar to the following:
1
/Users/alex-lee/.local/bin/uvx
Copy the message to your clipboard and open your client’s config file. Replace "command": "uvx" with the path you copied, then restart your client. For example:
1
"command": "/Users/alex-lee/.local/bin/uvx"
Package installation fails
If your package installation fails, try installing a specific Python version instead.
1
uvx --python 3.12 braze-mcp-server@latest
Client configuration
“This extension is not compatible with your device”
If you see this error when installing the Braze MCP server extension, it may indicate one of the following:
- Your device doesn’t meet the requirements: Some MCP server extensions require specific operating system versions or hardware.
- Missing development tools (macOS only): On macOS, the extension installation requires command line developer tools to run Python commands. If these tools aren’t installed, the installation will fail with this error.
To install command line developer tools on macOS, run the following in your terminal:
1
xcode-select --install
After installation completes, restart your MCP client and try installing the extension again.
MCP client can’t find the Braze server
- Verify your MCP client configuration syntax is correct.
- Restart your MCP client after configuration changes.
- Check that
uvxis in your systemPATH.
Authentication errors
- Verify your
BRAZE_API_KEYis correct and active. - Ensure your
BRAZE_BASE_URLmatches your Braze instance. - Check that your API key has the correct permissions.
Connection timeouts or network errors
- Verify your
BRAZE_BASE_URLis correct for your instance. - Check your network connection and firewall settings.
- Ensure you’re using HTTPS in your base URL.
Disclaimer
The Model Context Protocol (MCP) is a newly introduced open-source protocol that may be susceptible to security issues or vulnerabilities at this time.
Braze MCP Server setup code and instructions are provided by Braze “as is” and without any warranties, and customers use it at their own risk. Braze shall not be responsible for any consequences arising from improper setup, misuse of the MCP, or any potential security issues that may arise. Braze strongly encourages customers to review their configurations carefully and to follow the outlined guidelines to reduce risks associated with the integrity and security of their Braze environment.
For assistance or clarification, please contact Braze Support.