Data warehouse storage integrations
This page covers how to use Braze Cloud Data Ingestion (CDI) to sync relevant data with your Snowflake, Redshift, BigQuery, and Databricks integration.
Setting up data warehouse integrations
Cloud Data Ingestion integrations require some setup on the Braze side and in your data warehouse instance. Follow these steps to set up the integration:
- In your Snowflake instance, set up the tables or views you want to sync to Braze.
- Create a new Snowflake source in the Braze dashboard.
- Retrieve the public key provided in the Braze dashboard and append it to the Snowflake user for authentication.
- Create a sync in the Braze dashboard, test the integration, and start the sync.

The Snowflake quickstart guide provides sample code and walks through the required steps to create an automated pipeline using Snowflake Streams and CDI to sync data to Braze.
- Make sure Braze access is allowed to the Redshift tables you want to sync. Braze connects to Redshift over the internet.
- In your Redshift instance, set up the tables or views you want to sync to Braze.
- Create a new source and sync in the Braze dashboard.
- Test the integration and start the sync.

Rows processed per sync depend on your warehouse performance, network latency, and how much new data matches the sync query. Use the integration Sync history in the dashboard to see duration and row counts for recent runs.
- Create a service account that Braze accesses through Workload Identity Federation or a service account key, and allow access to the BigQuery projects and datasets that contain the data you want to sync.
- In your BigQuery account, set up the tables or views you want to sync to Braze.
- Create a new source and sync in the Braze dashboard.
- Test the integration and start the sync.
- Create a service principal for OAuth machine-to-machine (M2M) authentication or a personal access token, and allow access to the Databricks catalogs and schemas that contain the data you want to sync.
- In your Databricks account, set up the tables or views you want to sync to Braze.
- Create a new source and sync in the Braze dashboard.
- Test the integration and start the sync.

There may be two to five minutes of warm-up time when Braze connects to Classic and Pro SQL instances, which can lead to delays during connection setup and testing, as well as at the beginning of scheduled syncs. Using a serverless SQL instance minimizes warmup time and improves query throughput, but may result in slightly higher integration costs.
- Create a service principal and grant access to Fabric APIs.
- Set up a shared workspace and grant the service principal access to it.
- In the shared Fabric workspace, set up the tables or views you want to sync to Braze.
- Create a new source and sync in the Braze dashboard.
- Test the integration and start the sync.
Step 1: Set up tables or views
The steps in this section create a table with a PAYLOAD column. If you plan to map columns with Visual or write a query with SQL on the Data definition step, you can use an existing table or view instead. Skip the table creation step for your warehouse, and grant Braze read access to the tables or views you want to sync. For a comparison of options, see Choose a data definition option.
If you use a PAYLOAD column, your source table or view can include columns that aren’t listed for your warehouse in the tabs in the following section (for example, auditing or hashing). Braze reads only the columns described in those tabs; other columns are not used during Cloud Data Ingestion syncs.
Step 1.1: Set up the table
CREATE DATABASE BRAZE_CLOUD_PRODUCTION;
CREATE SCHEMA BRAZE_CLOUD_PRODUCTION.INGESTION;
CREATE OR REPLACE TABLE BRAZE_CLOUD_PRODUCTION.INGESTION.USERS_ATTRIBUTES_SYNC (
UPDATED_AT TIMESTAMP_NTZ(9) NOT NULL DEFAULT SYSDATE(),
--at least one of external_id, alias_name and alias_label, email, phone, or braze_id is required
EXTERNAL_ID VARCHAR(16777216),
--if using user alias, both alias_name and alias_label are required
ALIAS_LABEL VARCHAR(16777216),
ALIAS_NAME VARCHAR(16777216),
--braze_id can only be used to update existing users created through the Braze SDK
BRAZE_ID VARCHAR(16777216),
--If you include both email and phone, email is used as the primary identifier
EMAIL VARCHAR(16777216),
PHONE VARCHAR(16777216),
PAYLOAD VARCHAR(16777216) NOT NULL
);
You can name the database, schema, and table as you’d like, but the column names should match the preceding definition.
UPDATED_AT- The time this row was updated in or added to the table. Braze syncs rows whereUPDATED_ATis later than the last synced value. Rows at the exact boundary timestamp may be re-synced if new rows share that same timestamp.- User identifier columns - Your table may contain one or more user identifier columns. Each row should only contain one identifier (either
external_id, the combination ofalias_nameandalias_label,braze_id,emailorphone). A source table may have columns for one, two, three, four, or all five identifier types.EXTERNAL_ID- This identifies the user you want to update. This should match theexternal_idvalue used in Braze.ALIAS_NAMEandALIAS_LABEL- These two columns create a user alias object.alias_nameshould be a unique identifier, andalias_labelspecifies the type of alias. Users may have multiple aliases with different labels but only onealias_nameperalias_label.BRAZE_ID- The Braze user identifier. This is generated by the Braze SDK, and new users cannot be created using a Braze ID through Cloud Data Ingestion. To create new users, specify an external user ID or user alias.EMAIL- The user’s email address. If multiple profiles with the same email address exist, the most recently updated profile is prioritized for updates. If you include both email and phone, email is used as the primary identifier.PHONE- The user’s phone number. If multiple profiles with the same phone number exist, the most recently updated profile is prioritized for updates.
PAYLOAD- This is a JSON string of the fields you want to sync to the user in Braze.
Step 1.2: Set up the role and database permissions
CREATE ROLE BRAZE_INGESTION_ROLE;
GRANT USAGE ON DATABASE BRAZE_CLOUD_PRODUCTION TO ROLE BRAZE_INGESTION_ROLE;
GRANT USAGE ON SCHEMA BRAZE_CLOUD_PRODUCTION.INGESTION TO ROLE BRAZE_INGESTION_ROLE;
GRANT SELECT ON TABLE BRAZE_CLOUD_PRODUCTION.INGESTION.USERS_ATTRIBUTES_SYNC TO ROLE BRAZE_INGESTION_ROLE;
Update the names as needed, but the permissions should match the preceding example.
Step 1.3: Set up the warehouse and give access to Braze role
CREATE WAREHOUSE BRAZE_INGESTION_WAREHOUSE;
GRANT USAGE ON WAREHOUSE BRAZE_INGESTION_WAREHOUSE TO ROLE BRAZE_INGESTION_ROLE;
The warehouse needs to have the auto-resume flag on. If not, grant Braze additional OPERATE privileges on the warehouse so Braze can turn it on when the query runs.
Step 1.4: Set up the user
CREATE USER BRAZE_INGESTION_USER;
GRANT ROLE BRAZE_INGESTION_ROLE TO USER BRAZE_INGESTION_USER;
After this step, share connection information with Braze to receive a public key to append to the user.
When connecting different workspaces to the same Snowflake account, you must create a unique user for each Braze workspace where you are creating an integration. Within a workspace, you can reuse the same user across integrations, but integration creation fails if a user on the same Snowflake account is duplicated across workspaces.
Step 1.5: Allow Braze IPs in Snowflake network policy (optional)
Depending on the configuration of your Snowflake account, you may need to allow the following IP addresses in your Snowflake network policy. For more information on enabling this, see the relevant Snowflake documentation on modifying a network policy.
For instances US-01, US-02, US-03, US-04, US-05, US-06, US-07, these are the relevant IP addresses:
23.21.118.19134.206.23.17350.16.249.952.4.160.21454.87.8.3454.156.35.25152.54.89.23818.205.178.15
For instance US-08, these are the relevant IP addresses:
52.151.246.5152.170.163.18240.76.166.15740.76.166.17040.76.166.16740.76.166.16140.76.166.15640.76.166.16640.76.166.16040.88.51.7452.154.67.1740.76.166.8040.76.166.8440.76.166.8540.76.166.8140.76.166.7140.76.166.14440.76.166.145
For instance US-10, these are the relevant IP addresses:
100.25.232.16435.168.86.17952.7.44.1173.92.153.1835.172.3.12950.19.162.19
For instances EU-01 and EU-02, these are the relevant IP addresses:
52.58.142.24252.29.193.12135.158.29.22818.157.135.973.123.166.463.64.27.363.65.88.253.68.144.1883.70.107.88
For instance AU-01, these are the relevant IP addresses:
13.210.1.14513.211.70.15913.238.45.5452.65.73.16754.153.242.23954.206.45.213
For instance ID-01, these are the relevant IP addresses:
108.136.157.246108.137.30.20716.78.128.7116.78.14.13416.78.162.20843.218.73.35
For instance JP-01, these are the relevant IP addresses:
13.159.155.21254.199.221.24113.192.23.1654.250.120.13918.181.114.2323.114.38.100
For instance KR-01, these are the relevant IP addresses:
43.200.215.452.79.67.17552.79.113.603.34.212.9254.116.134.2313.37.197.225
Step 1.1: Set up the table
Optionally, set up a new Database and Schema to hold your source table
CREATE DATABASE BRAZE_CLOUD_PRODUCTION;
CREATE SCHEMA BRAZE_CLOUD_PRODUCTION.INGESTION;
Create a table (or view) to use for your CDI integration
CREATE TABLE BRAZE_CLOUD_PRODUCTION.INGESTION.USERS_ATTRIBUTES_SYNC (
updated_at timestamptz default sysdate,
--at least one of external_id, alias_name and alias_label, or braze_id is required
external_id varchar,
--if using user alias, both alias_name and alias_label are required
alias_label varchar,
alias_name varchar,
--braze_id can only be used to update existing users created through the Braze SDK
braze_id varchar,
--If you include both email and phone, email is used as the primary identifier
email varchar,
phone varchar,
payload varchar(max)
)
You can name the database, schema, and table as you’d like, but the column names should match the preceding definition.
UPDATED_AT- The time this row was updated in or added to the table. Braze syncs rows whereUPDATED_ATis later than the last synced value. Rows at the exact boundary timestamp may be re-synced if new rows share that same timestamp.- User identifier columns - Your table may contain one or more user identifier columns. Each row should only contain one identifier (either
external_id, the combination ofalias_nameandalias_label,braze_id,emailorphone). A source table may have columns for one, two, three, four, or all five identifier types.EXTERNAL_ID- This identifies the user you want to update. This should match theexternal_idvalue used in Braze.ALIAS_NAMEandALIAS_LABEL- These two columns create a user alias object.alias_nameshould be a unique identifier, andalias_labelspecifies the type of alias. Users may have multiple aliases with different labels but only onealias_nameperalias_label.BRAZE_ID- The Braze user identifier. This is generated by the Braze SDK, and new users cannot be created using a Braze ID through Cloud Data Ingestion. To create new users, specify an external user ID or user alias.EMAIL- The user’s email address. If multiple profiles with the same email address exist, the most recently updated profile is prioritized for updates. If you include both email and phone, email is used as the primary identifier.PHONE- The user’s phone number. If multiple profiles with the same phone number exist, the most recently updated profile is prioritized for updates.
PAYLOAD- This is a JSON string of the fields you want to sync to the user in Braze.
Step 1.2: Create user and grant permissions
CREATE USER braze_user PASSWORD '{password}';
GRANT USAGE ON SCHEMA BRAZE_CLOUD_PRODUCTION.INGESTION to braze_user;
GRANT SELECT ON TABLE USERS_ATTRIBUTES_SYNC TO braze_user;
These are the minimum required permissions for this user. If creating multiple CDI integrations, you may want to grant permissions to a schema or manage permissions using a group.
Step 1.3: Allow access to Braze IPs
If you have a firewall or other network policies, you must give Braze network access to your Redshift instance. An example of the Redshift URL endpoint is “example-cluster.ap-northeast-2.redshift.amazonaws.com”.
Some important things to know:
- You may also need to change your security groups to allow Braze to access your data in Redshift.
- Make sure to explicitly allow inbound traffic on the IPs in the table and on the port used to query your Redshift cluster (default is 5439). You should explicitly allow Redshift TCP connectivity on this port even if the inbound rules are set to “allow all”.
- The endpoint for the Redshift cluster must be publicly accessible for Braze to connect to your cluster.
- If you don’t want your Redshift cluster to be publicly accessible, you can set up a VPC and EC2 instance to use an SSH tunnel to access the Redshift data. For more information, see the AWS Knowledge Center post.
Allow access from the following IPs corresponding to your Braze dashboard’s region.
For instances US-01, US-02, US-03, US-04, US-05, US-06, US-07, these are the relevant IP addresses:
23.21.118.19134.206.23.17350.16.249.952.4.160.21454.87.8.3454.156.35.25152.54.89.23818.205.178.15
For instance US-08, these are the relevant IP addresses:
52.151.246.5152.170.163.18240.76.166.15740.76.166.17040.76.166.16740.76.166.16140.76.166.15640.76.166.16640.76.166.16040.88.51.7452.154.67.1740.76.166.8040.76.166.8440.76.166.8540.76.166.8140.76.166.7140.76.166.14440.76.166.145
For instance US-10, these are the relevant IP addresses:
100.25.232.16435.168.86.17952.7.44.1173.92.153.1835.172.3.12950.19.162.19
For instances EU-01 and EU-02, these are the relevant IP addresses:
52.58.142.24252.29.193.12135.158.29.22818.157.135.973.123.166.463.64.27.363.65.88.253.68.144.1883.70.107.88
For instance AU-01, these are the relevant IP addresses:
13.210.1.14513.211.70.15913.238.45.5452.65.73.16754.153.242.23954.206.45.213
For instance ID-01, these are the relevant IP addresses:
108.136.157.246108.137.30.20716.78.128.7116.78.14.13416.78.162.20843.218.73.35
For instance JP-01, these are the relevant IP addresses:
13.159.155.21254.199.221.24113.192.23.1654.250.120.13918.181.114.2323.114.38.100
For instance KR-01, these are the relevant IP addresses:
43.200.215.452.79.67.17552.79.113.603.34.212.9254.116.134.2313.37.197.225
Step 1.1: Set up the table
Optionally, set up a new project or dataset to hold your source table.
CREATE SCHEMA BRAZE-CLOUD-PRODUCTION.INGESTION;
Create one or more tables to use for your CDI integration with the following fields:
CREATE TABLE `BRAZE-CLOUD-PRODUCTION.INGESTION.USERS_ATTRIBUTES_SYNC`
(
updated_at TIMESTAMP DEFAULT current_timestamp,
--At least one of external_id, alias_name and alias_label, or braze_id is required
external_id STRING,
--If using user alias, both alias_name and alias_label are required
alias_name STRING,
alias_label STRING,
--braze_id can only be used to update existing users created through the Braze SDK
braze_id STRING,
--If you include both email and phone, email is used as the primary identifier
email STRING,
phone STRING,
payload JSON
);
| Field Name | Type | Mode |
|---|---|---|
UPDATED_AT |
TIMESTAMP | REQUIRED |
PAYLOAD |
JSON | REQUIRED |
EXTERNAL_ID |
STRING | NULLABLE |
ALIAS_NAME |
STRING | NULLABLE |
ALIAS_LABEL |
STRING | NULLABLE |
BRAZE_ID |
STRING | NULLABLE |
EMAIL |
STRING | NULLABLE |
PHONE |
STRING | NULLABLE |
You can name the project, dataset, and table as you’d like, but the column names should match the preceding definition.
UPDATED_AT- The time this row was updated in or added to the table. Braze syncs rows whereUPDATED_ATis later than the last synced value. Rows at the exact boundary timestamp may be re-synced if new rows share that same timestamp.- User identifier columns - Your table may contain one or more user identifier columns. Each row should only contain one identifier (either
external_id, the combination ofalias_nameandalias_label,braze_id,emailorphone). A source table may have columns for one, two, three, four, or all five identifier types.EXTERNAL_ID- This identifies the user you want to update. This should match theexternal_idvalue used in Braze.ALIAS_NAMEandALIAS_LABEL- These two columns create a user alias object.alias_nameshould be a unique identifier, andalias_labelspecifies the type of alias. Users may have multiple aliases with different labels but only onealias_nameperalias_label.BRAZE_ID- The Braze user identifier. This is generated by the Braze SDK, and new users cannot be created using a Braze ID through Cloud Data Ingestion. To create new users, specify an external user ID or user alias.EMAIL- The user’s email address. If multiple profiles with the same email address exist, the most recently updated profile is prioritized for updates. If you include both email and phone, email is used as the primary identifier.PHONE- The user’s phone number. If multiple profiles with the same phone number exist, the most recently updated profile is prioritized for updates.
PAYLOAD- This is a JSON string of the fields you want to sync to the user in Braze.
BigQuery partitioning
CDI supports partitions for BigQuery. If you partition by a function of UPDATED_AT (for example, at the granularity of a day, week, or hour, depending on the size of your dataset), BigQuery can prune the data it needs to scan. This improves performance and efficiency for very large tables.
Don’t partition by any other fields. Test different configurations to find the best setup for your specific data.
All CDI queries filter by UPDATED_AT, but this behavior could change. Design your table schema to not require that queries include this clause.
For more information, refer to the BigQuery partitioning documentation.
Step 1.2: Create credentials for Braze
Create a service account in GCP for Braze to use to connect and read data from your table(s). The service account should have the following permissions:
- BigQuery Connection User: Allows Braze to make connections
- BigQuery User: Provides Braze access to run queries, read dataset metadata, and list tables.
- BigQuery Data Viewer: Provides Braze access to view datasets and their contents.
- BigQuery Job User: Provides Braze access to run jobs
Braze can access the service account with either of the following authentication methods:
- Workload Identity Federation: Braze impersonates the service account with a short-lived identity, so you don’t create or upload a key.
- Service account key: You upload a JSON key for the service account to Braze.
Existing service account key credentials keep working, and you don’t need to migrate them. One Workload Identity Federation credential can serve both BigQuery and Google Cloud Storage sources.
Set up a workload identity pool, a provider, and the service account, and bind the Braze principal to the service account. For steps, see Configuring Google Cloud for Workload Identity Federation. If you’ve already set up Workload Identity Federation for a Google Cloud Storage source, you don’t need to repeat it. Grant the existing service account the permissions listed in this step.
After creating the service account and granting permissions, generate a JSON key. For more information, see Create and delete service account keys. Upload this key to the Braze dashboard in a later step.
Step 1.3: Allow access to Braze IPs
If you have network policies in place, you must give Braze network access to your Big Query instance. Allow access from the following IPs corresponding to your Braze dashboard’s region.
For instances US-01, US-02, US-03, US-04, US-05, US-06, US-07, these are the relevant IP addresses:
23.21.118.19134.206.23.17350.16.249.952.4.160.21454.87.8.3454.156.35.25152.54.89.23818.205.178.15
For instance US-08, these are the relevant IP addresses:
52.151.246.5152.170.163.18240.76.166.15740.76.166.17040.76.166.16740.76.166.16140.76.166.15640.76.166.16640.76.166.16040.88.51.7452.154.67.1740.76.166.8040.76.166.8440.76.166.8540.76.166.8140.76.166.7140.76.166.14440.76.166.145
For instance US-10, these are the relevant IP addresses:
100.25.232.16435.168.86.17952.7.44.1173.92.153.1835.172.3.12950.19.162.19
For instances EU-01 and EU-02, these are the relevant IP addresses:
52.58.142.24252.29.193.12135.158.29.22818.157.135.973.123.166.463.64.27.363.65.88.253.68.144.1883.70.107.88
For instance AU-01, these are the relevant IP addresses:
13.210.1.14513.211.70.15913.238.45.5452.65.73.16754.153.242.23954.206.45.213
For instance ID-01, these are the relevant IP addresses:
108.136.157.246108.137.30.20716.78.128.7116.78.14.13416.78.162.20843.218.73.35
For instance JP-01, these are the relevant IP addresses:
13.159.155.21254.199.221.24113.192.23.1654.250.120.13918.181.114.2323.114.38.100
For instance KR-01, these are the relevant IP addresses:
43.200.215.452.79.67.17552.79.113.603.34.212.9254.116.134.2313.37.197.225
Step 1.1: Set up the table
Optionally, set up a new Catalog or Schema to hold your source table.
CREATE SCHEMA BRAZE-CLOUD-PRODUCTION.INGESTION;
Create one or more tables to use for your CDI integration with the following fields:
CREATE TABLE `BRAZE-CLOUD-PRODUCTION.INGESTION.USERS_ATTRIBUTES_SYNC`
(
updated_at TIMESTAMP DEFAULT current_timestamp(),
--At least one of external_id, alias_name and alias_label, or braze_id is required
external_id STRING,
--If using user alias, both alias_name and alias_label are required
alias_name STRING,
alias_label STRING,
--braze_id can only be used to update existing users created through the Braze SDK
braze_id STRING,
--If you include both email and phone, email is used as the primary identifier
email STRING,
phone STRING,
payload STRING, STRUCT, or MAP
);
| Field Name | Type | Mode |
|---|---|---|
UPDATED_AT |
TIMESTAMP | REQUIRED |
PAYLOAD |
STRING, STRUCT, or MAP | REQUIRED |
EXTERNAL_ID |
STRING | NULLABLE |
ALIAS_NAME |
STRING | NULLABLE |
ALIAS_LABEL |
STRING | NULLABLE |
BRAZE_ID |
STRING | NULLABLE |
EMAIL |
STRING | NULLABLE |
PHONE |
STRING | NULLABLE |
You can name the schema and table as you’d like, but the column names should match the preceding definition.
UPDATED_AT- The time this row was updated in or added to the table. Braze syncs rows whereUPDATED_ATis later than the last synced value. Rows at the exact boundary timestamp may be re-synced if new rows share that same timestamp.- User identifier columns - Your table may contain one or more user identifier columns. Each row should only contain one identifier (either
external_id, the combination ofalias_nameandalias_label,braze_id,emailorphone). A source table may have columns for one, two, three, four, or all five identifier types.EXTERNAL_ID- This identifies the user you want to update. This should match theexternal_idvalue used in Braze.ALIAS_NAMEandALIAS_LABEL- These two columns create a user alias object.alias_nameshould be a unique identifier, andalias_labelspecifies the type of alias. Users may have multiple aliases with different labels but only onealias_nameperalias_label.BRAZE_ID- The Braze user identifier. This is generated by the Braze SDK, and new users cannot be created using a Braze ID through Cloud Data Ingestion. To create new users, specify an external user ID or user alias.EMAIL- The user’s email address. If multiple profiles with the same email address exist, the most recently updated profile is prioritized for updates. If you include both email and phone, email is used as the primary identifier.PHONE- The user’s phone number. If multiple profiles with the same phone number exist, the most recently updated profile is prioritized for updates.
PAYLOAD- This is a string or struct of the fields you want to sync to the user in Braze.
Step 1.2: Create credentials for Braze
Braze can connect to Databricks with either of the following authentication methods:
- OAuth M2M (recommended): Braze authenticates as a Databricks service principal using a client ID and client secret. Databricks recommends OAuth M2M authentication for unattended connections like Cloud Data Ingestion.
- Personal access token: Braze authenticates with a token generated in your Databricks workspace.
Existing personal access token credentials keep working, and you don’t need to migrate them. However, personal access tokens often expire on a schedule set by your workspace admin, and syncs stop when the token expires. To move an existing source to OAuth M2M, create an OAuth M2M credential and select it when you edit the source.
Braze connects to your Databricks workspace using a service principal with OAuth M2M authentication. Create a new service principal for Braze to use, and grant it access to your SQL warehouse and source tables. Braze needs the following details to connect:
- Client ID (also called application ID) for the service principal
- Client secret for Braze to authenticate
Create the service principal
- In your Databricks workspace, select your username in the top bar, and then select Settings.
- Go to Identity and access, and then select Manage next to Service principals.
- Select Add service principal > Add new.
- Enter a name that helps you identify the service principal, such as “Braze CDI”, and then select Add.
- Select the service principal that you created. On the Configurations tab, make sure Databricks SQL access is selected.
Generate a client secret
- On the service principal’s page, select the Secrets tab, and then select Generate secret.
- Enter a lifetime for the secret, in days. Databricks allows a maximum lifetime of 730 days.
- Select Generate.
- Copy the Secret and Client ID values, and then select Done.
Keep the client ID and secret in a safe place until you need to enter them on the Braze dashboard during the credential creation step. Databricks shows the secret only once.
Databricks doesn’t allow unlimited lifetimes on service principal secrets. Remember to replace the secret before it expires to maintain the flow of data to Braze. For steps, see Update the client secret.
Grant access to the SQL warehouse
Braze needs permission to run queries on your SQL warehouse, but doesn’t need workspace admin access.
- In the sidebar, select SQL Warehouses, and then select the warehouse you want Braze to use.
- Select Permissions.
- Search for and select the service principal you created.
- In the permission dropdown, select Can use, and then select Add.
Grant access to the source tables
Grant the service principal read access to the catalog, schema, and tables that you set up in Step 1.1. Use the service principal’s application ID (the same value as the client ID) as the grantee.
GRANT USE CATALOG ON CATALOG `BRAZE-CLOUD-PRODUCTION` TO `APPLICATION_ID`;
GRANT USE SCHEMA ON SCHEMA `BRAZE-CLOUD-PRODUCTION`.INGESTION TO `APPLICATION_ID`;
GRANT SELECT ON TABLE `BRAZE-CLOUD-PRODUCTION`.INGESTION.USERS_ATTRIBUTES_SYNC TO `APPLICATION_ID`;
Replace APPLICATION_ID with the application ID of your service principal. Update the other names as needed, but the permissions should match the preceding example.
Update the client secret
Braze stores one client secret per credential. When you update it, every source and sync that uses the credential switches to the new secret. To replace the secret:
- In Databricks, generate a new secret for the service principal by following the steps in Generate a client secret. Keep the old secret until step 6.
- In the Braze dashboard, go to Data Settings > Cloud Data Ingestion > Credentials, and then select your OAuth M2M credential. The Used by section lists every source and sync that uses this credential.
- Pause the syncs that use this credential, or plan the update for a time when none of them are scheduled to run. This prevents a sync from starting while you update the credential.
- Select Edit credential, enter the new client secret, and then select Save. The change applies to every source and sync that uses this credential.
- Resume any syncs you paused.
- After Braze saves the new secret, delete the old secret in Databricks.
For Braze to access Databricks, a personal access token needs to be created.
- In your Databricks workspace, select your Databricks username in the top bar, and then select User Settings from the dropdown.
- On the Access tokens tab, select Generate new token.
- Enter a comment that helps you to identify this token, such as “Braze CDI”, and change the token’s lifetime to no lifetime by leaving the Lifetime (days) box empty (blank).
- Select Generate.
- Copy the displayed token, and then select Done.
Keep the token in a safe place until you need to enter it on the Braze dashboard during the credential creation step.
Step 1.3: Allow access to Braze IPs
If you have network policies in place, you must give Braze network access to your Databricks instance. Allow access from the following IPs corresponding to your Braze dashboard’s region.
For instances US-01, US-02, US-03, US-04, US-05, US-06, US-07, these are the relevant IP addresses:
23.21.118.19134.206.23.17350.16.249.952.4.160.21454.87.8.3454.156.35.25152.54.89.23818.205.178.15
For instance US-08, these are the relevant IP addresses:
52.151.246.5152.170.163.18240.76.166.15740.76.166.17040.76.166.16740.76.166.16140.76.166.15640.76.166.16640.76.166.16040.88.51.7452.154.67.1740.76.166.8040.76.166.8440.76.166.8540.76.166.8140.76.166.7140.76.166.14440.76.166.145
For instance US-10, these are the relevant IP addresses:
100.25.232.16435.168.86.17952.7.44.1173.92.153.1835.172.3.12950.19.162.19
For instances EU-01 and EU-02, these are the relevant IP addresses:
52.58.142.24252.29.193.12135.158.29.22818.157.135.973.123.166.463.64.27.363.65.88.253.68.144.1883.70.107.88
For instance AU-01, these are the relevant IP addresses:
13.210.1.14513.211.70.15913.238.45.5452.65.73.16754.153.242.23954.206.45.213
For instance ID-01, these are the relevant IP addresses:
108.136.157.246108.137.30.20716.78.128.7116.78.14.13416.78.162.20843.218.73.35
For instance JP-01, these are the relevant IP addresses:
13.159.155.21254.199.221.24113.192.23.1654.250.120.13918.181.114.2323.114.38.100
For instance KR-01, these are the relevant IP addresses:
43.200.215.452.79.67.17552.79.113.603.34.212.9254.116.134.2313.37.197.225
Step 1.1: Set up the service principal and grant access
Braze connects to your Fabric warehouse using a service principal with Entra ID authentication. Create a new service principal for Braze to use, and grant access to Fabric resources as needed. Braze needs the following details to connect:
- Tenant ID (also called directory) for your Azure account
- Principal ID (also called application ID) for the service principal
- Client secret for Braze to authenticate
- In the Azure portal, navigate to the Microsoft Entra admin center, and then App Registrations.
- Select + New registration under Identity > Applications > App registrations
- Enter a name, and select
Accounts in this organizational directory onlyas the supported account type. Then, select Register. - Select the application (service principal) you just created, then navigate to Certificates & secrets > + New client secret
- Enter a description for the secret, and set an expiry period for the secret. Then, select Add.
- Note the client secret created to use in the Braze setup.
Azure doesn’t allow unlimited expiry on service principal secrets. Remember to refresh the credentials before they expire to maintain the flow of data to Braze.
Step 1.2: Grant access to Fabric resources
Provide access for Braze to connect to your Fabric instance. In your Fabric admin portal, navigate to Settings > Governance and insights > Admin portal > Tenant settings.
- In Developer settings enable Service principals can use Fabric APIs so Braze can connect using Microsoft Entra ID.
- In OneLake settings enable Users can access data stored in OneLake with apps external to Fabric so that the service principal can access data from an external app.
Step 1.3: Set up a shared workspace and grant access
Any Fabric resources you want to connect to Braze must be placed in a shared workspace. If you’ve only been using the default My Workspace, create a new shared workspace:
- On the navigation menu, select Workspaces, then select + New workspace.
- Enter a Name for the workspace, then select Apply.
After you have a shared workspace, grant the service principal access:
- Select the workspace, then select Manage Access.
- Select + Add people or groups.
- Search for and select the name of the service principal you created in Step 1.1. If it doesn’t appear, confirm you’ve enabled the Service principals can use Fabric APIs setting in Step 1.2.
- In the role dropdown, select Contributor.
The service principal can now access Fabric warehouse resources in this workspace through their SQL endpoints, including the warehouse to use for Braze.
Step 1.4: Set up the table
Braze supports both tables and views in Fabric Warehouses. If you need to create a new warehouse, create it within the shared workspace from Step 1.3. Go to Create > Data Warehouse > Warehouse in the Fabric console.
CREATE OR ALTER TABLE [warehouse].[schema].[CDI_table_name]
(
UPDATED_AT DATETIME2(6) NOT NULL,
PAYLOAD VARCHAR NOT NULL,
--at least one of external_id, alias_name and alias_label, email, phone, or braze_id is required
EXTERNAL_ID VARCHAR,
--if using user alias, both alias_name and alias_label are required
ALIAS_NAME VARCHAR,
ALIAS_LABEL VARCHAR,
--braze_id can only be used to update existing users created through the Braze SDK
BRAZE_ID VARCHAR,
--If you include both email and phone, email is used as the primary identifier
EMAIL VARCHAR,
PHONE VARCHAR
)
GO
You can name the warehouse, schema, and table or view as you’d like, but the column names should match the preceding definition.
UPDATED_AT- The time this row was updated in or added to the table. Braze syncs rows whereUPDATED_ATis later than the last synced value. Rows at the exact boundary timestamp may be re-synced if new rows share that same timestamp.- User identifier columns - Your table may contain one or more user identifier columns. Each row should only contain one identifier (either
external_id, the combination ofalias_nameandalias_label,braze_id,emailorphone). A source table may have columns for one, two, three, four, or all five identifier types.EXTERNAL_ID- This identifies the user you want to update. This should match theexternal_idvalue used in Braze.ALIAS_NAMEandALIAS_LABEL- These two columns create a user alias object.alias_nameshould be a unique identifier, andalias_labelspecifies the type of alias. Users may have multiple aliases with different labels but only onealias_nameperalias_label.BRAZE_ID- The Braze user identifier. This is generated by the Braze SDK, and new users cannot be created using a Braze ID through Cloud Data Ingestion. To create new users, specify an external user ID or user alias.EMAIL- The user’s email address. If multiple profiles with the same email address exist, the most recently updated profile is prioritized for updates. If you include both email and phone, email is used as the primary identifier.PHONE- The user’s phone number. If multiple profiles with the same phone number exist, the most recently updated profile is prioritized for updates.
PAYLOAD- This is a JSON string of the fields you want to sync to the user in Braze.
Step 1.5: Get warehouse connection string
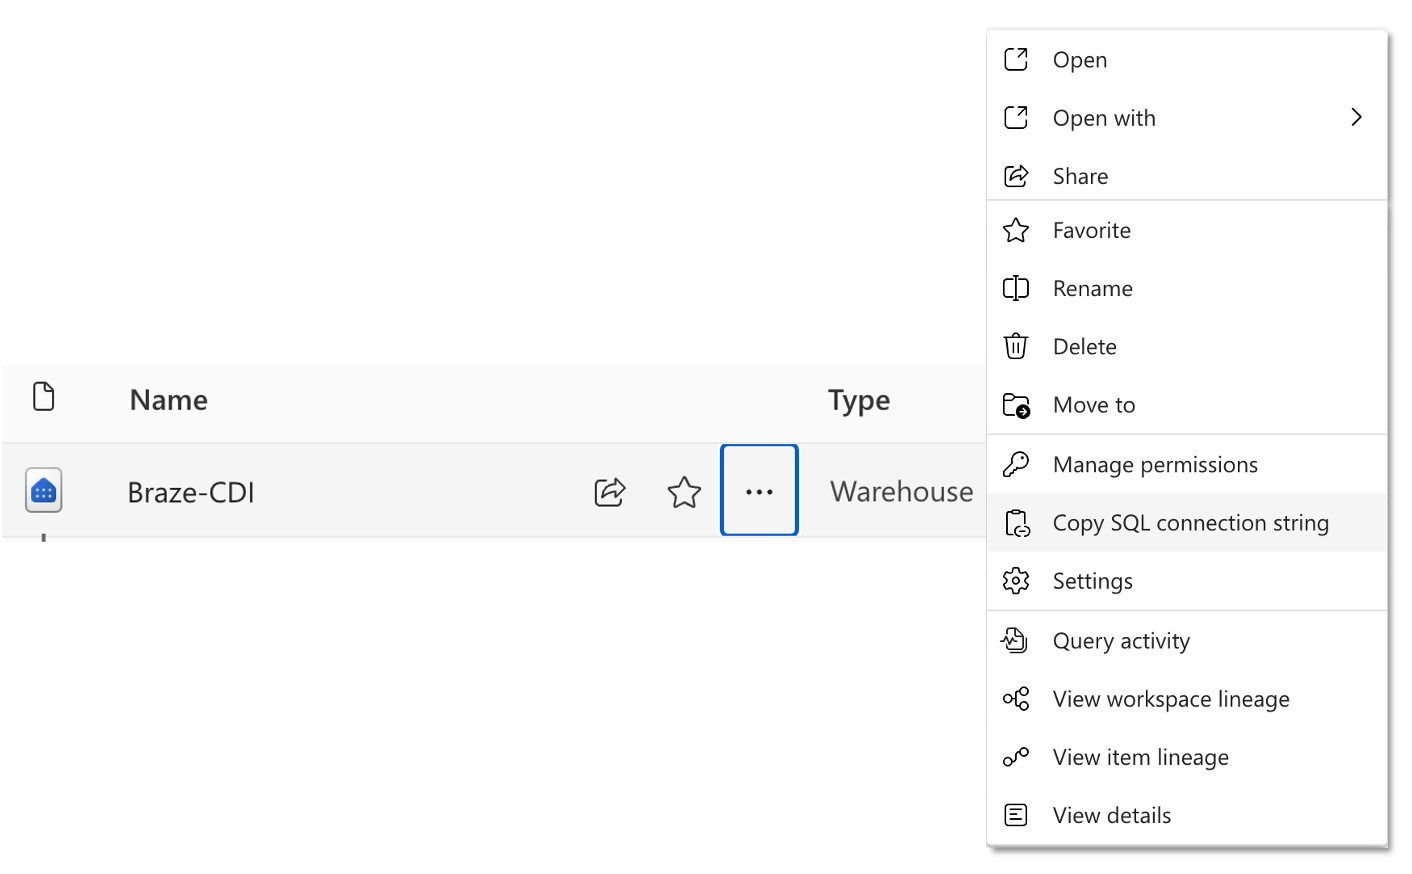
To retrieve the SQL endpoint for your warehouse, go to the workspace in Fabric, hover over the warehouse name in the item list, and select Copy SQL connection string.
Step 1.6: Allow Braze IPs in Firewall (Optional)
Depending on the configuration of your Microsoft Fabric account, you may need to allow the following IP addresses in your firewall to allow traffic from Braze. For more information on enabling this, see the relevant documentation on Entra Conditional Access.
For instances US-01, US-02, US-03, US-04, US-05, US-06, US-07, these are the relevant IP addresses:
23.21.118.19134.206.23.17350.16.249.952.4.160.21454.87.8.3454.156.35.25152.54.89.23818.205.178.15
For instance US-08, these are the relevant IP addresses:
52.151.246.5152.170.163.18240.76.166.15740.76.166.17040.76.166.16740.76.166.16140.76.166.15640.76.166.16640.76.166.16040.88.51.7452.154.67.1740.76.166.8040.76.166.8440.76.166.8540.76.166.8140.76.166.7140.76.166.14440.76.166.145
For instance US-10, these are the relevant IP addresses:
100.25.232.16435.168.86.17952.7.44.1173.92.153.1835.172.3.12950.19.162.19
For instances EU-01 and EU-02, these are the relevant IP addresses:
52.58.142.24252.29.193.12135.158.29.22818.157.135.973.123.166.463.64.27.363.65.88.253.68.144.1883.70.107.88
For instance AU-01, these are the relevant IP addresses:
13.210.1.14513.211.70.15913.238.45.5452.65.73.16754.153.242.23954.206.45.213
For instance ID-01, these are the relevant IP addresses:
108.136.157.246108.137.30.20716.78.128.7116.78.14.13416.78.162.20843.218.73.35
For instance JP-01, these are the relevant IP addresses:
13.159.155.21254.199.221.24113.192.23.1654.250.120.13918.181.114.2323.114.38.100
For instance KR-01, these are the relevant IP addresses:
43.200.215.452.79.67.17552.79.113.603.34.212.9254.116.134.2313.37.197.225
Step 2: Create a new source in the Braze dashboard
In the Braze Dashboard, go to Data Settings > Cloud Data Ingestion > Sources, select Add data source, and then select Snowflake.
Step 2.1: Add Snowflake connection information
Choose a name for your source and input your Snowflake credentials and configuration, then proceed to the next step.
Before you continue, confirm the value you enter in Snowflake Account Locator.
For the Snowflake Account Locator field, enter your Snowflake account identifier. Enter only the account identifier value, such as myorganization-myaccount. Do not include https://, .snowflakecomputing.com, or any path.
To find your Snowflake account identifier:
- In Snowsight, select your account menu.
- Select View account details.
- Copy the Account identifier value.
- If you copy from a Snowflake URL, use only the value before
.snowflakecomputing.com.
Step 2.2: Add a public key to the Braze user
After inputting your credentials and configuration, click Save credentials and generate an RSA key and go back to Snowflake to complete the setup. Add the public key displayed on the dashboard to the user you created for Braze to connect to Snowflake.
For additional information on how to do this, see the Snowflake documentation. If you want to rotate the keys at any point, Braze can generate a new key pair and provide the new public key.
ALTER USER BRAZE_INGESTION_USER SET RSA_PUBLIC_KEY='MIIBIjANBgkqhkiG9w0BA...';
In the Braze Dashboard, go to Data Settings > Cloud Data Ingestion > Sources, select Add data source, and then select Amazon Redshift.
Step 2.1: Add Redshift connection information and source table
Choose a name for your source and input your Redshift credentials and configuration. If you’re using a private network tunnel, toggle the slider and input the tunnel information. Then, proceed to the next step.
In the Braze dashboard, the Database name field only accepts letters (A–Z, a–z), numbers (0–9), and underscores (_), even though Amazon Redshift supports additional characters in database identifiers.
Step 2.2: Test connection and connect to source
Next, select Test connection. Once successful, finalize remaining settings and click Connect to Source. If the connection fails, an error message appears to help troubleshoot the issue.
Troubleshooting: Invalid snapshot identifier
If Braze returns an Invalid snapshot identifier error during Test connection or sync setup, Redshift can’t resolve the snapshot reference used when your source object is queried.
In Redshift, a snapshot is a point-in-time backup of a cluster. Each snapshot has a unique identifier used by Redshift to reference that backup state. For more information, see Amazon Redshift snapshots and backups.
This error can occur when metadata changes while Braze validates the source object, such as during snapshot copy, restore, or replication-related operations. For more information, see copying snapshots to another AWS Region and restoring a cluster from a snapshot.
To troubleshoot:
- Verify source settings in Braze, including cluster endpoint, database, schema, and object name.
- Run the same query directly in Redshift to confirm the table or view is readable and stable.
- Retry after active snapshot, restore, resize, or replication activity finishes.
- If the issue persists, query a materialized view instead of a frequently changing base table.
A materialized view stores precomputed query results that you can refresh on a schedule, which can make reads more stable for CDI syncs. For more information, see materialized views in Amazon Redshift.
Example:
CREATE MATERIALIZED VIEW ingestion.users_attributes_mv AS
SELECT updated_at, external_id, alias_label, alias_name, braze_id, email, phone, payload
FROM ingestion.users_attributes_sync;
REFRESH MATERIALIZED VIEW ingestion.users_attributes_mv;
After you create the materialized view, use the materialized view name as the source object in your Braze CDI sync instead of the base table.
In the Braze Dashboard, go to Data Settings > Cloud Data Ingestion > Sources, select Add data source, and then select Google BigQuery.
Step 2.1: Add BigQuery connection information and source table
Enter a name for your source, and then enter your BigQuery credentials and configuration:
- For Credential name, enter a label that helps you identify these credentials in Braze.
- For the authentication method, select Workload Identity Federation or Service Account Key to match the credentials you created in Step 1.2.
- For Workload Identity Federation, copy the Braze principal ARN for your Google Cloud setup, and then enter the Project number, Workload identity pool ID, Provider ID, and Service account email. For a service account key, upload the JSON key.
Then, input the remaining configuration fields.
Step 2.2: Test connection and connect to source
Next, select Test connection. Once successful, finalize remaining settings and click Connect to Source. If the connection fails, an error message appears to help troubleshoot the issue.
In the Braze Dashboard, go to Data Settings > Cloud Data Ingestion > Sources, select Add data source, and then select Databricks.
Step 2.1: Add Databricks connection information and source table
Enter a name for your source, and then enter your Databricks credentials and configuration:
- For Credential name, enter a label that helps you identify these credentials in Braze.
- For Authentication method, select OAuth M2M or Personal Access Token to match the credentials you created in Step 1.2.
- For OAuth M2M, enter the Client ID and Client secret for your service principal. For a personal access token, enter the Access token.
Then, proceed to the next step.
Step 2.2: Test connection and connect to source
Next, select Test connection. Once successful, finalize remaining settings and click Connect to Source. If the connection fails, an error message appears to help troubleshoot the issue.
You must successfully test a source before it can be created. If you close the creation page, your source is not saved.
In the Braze dashboard, go to Data Settings > Cloud Data Ingestion > Sources, select Add data source, and then select Microsoft Fabric.
Step 2.1: Set up a Cloud Data Ingestion sync
Choose a name for your source and input your Microsoft Fabric credentials and configuration.
- Credentials Name is a label for these credentials in Braze, you can set a helpful value here
- See steps in section 1 for details on how to retrieve Tenant ID, Principal ID, Client Secret, and Connection String
Step 2.2: Test connection and connect to source
Next, select Test connection. Once successful, finalize remaining settings and click Connect to Source. If the connection fails, an error message appears to help troubleshoot the issue.
You must successfully test a source before it can be created. If you close the creation page, your source is not saved.
Step 3: Create a new sync in the Braze dashboard
Go to Data Settings > Cloud Data Ingestion > Syncs, and select Create data sync.
Step 3.1: Configure sync details and define your data
Enter a name for your sync. Then, select an active source and a sync data type. Next, select Visual or Table and enter your source table, or select SQL to write a custom SQL query. Finally, select Preview and validate.
After validation succeeds, a preview of the data appears. Select Next: Notifications to continue. If validation fails, an error message appears to help troubleshoot the issue.
You must successfully validate a sync before progressing to next steps. If you need to close out of the sync creation page, select Save as draft to keep your work in progress.
Step 3.2: Add notification preferences
Input contact email(s) for sync error notifications. Braze uses this contact information to send notifications about integration errors, such as unexpected loss of table access.
Contact emails only receive notifications of global or sync-level errors such as missing tables, permissions, and others. They do not receive row-level issues. Global errors indicate critical problems with the connection that prevent syncs from running.
Such problems can include the following:
- Connectivity issues
- Lack of resources
- Permissions issues
- Catalog tier is out of space (catalog syncs only)
Step 3.3: Scheduling
Lastly, configure your sync as non-recurring or recurring.
Non-recurring syncs run only when you select Sync Now in the dashboard or call the Trigger a sync endpoint.
Recurring syncs can run as often as every 5 minutes or as rarely as once per month. By default, the shortest interval you can set in the dashboard is 15 minutes, which helps manage your warehouse compute costs and request volume. To sync as often as every 5 minutes, contact Braze Support or your customer success manager. Braze schedules recurring syncs in UTC.
Step 3.1: Configure sync details and define your data
Enter a name for your sync. Then, select an active source and a sync data type. Next, select Visual or Table and enter your source table, or select SQL to write a custom SQL query. Finally, select Preview and validate.
After validation succeeds, a preview of the data appears. Select Next: Notifications to continue. If validation fails, an error message appears to help troubleshoot the issue.
You must successfully validate a sync before progressing to next steps. If you need to close out of the sync creation page, select Save as draft to keep your work in progress.
Step 3.2: Add notification preferences
Input contact email(s) for sync error notifications. Braze uses this contact information to send notifications about integration errors, such as unexpected loss of table access.
Contact emails only receive notifications of global or sync-level errors such as missing tables, permissions, and others. They do not receive row-level issues. Global errors indicate critical problems with the connection that prevent syncs from running.
Such problems can include the following:
- Connectivity issues
- Lack of resources
- Permissions issues
- Catalog tier is out of space (catalog syncs only)
Step 3.3: Scheduling
Lastly, configure your sync as non-recurring or recurring.
Non-recurring syncs run only when you select Sync Now in the dashboard or call the Trigger a sync endpoint.
Recurring syncs can run as often as every 5 minutes or as rarely as once per month. By default, the shortest interval you can set in the dashboard is 15 minutes, which helps manage your warehouse compute costs and request volume. To sync as often as every 5 minutes, contact Braze Support or your customer success manager. Braze schedules recurring syncs in UTC.
Step 3.1: Configure sync details and define your data
Enter a name for your sync. Then, select an active source and a sync data type. Next, select Visual or Table and enter your source table, or select SQL to write a custom SQL query. Finally, select Preview and validate.
After validation succeeds, a preview of the data appears. Select Next: Notifications to continue. If validation fails, an error message appears to help troubleshoot the issue.
You must successfully validate a sync before progressing to next steps. If you need to close out of the sync creation page, select Save as draft to keep your work in progress.
Step 3.2: Add notification preferences
Input contact email(s) for sync error notifications. Braze uses this contact information to send notifications about integration errors, such as unexpected loss of table access.
Contact emails only receive notifications of global or sync-level errors such as missing tables, permissions, and others. They do not receive row-level issues. Global errors indicate critical problems with the connection that prevent syncs from running. Such problems can include the following:
- Connectivity issues
- Lack of resources
- Permissions issues
- Catalog tier is out of space (catalog syncs only)
Step 3.3: Scheduling
Lastly, configure your sync as non-recurring or recurring.
Non-recurring syncs run only when you select Sync Now in the dashboard or call the Trigger a sync endpoint.
Recurring syncs can run as often as every 5 minutes or as rarely as once per month. By default, the shortest interval you can set in the dashboard is 15 minutes, which helps manage your warehouse compute costs and request volume. To sync as often as every 5 minutes, contact Braze Support or your customer success manager. Braze schedules recurring syncs in UTC.
Step 3.1: Configure sync details and define your data
Enter a name for your sync. Then, select an active source and a sync data type. Next, select Visual or Table and enter your source table, or select SQL to write a custom SQL query. Finally, select Preview and validate.
After validation succeeds, a preview of the data appears. Select Next: Notifications to continue. If validation fails, an error message appears to help troubleshoot the issue.
You must successfully validate a sync before progressing to next steps. If you need to close out of the sync creation page, select Save as draft to keep your work in progress.
Step 3.2: Add notification preferences
Input contact email(s) for sync error notifications. Braze uses this contact information to send notifications about integration errors, such as unexpected loss of table access.
Contact emails only receive notifications of global or sync-level errors such as missing tables, permissions, and others. They do not receive row-level issues. Global errors indicate critical problems with the connection that prevent syncs from running.
Such problems can include the following:
- Connectivity issues
- Lack of resources
- Permissions issues
- Catalog tier is out of space (catalog syncs only)
Step 3.3: Scheduling
Lastly, configure your sync as non-recurring or recurring.
Non-recurring syncs run only when you select Sync Now in the dashboard or call the Trigger a sync endpoint.
Recurring syncs can run as often as every 5 minutes or as rarely as once per month. By default, the shortest interval you can set in the dashboard is 15 minutes, which helps manage your warehouse compute costs and request volume. To sync as often as every 5 minutes, contact Braze Support or your customer success manager. Braze schedules recurring syncs in UTC.
Step 3.1: Configure sync details and define your data
Enter a name for your sync. Then, select an active source and a sync data type. Next, select Visual or Table and enter your source table, or select SQL to write a custom SQL query. Finally, select Preview and validate.
After validation succeeds, a preview of the data appears. Select Next: Notifications to continue. If validation fails, an error message appears to help troubleshoot the issue.
You must successfully validate a sync before progressing to next steps. If you need to close out of the sync creation page, select Save as draft to keep your work in progress.
Step 3.2: Add notification preferences
Input contact email(s) for sync error notifications. Braze uses this contact information to send notifications about integration errors, such as unexpected loss of table access.
Contact emails only receive notifications of global or sync-level errors such as missing tables, permissions, and others. They do not receive row-level issues. Global errors indicate critical problems with the connection that prevent syncs from running.
Such problems can include the following:
- Connectivity issues
- Lack of resources
- Permissions issues
- Catalog tier is out of space (catalog syncs only)
Step 3.3: Scheduling
Lastly, configure your sync as non-recurring or recurring.
Non-recurring syncs run only when you select Sync Now in the dashboard or call the Trigger a sync endpoint.
Recurring syncs can run as often as every 5 minutes or as rarely as once per month. By default, the shortest interval you can set in the dashboard is 15 minutes, which helps manage your warehouse compute costs and request volume. To sync as often as every 5 minutes, contact Braze Support or your customer success manager. Braze schedules recurring syncs in UTC.
You must successfully validate an integration before it can move from Draft to Active state. If you close the creation page, your integration is saved, and you can revisit the details page to make changes and validate.
Set up additional integrations or users (optional)
You can set up multiple integrations with Braze. When creating additional syncs, you can reuse existing credentials if connecting to the Snowflake account.
If you reuse the same user and role across integrations, you do not need to add the public key again.
You can set up multiple integrations with Braze. When creating additional syncs, you can reuse existing credentials if connecting to the same Redshift account.
If you reuse the same user across integrations, you cannot delete the user in the Braze dashboard until it’s removed from all active syncs.
You can set up multiple integrations with Braze. When creating additional syncs, you can reuse existing credentials if connecting to the same BigQuery account.
If you reuse the same user across integrations, you cannot delete the user in the Braze dashboard until it’s removed from all active syncs.
You can set up multiple integrations with Braze. When creating additional syncs, you can reuse existing credentials if connecting to the same Databricks account.
If you reuse the same user across integrations, you cannot delete the user in the Braze dashboard until it’s removed from all active syncs.
You can set up multiple integrations with Braze. When creating additional syncs, you can reuse existing credentials if connecting to the same Fabric account.
If you reuse the same user across integrations, you cannot delete the user in the Braze dashboard until it’s removed from all active syncs.
Running the sync
When activated, your sync runs on the schedule configured during setup. If you want to run the sync outside its schedule or to fetch the most recent data, select Sync Now. This run does not impact regularly scheduled future syncs. To start a sync automatically when your data updates, call the Trigger a sync endpoint from your pipeline.
When activated, your sync runs on the schedule configured during setup. If you want to run the sync outside its schedule or to fetch the most recent data, select Sync Now. This run does not impact regularly scheduled future syncs. To start a sync automatically when your data updates, call the Trigger a sync endpoint from your pipeline.
When activated, your sync runs on the schedule configured during setup. If you want to run the sync outside its schedule or to fetch the most recent data, select Sync Now. This run does not impact regularly scheduled future syncs. To start a sync automatically when your data updates, call the Trigger a sync endpoint from your pipeline.
When activated, your sync runs on the schedule configured during setup. If you want to run the sync outside its schedule or to fetch the most recent data, select Sync Now. This run does not impact regularly scheduled future syncs. To start a sync automatically when your data updates, call the Trigger a sync endpoint from your pipeline.
When activated, your sync runs on the schedule configured during setup. If you want to run the sync outside its schedule or to fetch the most recent data, select Sync Now. This run does not impact regularly scheduled future syncs. To start a sync automatically when your data updates, call the Trigger a sync endpoint from your pipeline.