
AppboyKit (également connu sous le nom de SDK Objective-C) n’est plus pris en charge et a été remplacé par le SDK Swift. Il ne recevra plus de nouvelles fonctionnalités, de corrections de bugs, de mises à jour de sécurité ni d’assistance technique—cependant, l’envoi de messages et l’analyse continueront à fonctionner normalement. Pour en savoir plus, consultez Présentation du nouveau SDK Braze Swift.
Intégration des notifications push
Étape 1 : Téléchargez votre jeton APN
Avant de pouvoir envoyer une notification push iOS à l’aide de Braze, vous devez télécharger votre fichier de notification push .p8, comme indiqué dans la documentation destinée aux développeurs d’Apple :
- Dans votre compte de développeur Apple, accédez à Certificates, Identifiers & Profiles.
- Sous Keys, sélectionnez All et cliquez sur le bouton d’ajout (+) en haut de la page.
- Sous Key Description, saisissez un nom unique pour la clé de signature.
- Sous Key Services, cochez la case Apple Push Notification service (APNs), puis cliquez sur Continue. Cliquez sur Confirm.
- Notez l’ID de la clé. Cliquez sur Download pour générer et télécharger la clé. Veillez à enregistrer le fichier téléchargé dans un endroit sécurisé, car vous ne pouvez le télécharger qu’une seule fois.
- Dans Braze, accédez à Paramètres > Paramètres des applications et téléchargez le fichier
.p8sous Apple Push Certificate. Vous pouvez charger votre certificat de notification push de développement ou de production. Pour tester les notifications push une fois que votre application est en direct dans l’App Store, il est recommandé de créer un espace de travail distinct pour la version de développement de votre application. - Lorsque vous y êtes invité, saisissez l’ID de bundle, l’ID de la clé et l’ID de l’équipe de votre application. Vous devrez également préciser si les notifications doivent être envoyées à l’environnement de développement ou de production de votre application, celui-ci étant défini par son profil de provisionnement.
- Lorsque vous avez terminé, sélectionnez Enregistrer.
Étape 2 : Activer les fonctionnalités push
Dans les paramètres de votre projet, assurez-vous que dans l’onglet Capabilities, la fonctionnalité Push Notifications est activée.

Si vous disposez de certificats push distincts pour le développement et la production, assurez-vous de décocher la case Automatically manage signing dans l’onglet General. Cela vous permettra de choisir différents profils de provisionnement pour chaque configuration de build, car la fonctionnalité de signature automatique de code de Xcode ne gère que la signature de développement.
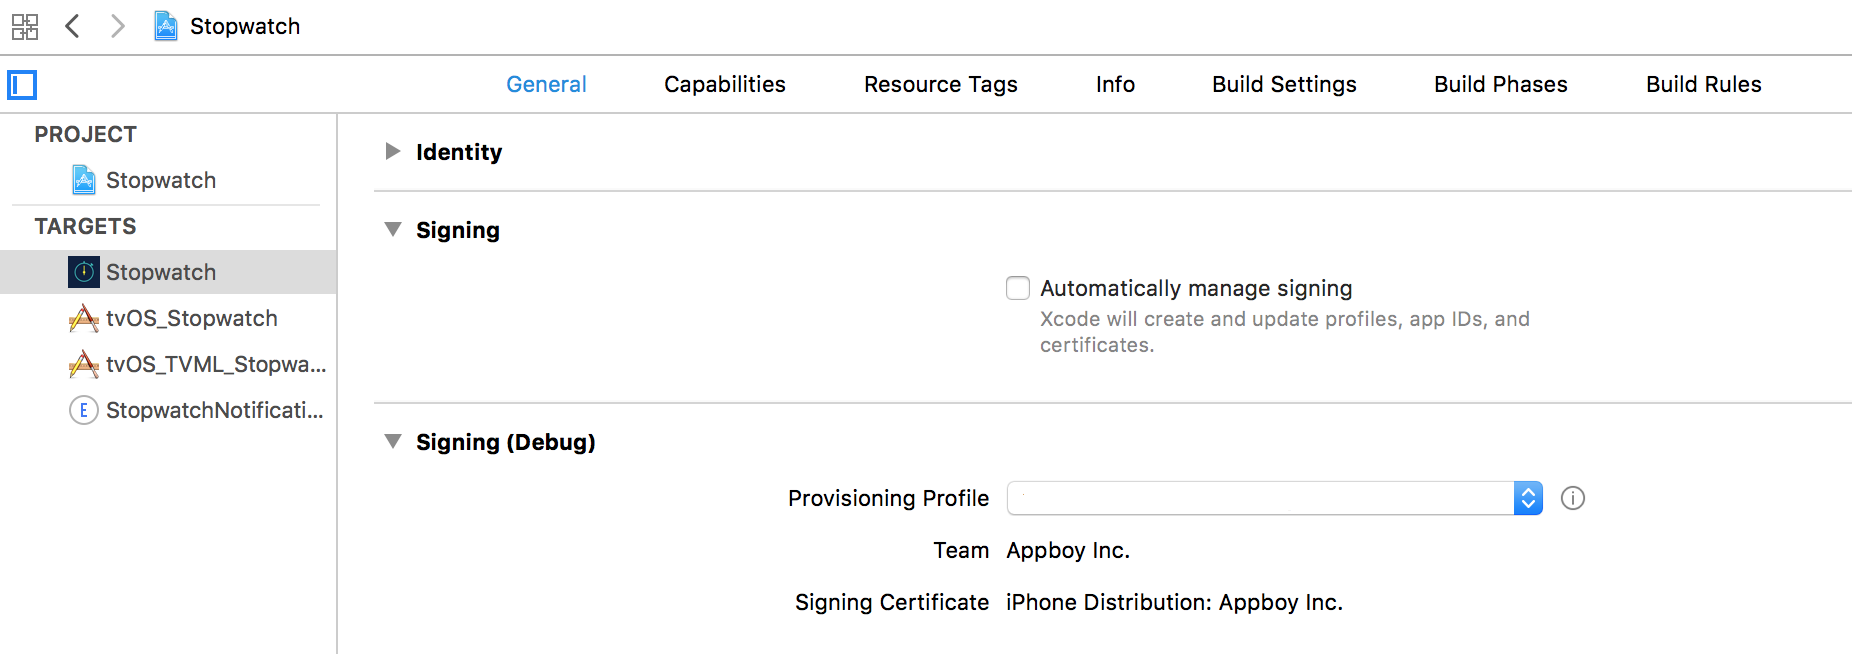
Étape 3 : S’inscrire aux notifications push
L’exemple de code approprié doit être inclus dans la méthode déléguée application:didFinishLaunchingWithOptions: de votre application pour que les appareils de vos utilisateurs s’inscrivent auprès d’APNs. Assurez-vous d’appeler tout le code d’intégration push dans le thread principal de votre application.
Braze fournit également des catégories push par défaut pour la prise en charge des boutons d’action push, qui doivent être ajoutées manuellement à votre code d’inscription push. Consultez les boutons d’action push pour connaître les étapes d’intégration supplémentaires.
Si vous avez implémenté une invite push personnalisée comme décrit dans nos bonnes pratiques push, assurez-vous d’appeler le code suivant à chaque exécution de l’application après que les utilisateurs ont accordé les autorisations push à votre application. Les applications doivent se réinscrire auprès d’APNs car les jetons d’appareil peuvent changer de manière arbitraire.
Utilisation du framework UserNotification (iOS 10+)
Si vous utilisez le framework UserNotifications (recommandé), introduit dans iOS 10, ajoutez le code suivant à la méthode application:didFinishLaunchingWithOptions: du délégué de votre application.

L’exemple de code suivant inclut l’intégration de l’authentification push provisoire (lignes 5 et 6). Si vous ne prévoyez pas d’utiliser l’autorisation provisoire dans votre application, vous pouvez supprimer les lignes de code qui ajoutent UNAuthorizationOptionProvisional aux options de requestAuthorization.
Consultez les options de notification iOS pour en savoir plus sur l’authentification push provisoire.
if (floor(NSFoundationVersionNumber) > NSFoundationVersionNumber_iOS_9_x_Max) {
UNUserNotificationCenter *center = [UNUserNotificationCenter currentNotificationCenter];
center.delegate = self;
UNAuthorizationOptions options = UNAuthorizationOptionAlert | UNAuthorizationOptionSound | UNAuthorizationOptionBadge;
if (@available(iOS 12.0, *)) {
options = options | UNAuthorizationOptionProvisional;
}
[center requestAuthorizationWithOptions:options
completionHandler:^(BOOL granted, NSError * _Nullable error) {
[[Appboy sharedInstance] pushAuthorizationFromUserNotificationCenter:granted];
}];
[[UIApplication sharedApplication] registerForRemoteNotifications];
} else {
UIUserNotificationSettings *settings = [UIUserNotificationSettings settingsForTypes:(UIUserNotificationTypeBadge | UIUserNotificationTypeAlert | UIUserNotificationTypeSound) categories:nil];
[[UIApplication sharedApplication] registerForRemoteNotifications];
[[UIApplication sharedApplication] registerUserNotificationSettings:settings];
}
if #available(iOS 10, *) {
let center = UNUserNotificationCenter.current()
center.delegate = self as? UNUserNotificationCenterDelegate
var options: UNAuthorizationOptions = [.alert, .sound, .badge]
if #available(iOS 12.0, *) {
options = UNAuthorizationOptions(rawValue: options.rawValue | UNAuthorizationOptions.provisional.rawValue)
}
center.requestAuthorization(options: options) { (granted, error) in
Appboy.sharedInstance()?.pushAuthorization(fromUserNotificationCenter: granted)
}
UIApplication.shared.registerForRemoteNotifications()
} else {
let types : UIUserNotificationType = [.alert, .badge, .sound]
let setting : UIUserNotificationSettings = UIUserNotificationSettings(types:types, categories:nil)
UIApplication.shared.registerUserNotificationSettings(setting)
UIApplication.shared.registerForRemoteNotifications()
}
Vous devez assigner votre objet délégué en utilisant center.delegate = self de manière synchrone avant que votre application ne termine son lancement, de préférence dans application:didFinishLaunchingWithOptions:. Ne pas le faire peut empêcher votre application de recevoir les notifications push entrantes. Consultez la documentation Apple sur UNUserNotificationCenterDelegate pour en savoir plus.
Sans le framework UserNotifications
Si vous n’utilisez pas le framework UserNotifications, ajoutez le code suivant à la méthode application:didFinishLaunchingWithOptions: du délégué de votre application :
UIUserNotificationSettings *settings = [UIUserNotificationSettings settingsForTypes:(UIUserNotificationTypeBadge | UIUserNotificationTypeAlert | UIUserNotificationTypeSound) categories:nil];
[[UIApplication sharedApplication] registerForRemoteNotifications];
[[UIApplication sharedApplication] registerUserNotificationSettings:settings];
let types : UIUserNotificationType = UIUserNotificationType.Badge | UIUserNotificationType.Sound | UIUserNotificationType.Alert
var setting : UIUserNotificationSettings = UIUserNotificationSettings(forTypes: types, categories: nil)
UIApplication.shared.registerUserNotificationSettings(setting)
UIApplication.shared.registerForRemoteNotifications()
Étape 4 : Enregistrer les jetons push auprès de Braze
Une fois l’enregistrement APNs terminé, la méthode suivante doit être modifiée pour transmettre le deviceToken résultant à Braze afin que l’utilisateur puisse recevoir des notifications push :
Ajoutez le code suivant à votre méthode application:didRegisterForRemoteNotificationsWithDeviceToken: :
[[Appboy sharedInstance] registerDeviceToken:deviceToken];
Ajoutez le code suivant à la méthode application(_:didRegisterForRemoteNotificationsWithDeviceToken:) de votre application :
Appboy.sharedInstance()?.registerDeviceToken(deviceToken)
La méthode déléguée application:didRegisterForRemoteNotificationsWithDeviceToken: est appelée à chaque fois après l’appel de [[UIApplication sharedApplication] registerForRemoteNotifications]. Si vous effectuez une migration vers Braze depuis un autre service push et que l’appareil de votre utilisateur est déjà enregistré auprès d’APNs, cette méthode récupérera les jetons des enregistrements existants lors de son prochain appel, et les utilisateurs n’auront pas besoin de se réabonner aux notifications push.
Étape 5 : Activer la gestion des notifications push
Le code suivant transmet les notifications push reçues à Braze et est nécessaire pour la journalisation des analyses push et la gestion des liens. Assurez-vous d’appeler tout le code d’intégration push dans le thread principal de votre application.
iOS 10+
Lors de la compilation pour iOS 10+, nous vous recommandons d’intégrer le framework UserNotifications et de procéder comme suit :
Ajoutez le code suivant à la méthode application:didReceiveRemoteNotification:fetchCompletionHandler: de votre application :
[[Appboy sharedInstance] registerApplication:application
didReceiveRemoteNotification:userInfo
fetchCompletionHandler:completionHandler];
Ensuite, ajoutez le code suivant à la méthode (void)userNotificationCenter:didReceiveNotificationResponse:withCompletionHandler: de votre application :
[[Appboy sharedInstance] userNotificationCenter:center
didReceiveNotificationResponse:response
withCompletionHandler:completionHandler];
Gestion des notifications push au premier plan
Pour afficher une notification push lorsque l’application est au premier plan, implémentez userNotificationCenter:willPresentNotification:withCompletionHandler: :
- (void)userNotificationCenter:(UNUserNotificationCenter *)center
willPresentNotification:(UNNotification *)notification
withCompletionHandler:(void (^)(UNNotificationPresentationOptions options))completionHandler {
if (@available(iOS 14.0, *)) {
completionHandler(UNNotificationPresentationOptionList | UNNotificationPresentationOptionBanner);
} else {
completionHandler(UNNotificationPresentationOptionAlert);
}
}
Si la notification au premier plan est cliquée, le délégué push iOS 10 userNotificationCenter:didReceiveNotificationResponse:withCompletionHandler: sera appelé, et Braze enregistrera un événement de clic push.
Ajoutez le code suivant à la méthode application(_:didReceiveRemoteNotification:fetchCompletionHandler:) de votre application :
Appboy.sharedInstance()?.register(application,
didReceiveRemoteNotification: userInfo,
fetchCompletionHandler: completionHandler)
Ensuite, ajoutez le code suivant à la méthode userNotificationCenter(_:didReceive:withCompletionHandler:) de votre application :
Appboy.sharedInstance()?.userNotificationCenter(center,
didReceive: response,
withCompletionHandler: completionHandler)
Gestion des notifications push au premier plan
Pour afficher une notification push lorsque l’application est au premier plan, implémentez userNotificationCenter(_:willPresent:withCompletionHandler:) :
func userNotificationCenter(_ center: UNUserNotificationCenter,
willPresent notification: UNNotification,
withCompletionHandler completionHandler: @escaping (UNNotificationPresentationOptions) -> Void) {
if #available(iOS 14.0, *) {
completionHandler([.list, .banner]);
} else {
completionHandler([.alert]);
}
}
Si la notification au premier plan est cliquée, le délégué push iOS 10 userNotificationCenter(_:didReceive:withCompletionHandler:) sera appelé, et Braze enregistrera un événement de clic push.
Avant iOS 10
iOS 10 a modifié le comportement de sorte que application:didReceiveRemoteNotification:fetchCompletionHandler: n’est plus appelé lorsqu’une notification push est cliquée. Pour cette raison, si vous ne mettez pas à jour la compilation vers iOS 10+ et n’utilisez pas le framework UserNotifications, vous devez appeler Braze depuis les deux anciens délégués, ce qui constitue une rupture par rapport à notre intégration précédente.
Pour les applications compilées avec des SDK < iOS 10, suivez les instructions ci-dessous :
Pour activer le suivi des ouvertures sur les notifications push, ajoutez le code suivant à la méthode application:didReceiveRemoteNotification:fetchCompletionHandler: de votre application :
[[Appboy sharedInstance] registerApplication:application
didReceiveRemoteNotification:userInfo
fetchCompletionHandler:completionHandler];
Pour prendre en charge les analyses push sur iOS 10, vous devez également ajouter le code suivant à la méthode déléguée application:didReceiveRemoteNotification: de votre application :
[[Appboy sharedInstance] registerApplication:application
didReceiveRemoteNotification:userInfo];
Pour activer le suivi des ouvertures sur les notifications push, ajoutez le code suivant à la méthode application(_:didReceiveRemoteNotification:fetchCompletionHandler:) de votre application :
Appboy.sharedInstance()?.register(application,
didReceiveRemoteNotification: userInfo,
fetchCompletionHandler: completionHandler)
Pour prendre en charge les analyses push sur iOS 10, vous devez également ajouter le code suivant à la méthode déléguée application(_:didReceiveRemoteNotification:) de votre application :
Appboy.sharedInstance()?.register(application,
didReceiveRemoteNotification: userInfo)
Étape 6 : Deep linking
Le deep linking depuis une notification push vers l’application est automatiquement géré via notre documentation d’intégration push standard. Si vous souhaitez en savoir plus sur l’ajout de deep links vers des emplacements spécifiques dans votre application, consultez nos cas d’usage avancés.
Étape 7 : Tests unitaires (facultatif)
Pour ajouter une couverture de test aux étapes d’intégration que vous venez de suivre, implémentez les tests unitaires pour les notifications push.