How to use eCommerce recommended events
This page covers how and where you can use eCommerce recommended events across the platform, including how to use Braze eCommerce Canvas templates.
eCommerce recommended events are currently in early access. Contact your Braze customer success manager if you’re interested in participating in this early access.
If you’re using the new Shopify connector, eCommerce recommended events will automatically be available through the integration.
Using a Canvas template
To use a Canvas template:
- Go to Messaging > Canvas.
- Select Create Canvas > Use a Canvas Template.
- Browse the Braze templates tab for the template you want to use. You can preview a template by selecting its name.
- Select Apply Template for the template you want to use.

eCommerce Canvas templates
Braze offers four eCommerce Canvas templates.
Abandoned browse
Use the Abandoned browse template to engage users who have browsed products but did not add them to their cart or place an order.

Setup
On the Canvas page, select Use a Canvas Template > Braze templates and then apply the Abandoned browse template.
Default settings
The following settings are pre-configured in your Canvas:
- Basics
- Canvas name: Abandoned browse
- Conversion event:
ecommerce.order placed- Conversion deadline: 3 days
- Entry schedule
- Action-based when a user performs the
ecommerce.product_viewedevent - Start time is when you create the Canvas template

- Action-based when a user performs the
- Target audience
- Entry audience
- Email is not blank
- You can also modify the entry audience criteria to meet your business needs
- Entry controls
- Users are eligible to re-enter this Canvas after the full duration of the Canvas is complete
- Exit criteria
- Performs
ecommerce.cart_updated,ecommerce.checkout_started, orecommerce.order_placed
- Performs
- Entry audience
- Send settings
- Users who are subscribed or opted in
- Delay step
- 1 hour delay
- Message step
- Review the email template and HTML block with a Liquid templating example to add products to your message in the pre-built template. If you use your own email template, you can also reference Liquid variables, as demonstrated in the following section.
Abandoned browse product personalization for emails
Here is an example of how you would add an HTML product block for your Abandoned Browse email.
1
2
3
4
5
6
7
8
9
10
11
<table style="width:100%">
  <tr>
    <th><img src="{{context.${image_url}}}" width="200" height="200"><img></th>
    <th align="left">
      <ul style="list-style-type: none">
        <li>Item: {{context.${product_name}}}</li>
        <li>Price: ${{context.${price}}}</li>
      </ul>
    </th>
  </tr>
</table>
Product URL
1
{{context.${product_url}}}
Abandoned cart
Use the Abandoned cart template to cover potential lost sales from customers who added products to their cart but did not continue to checkout or place an order.

Setup
On the Canvas page, select Use a Canvas Template > Braze templates and then apply the Abandoned cart template.
Default settings
The following settings are pre-configured in your Canvas:
- Basics
- Canvas name: Abandoned cart
- Conversion event:
ecommerce.order_placed- Conversion deadline: 3 days
- Entry schedule
- Action-based trigger when a user triggers the Perform Cart Updated Event (located in the dropdown)
- Start time is when you create the Canvas template

- Target Audience
- Entry audience
- Has used these apps more than 0 times
- Email is not blank
- Entry controls
- Users are immediately re-eligible for Canvas entry
- Exit criteria
- Performs
ecommerce.cart_updated,ecommerce.checkout_started, orecommerce.order_placed
- Performs
- Entry audience
- Send settings
- Users who are subscribed or opted in
- Delay step
- 4 hour delay
- Message step
- Review the email template and HTML block with a Liquid templating example to add products to your message in the pre-built template. If you use your own email template, you can also reference Liquid variables, as demonstrated in the following section.
How abandoned cart re-entry logic works
When a user starts the checkout process, their cart is marked as checkout_started. From that point onward, any further cart updates with the same cart ID will not qualify the user to re-enter the abandoned cart user journey.
- When a user adds an item to their cart, they enter the Canvas.
- Each time they add or update items, they re-enter the Canvas—this keeps their cart data and messaging up to date.
- When the user starts the checkout process, their cart is tagged as
checkout_started, and they exit the Canvas. - Any future cart updates using the same cart ID will not trigger re-entry because this cart has already moved into the checkout stage.
When users move to the checkout user journey, they’re targeted by the abandoned checkout Canvas instead, which is designed for users further along in the purchase journey.
Abandoned cart product personalization for emails
Abandoned cart user journeys require a special shopping_cart Liquid tag for product personalization.
Here is an example of how you would add an HTML block with your shopping_cart Liquid tag to add products into your email.
1
2
3
4
5
6
7
8
9
10
11
12
13
14
15
16
17
18
19
<table style="width:100%">
  {% shopping_cart {{context.${cart_id}}} %}
  {% for item in shopping_cart.products %}
  {% catalog_items <add_your_catalog_name> {{item.variant_id}} %}
  <tr>
    <th><img src="{{ items[0].variant_image_url }}" width="200" height="200"><img></th>
    <th align="left">
      <ul style="list-style-type: none">
        <li>Item: {{ item.product_name }}</li>
        <li>Price: ${{ item.price }}</li>
        <li>Quantity: ${{ item.quantity }}</li>
        <li>Variant ID: {{ item.variant_id }}</li>
        <li>Product URL:{{ item.product_url }}</li>
        <li>SKU: {{ item.metadata.sku }}</li>
      </ul>
    </th>
  </tr>
  {% endfor %}
</table>
If you use Shopify, add your catalog name to get the variant image URL.
HTML cart URL
If you want to direct users back to their cart, you can add a nested event property under the metadata object, such as:
1
{{context.${metadata}.cart_url}}
If you use Shopify, create your cart URL by using this Liquid template:
1
{{context.${source}}}/checkouts/cn/{{context.${cart_id}}}
Abandoned checkout
Use the Abandoned checkout template to target customers who started the checkout process but left before placing their order.

Setup
On the Canvas page, select Use a Canvas Template > Braze templates and then apply the Abandoned checkout template.
Default settings
The following settings are pre-configured in your Canvas:
- Basics
- Canvas name: Abandoned checkout
- Conversion event:
ecommerce.order_placed- Conversion deadline: 3 days
- Entry schedule
- Action-based trigger when a user performs the
ecommerce.checkout_startedevent - Start time is when you create the Canvas template

- Action-based trigger when a user performs the
- Target audience
- Entry audience
- Has used these apps more than 0 times
- Email is not blank
- Entry controls
- Users are immediately re-eligible for Canvas entry
- Exit criteria
- Performs the
ecommerce.order_placedevents
- Performs the
- Entry audience
- Send settings
- Users who are subscribed or opted in
- Delay step
- 4 hour delay
- Message step
- Review the email template and HTML block with a Liquid templating example to add products to your message in the pre-built template. If you use your own email template, you can also reference Liquid variables, as demonstrated in the following section.
Abandoned checkout personalization for emails
Abandoned checkout user journeys require a special shopping_cart Liquid tag for product personalization.
Here is an example of how you would add an HTML block with your shopping_cart Liquid tag to add products into your email.
1
2
3
4
5
6
7
8
9
10
11
12
13
14
15
16
17
18
<table style="width:100%">
  {% shopping_cart {{context.${cart_id}}} :abort_if_not_abandoned false %}
  {% for item in shopping_cart.products %}
  {% catalog_items <add_your_catalog_name> {{item.variant_id}} %}
  <tr>
    <th><img src="{{ items[0].variant_image_url }}" width="200" height="200"><img></th>
    <th align="left">
      <ul style="list-style-type: none">
        <li>Item: {{ item.product_name }}</li>
        <li>Price: ${{ item.price }}</li>
        <li>Quantity: ${{ item.quantity }}</li>
        <li>Variant ID: {{ item.variant_id }}</li>
        <li>Product URL:{{ item.product_url }}</li>
        <li>SKU: {{ item.metadata.sku }}</li>
      </ul>
    </th>
    {% endfor %}
</table>
Checkout URL
1
{{context.${metadata}.checkout_url}}
Order confirmation and feedback survey
Use the Order confirmation & feedback survey template to confirm successful orders and enhance customer satisfaction.

Setup
On the Canvas page, select Use a Canvas Template > Braze templates and then apply the Order confirmation & feedback survey template.
Default settings
The following settings are pre-configured in your Canvas:
- Basics
- Canvas name: Order confirmation with feedback survey
- Conversion event:
ecommerce.session_start- Conversion deadline: 10 days
- Entry schedule
- Action-based trigger when a user performs the
ecommerce.cart_updatedevent - Start time is when you create the Canvas template

- Action-based trigger when a user performs the
- Target audience
- Entry audience
- Has used these apps more than 0 times
- Email is not blank
- Entry controls
- Users are immediately re-eligible for Canvas entry
- Exit criteria
- Not applicable

- Not applicable
- Entry audience
- Send settings
- Users who are subscribed or opted in
- Message step
- Review the email template and HTML block with a Liquid templating example to add products to your message in the pre-built template. If you use your own email template, you can also reference Liquid variables, as demonstrated in the following section.
Order confirmation personalization for emails
Here is an example of how you would add an HTML product block to your order confirmation after an order is placed.
1
2
3
4
5
6
7
8
9
10
11
12
13
14
15
<table style="width:100%">
  {% for item in {{context.${products}}} %}
  {% catalog_items <add_your_catalog_name> {{item.variant_id}} %}
  <tr>
    <th><img src="{{ items[0].variant_image_url }}" width="200" height="200" /></th>
    <th align="left">
      <ul style="list-style-type: none">
        <li>Item: {{item.product_name}}</li>
        <li>Price: {{item.price}}</li>
        <li>Quantity: {{item.quantity}}</li>
      </ul>
    </th>
  </tr>
  {% endfor %}
</table>
Order status URL
1
{{context.${metadata}.order_status_url}}
Message personalization
Liquid is a powerful templating language used by Braze that allows you to create dynamic and personalized content for your customers. By using Liquid tags, you can customize messages based on customer data, product information, and other variables, enhancing the shopping experience and driving engagement.
Key features of Liquid
- Dynamic content: Insert customer-specific information such as names, order details, and preferences into your messages.
- Conditional logic: Use if/else statements to display different content based on specific conditions (such as customer location and purchase history).
- Loops: Iterate over collections of products or customer data to display lists or grids of items.
Getting started with Liquid
To begin personalizing your messages using Liquid tags, you can refer to the following resources:
- Shopify data reference with pre-defined liquid tags
- Liquid
Segmentation
Use Braze segments to create targeted customer segments based on specific attributes and behaviors, and deliver personalized messaging and campaigns. With this powerful feature, you can effectively engage your customers by reaching the right audience with the right message at the right time.
For more information on getting started with segments, check out About Braze segments.
Recommended events
eCommerce events are based on recommended events. Because recommended events are more opinionated custom events, you can search for the recommended eCommerce event names by selecting any custom event filter.
eCommerce filters
Segment your users with eCommerce filters, like Ecommerce Source and Total Revenue, by going to the Ecommerce section within the segmenter.
For a list of eCommerce filters and their definitions, refer to Segment filters and select the “eCommerce” search category.

The plans to phase out the purchase event will be announced in 2026. The purchase event will eventually be replaced by new eCommerce recommended events, which will come with enhanced features for segmentation, reporting, analytics, and more. When this happens, segment filters will no longer populate under purchase behavior. For a full list of purchase events, refer to Logging purchase events.
Nested event properties
To segment by nested event properties, you can leverage Segment Extensions. For example, you can use Segment Extensions to find who has bought the product “SKU-123” in the last 90 days.
Analytics
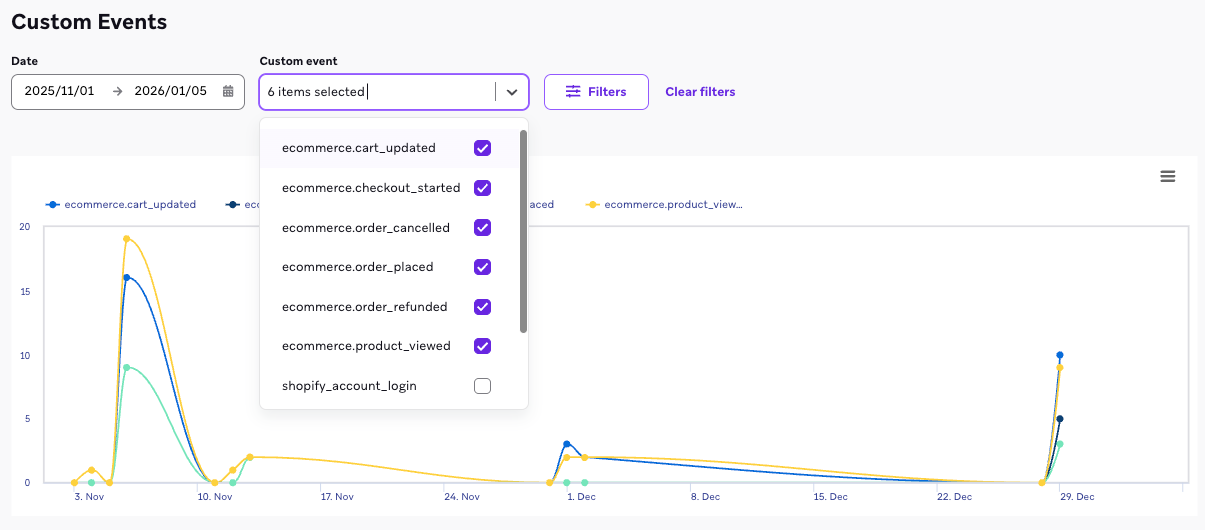
Custom events report
You can track eCommerce recommended event volume in the Custom Events report. Filter by Perform Custom Event, then specify the eCommerce recommended event name to view its performance over time.
Dashboards
Conversions dashboard
After you launch a campaign or Canvas using the “Places Order” conversion event, you can create a corresponding conversion report to track performance.

eCommerce revenue dashboard
To gain insights into revenue attributed to the last campaign or Canvas a user interacted with before placing an order, use the eCommerce revenue dashboard and select a conversion window.
Revenue report
To analyze data from these new events, go to the Dashboard Builder and view the eCommerce Revenue - Last Touch Attribution dashboard.
 Edit this page on GitHub