Set up orchestration
BrazeAI Decisioning Studio™ Go needs to connect to your Customer Engagement Platform (CEP) to orchestrate personalized communications. This article explains how to set up the integration for each supported CEP.
Supported CEPs
Decisioning Studio Go supports the following Customer Engagement Platforms:
| CEP | Integration Type | Key Features |
|---|---|---|
| Braze | API-triggered campaigns | Native integration, real-time triggering |
| Salesforce Marketing Cloud | Journey Builder with API Events | SQL query automation, data extensions |
Select your CEP below to get started with the integration setup.
Set up Braze integration
To integrate Decisioning Studio Go with Braze, you’ll create an API key, configure an API-triggered campaign, and provide the necessary identifiers to the Decisioning Studio Go portal.
Step 1: Create a REST API key
- In the Braze dashboard, go to Settings > APIs and Identifiers > API Keys.
- Select Create API Key.
- Enter a name for your API key. An example is “DecisioningStudioGoEmail”.
- Select the permissions based on the following categories:
- User Data: select
users.track,users.delete,users.export.ids,users.export.segment - Messages: select
messages.send - Campaigns: select all listed permissions
- Canvas: select all listed permissions
- Segments: select all listed permissions
- Templates: select all listed permissions
- User Data: select
- Select Create API key.
- Copy the API key and paste it into your BrazeAI Decisioning Studio™ Go portal.
Step 2: Locate your email display name
- In the Braze dashboard, go to Settings > Email Preferences.
- Locate the display name to be used with BrazeAI Decisioning Studio™ Go.
- Copy and paste the From Display Name into the BrazeAI Decisioning Studio™ Go portal as the Email Display Name.
- Copy and paste the associated email address into your BrazeAI Decisioning Studio™ Go portal as the From email address, which combines the local part and the domain.
Step 3: Find your Braze URL and App ID
To find your Braze URL:
- Go to the Braze dashboard.
- In your browser window, your Braze URL starts with
https://and ends withbraze.com. An example Braze URL ishttps://dashboard-01.braze.com.
To find your App ID (API Key):
Braze offers app IDs (referred to as API keys in the Braze dashboard) that you can use for tracking purposes, such as to associate activity with a specific app in your workspace. If you use app IDs, BrazeAI Decisioning Studio™ Go supports associating an app ID with each experimenter.
If you do not use app IDs, you can enter any string of characters as a placeholder.
- In the Braze dashboard, go to Settings > App Settings.
- Go to the app you want to track.
- Copy and paste the API Key into your BrazeAI Decisioning Studio™ Go portal.
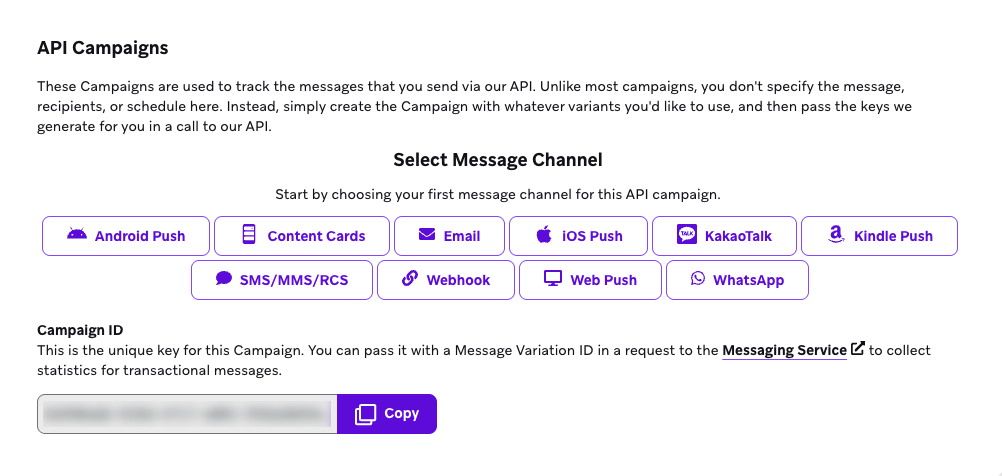
Step 4: Create an API-triggered campaign
- In the Braze dashboard, go to Messaging > Campaigns.
- Select Create campaign.
- For your campaign type, select API campaign.
- Enter a name for your campaign. An example is “Decisioning Studio Go Email”.

- For your messaging channel, select Email.
- In Additional Options, select the Allow users to become re-eligible to receive campaign checkbox.
- For the time to become re-eligible, enter 1 and select Hours from the dropdown.
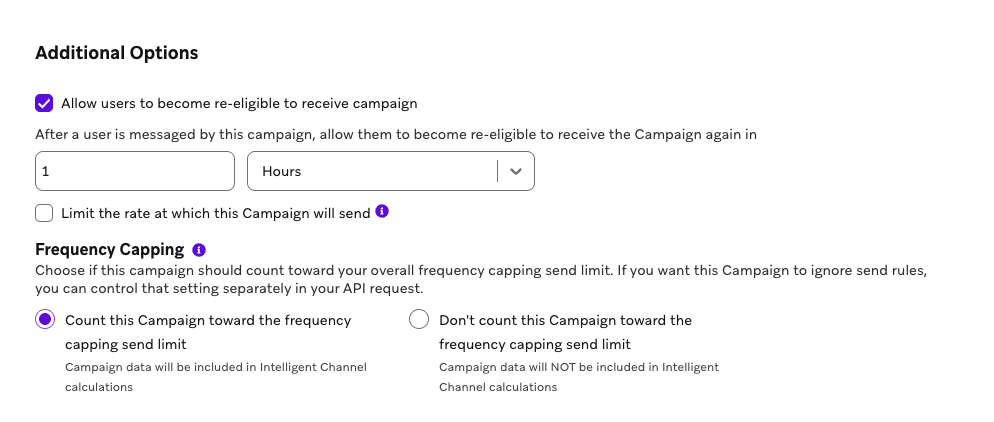
- Select Save Campaign.
Step 5: Copy your campaign and message IDs
- In your API campaign, copy the Campaign ID. Then, go to the BrazeAI Decisioning Studio™ Go portal and paste the Campaign ID.

- Copy the Message Variation ID. Then, go to the BrazeAI Decisioning Studio™ Go portal and paste the Message Variation ID.
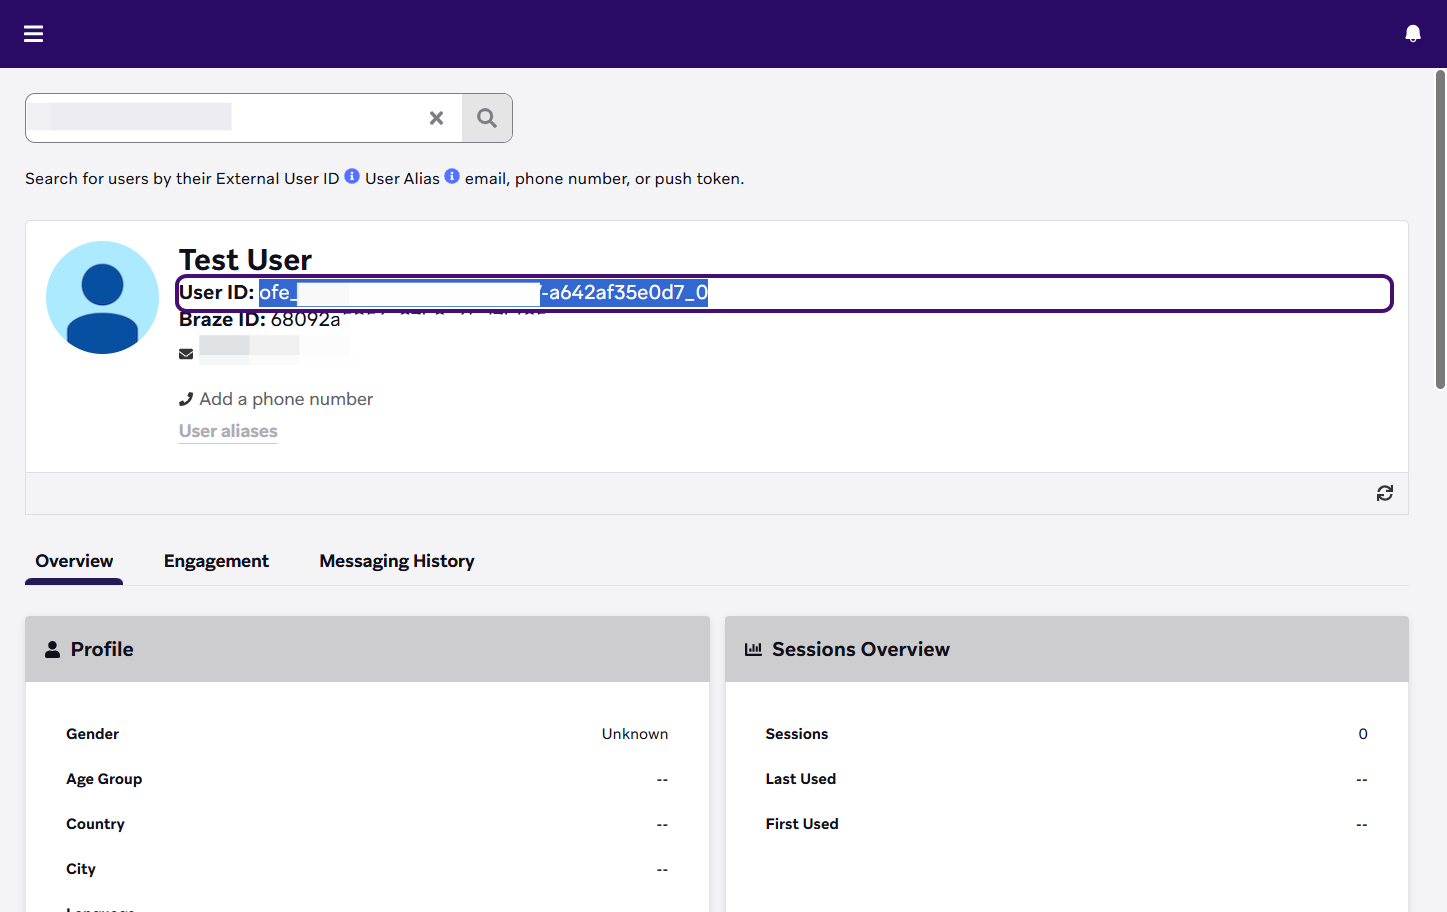
Step 6: Locate a test user ID
To test your integration, you’ll need a user ID:
- In the Braze dashboard, go to Audience > Search Users.
- Search for the user by their external user ID, user alias, email, phone number, or push token.
- Copy the user ID to reference in your setup.
Set up SFMC integration
To integrate Decisioning Studio Go with Salesforce Marketing Cloud, you’ll set up an app package, create a data query automation, and build a Journey to handle triggered sends.
Part 1: Set up an SFMC app package
- Go to your Marketing Cloud home page.
- Open the menu in the global header and select Setup.
- Go to Apps under Platform Tools in the side panel navigation, then select Installed Packages.
- Select New to create an app package.
- Give the app package a name and description.

- Select Add Component.
- For the Component Type, select API Integration. Then, select Next.
- For the Integration Type, select Server-to-server. Then, select Next.
- Select the following recommended scopes for your app package only:
- Channels > Email > Read, Write, Send
- Channels > OTT > Read
- Channels > Push > Read
- Channels > SMS > Read
- Channels > Social > Read
- Channels > Web > Read
- Assets > Documents and Images > Read, Write
- Assets > Saved Content > Read, Write
- Automation > Automations > Read, Write, Execute
- Automation > Journeys > Read, Write, Execute, Activate/Stop/Pause/Send/Schedule
- Contacts > Audiences > Read
- Contacts > List and Subscribers > Read, Write
- Cross Cloud Platform > Market Audience > View
- Cross Cloud Platform > Market Audience Member > View
- Cross Cloud Platform > Marketing Cloud Connect > Read
- Data > Data Extensions > Read, Write
- Data > File Locations > Read
- Data > Tracking Events > Read, Write
- Event notifications > Callbacks > Read
- Event notifications > Subscriptions > Read
Show image of recommended scopes

- Select Save.
- Copy and paste the following fields into the BrazeAI Decisioning Studio™ Go portal: Client Id, Client Secret, Authentication Base URI, REST Base URI, SOAP Base URI.
Part 2: Set up a data query automation
Step 1: Create a new automation
- From your Salesforce Marketing Cloud home, go to Journey Builder and select Automation Studio.

- Select New Automation.
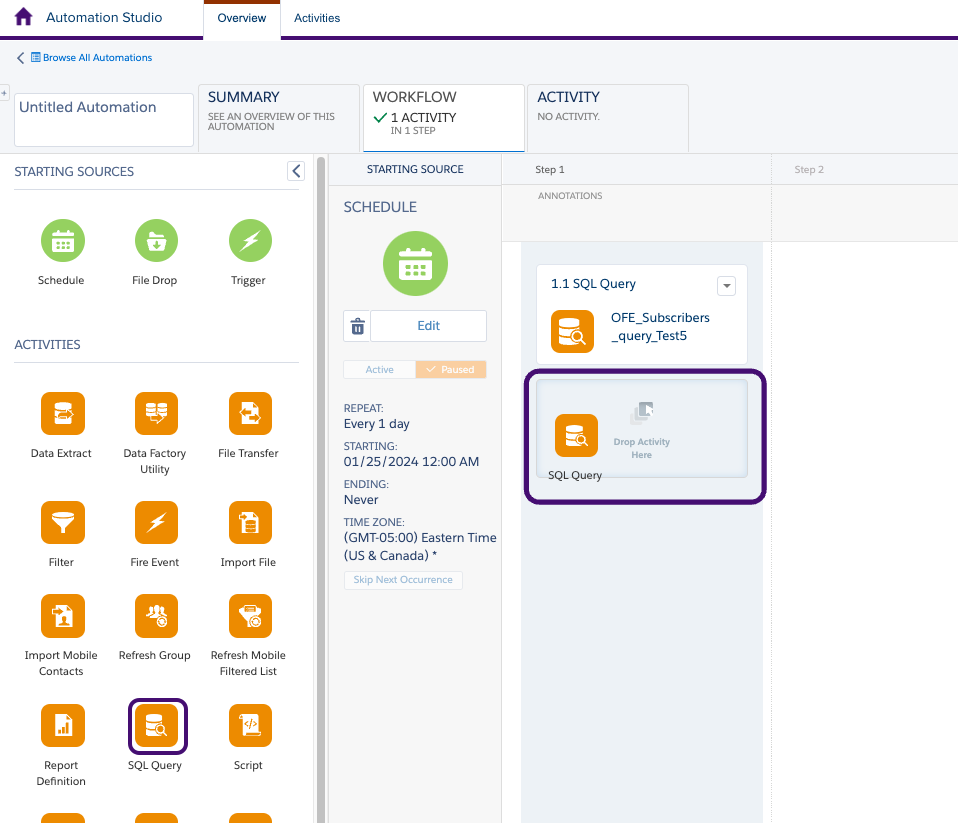
- Drag and drop a Schedule node as the Starting Source.
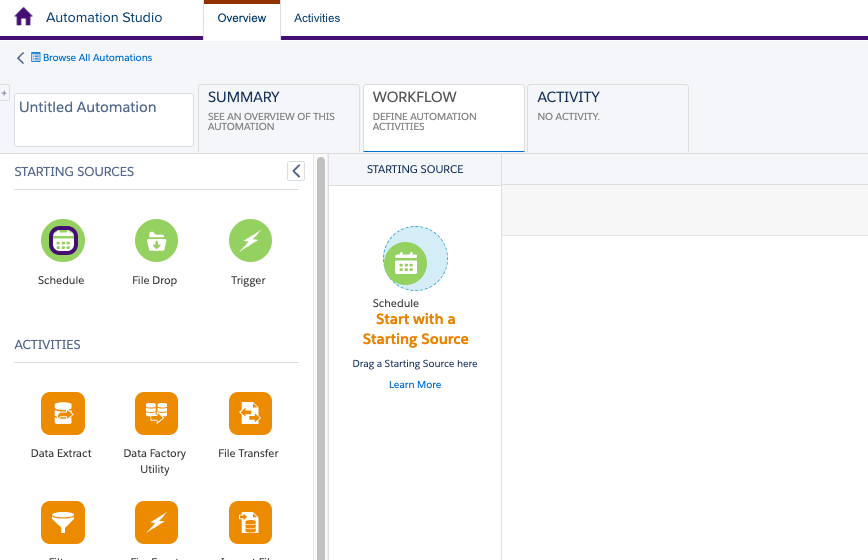
- In the Schedule node, select Configure.
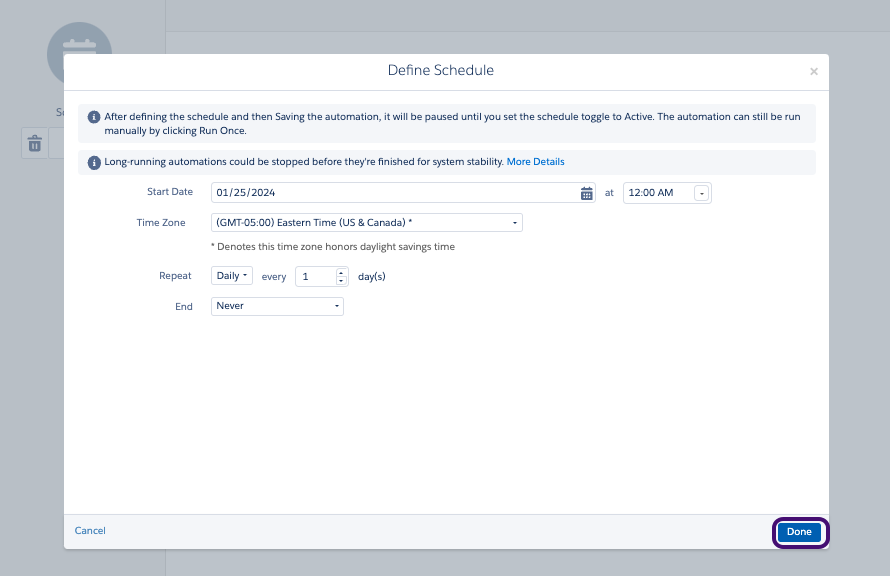
- Set the following for the schedule:
- Start Date: Tomorrow’s calendar day
- Time: 12:00 AM
- Time Zone: (GMT-05:00) Eastern (US & Canada)
- For Repeat, select Daily.
- Set this schedule to never end.
- Select Done to save the schedule.
Step 2: Create your SQL queries
Next, create 2 SQL queries: a subscribers query and an engagement query. These queries allow BrazeAI Decisioning Studio™ Go to retrieve data to populate the audience and ingest engagement events.
Subscribers query:
- Drag and drop an SQL Query into the canvas.
- Select Choose.
- Select Create New Query Activity.
- Give the query a name and external key. We recommend using the suggested name and external key for the subscriber query provided in your BrazeAI Decisioning Studio™ Go portal.
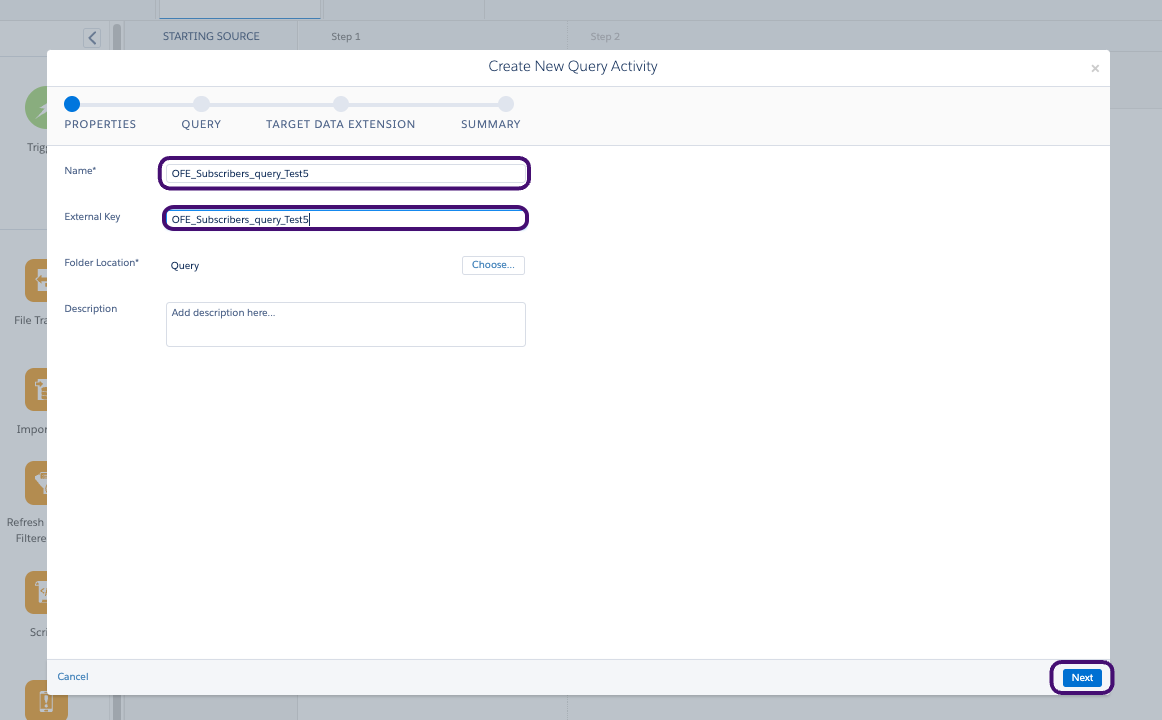
- Select Next.
- In your BrazeAI Decisioning Studio™ Go portal, locate the System data SQL query under Subscriber Query Resources.
- Copy and paste the query into the text box and select Next.

- In your BrazeAI Decisioning Studio™ Go portal, in the Resources to use section, locate the external key of the target data extension. Then, paste it into the search bar to search.
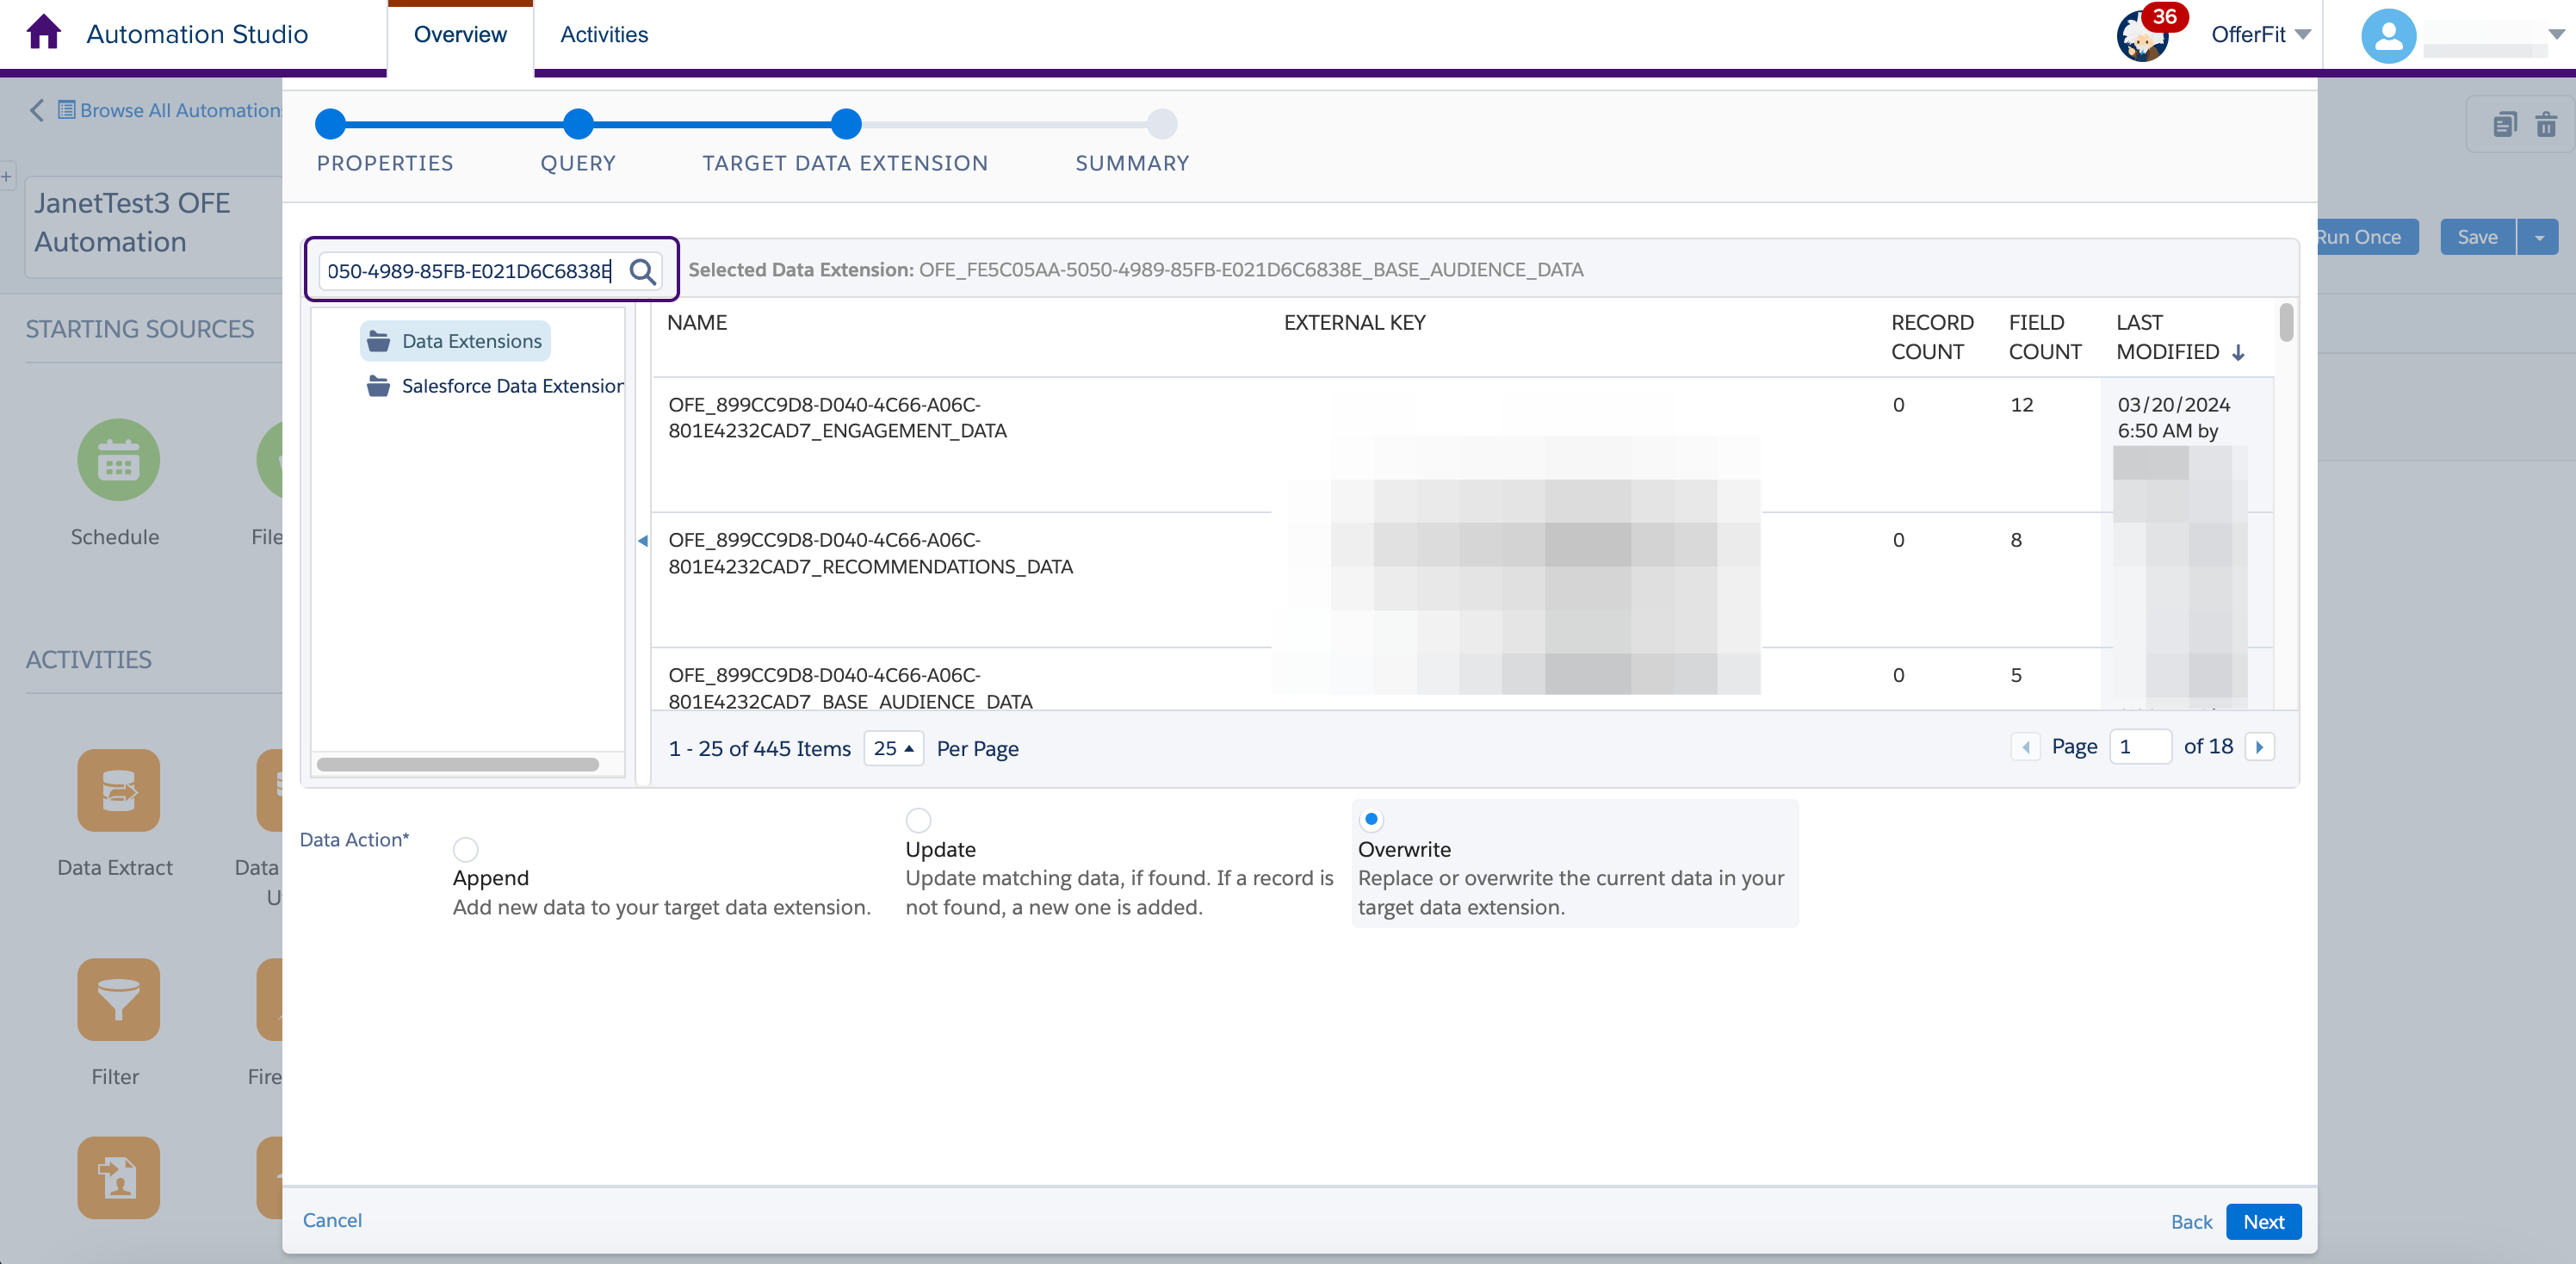
- Select the data extension that matches the external key you searched for. The target data extension name is also provided in your BrazeAI Decisioning Studio™ Go portal to cross-reference. The Data Extension for the subscriber query should end in a
BASE_AUDIENCE_DATAsuffix.

- Select Overwrite then Next.
Engagement query:
- Drag and drop an SQL Query into the canvas.
- Select Choose.
- Select Create New Query Activity.
- Give the query a name and external key. We recommend using the suggested name and external key for the engagement query provided in your BrazeAI Decisioning Studio™ Go portal.
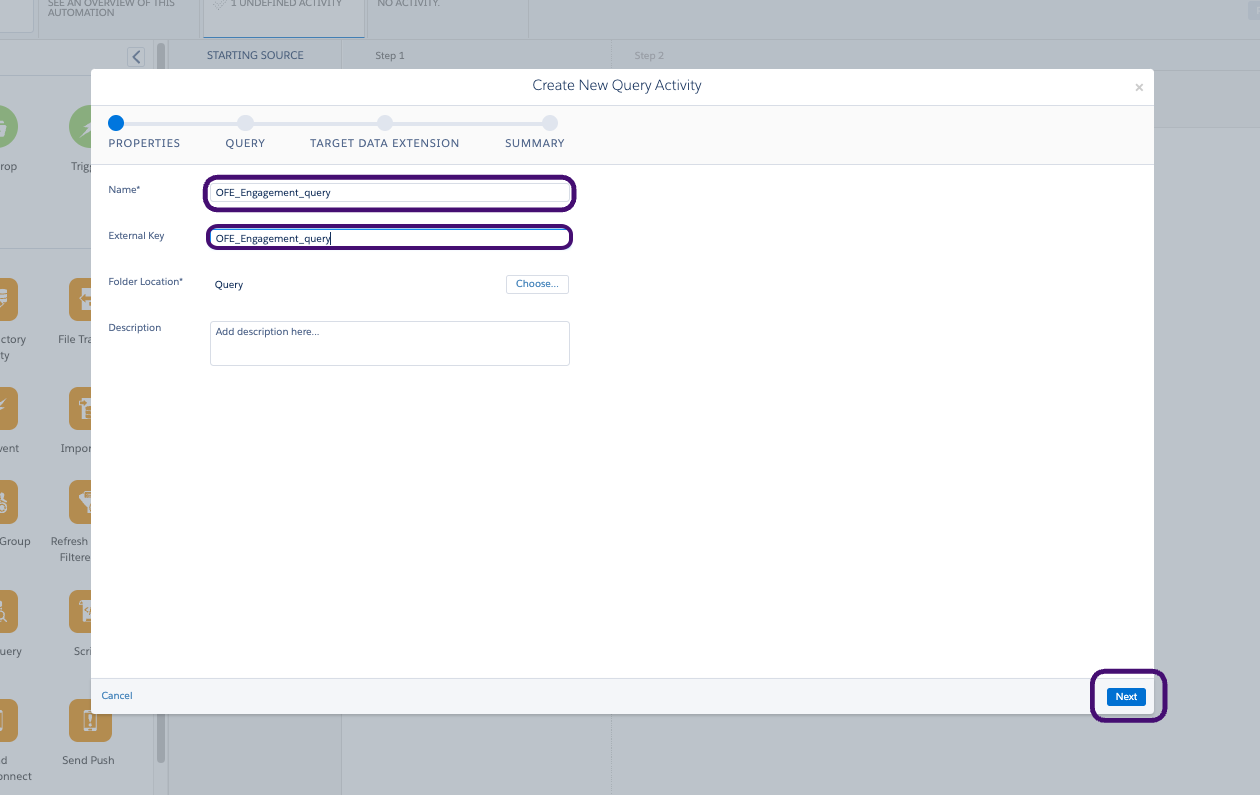
- Select Next.
- In your BrazeAI Decisioning Studio™ Go portal, locate the System data SQL query under Engagement Query Resources.
- Copy and paste the query into the text box and select Next.

- Locate and select the target Data Extension for the Engagement Query specified in your BrazeAI Decisioning Studio™ Go portal.
The target data extension name is also provided in your BrazeAI Decisioning Studio™ Go portal to cross-reference. Make sure you’re looking at the target Data Extension for the Engagement Query. The Data Extension for the engagement query should end with an ENGAGEMENT_DATA suffix.
- Select Overwrite then Next.

Step 3: Run the automation
- Give the automation a name and select Save.
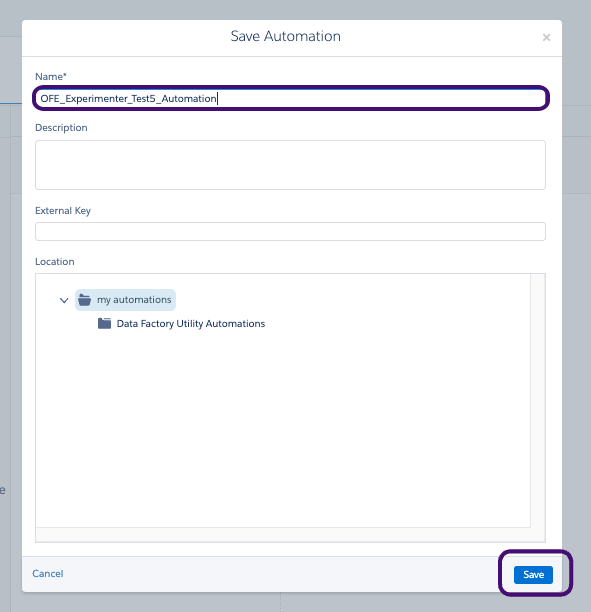
- Next, select Run Once to confirm everything is working as expected.
- Select both queries and select Run.

- Select Run Now.

Now, you can check to make sure the automation is running successfully. Contact Braze Support for further assistance if your automation isn’t running as expected.
Part 3: Create your SFMC Journey
Step 1: Set up the Journey
- In Salesforce Marketing Cloud, go to Journey Builder > Journey Builder.
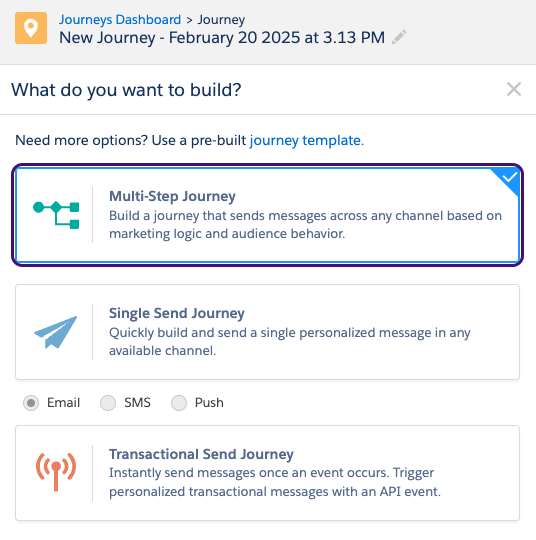
- Select Create New Journey.
- For your journey type, select Multi-Step Journey, then select Create.
Step 2: Build the Journey
Create an entry source:
- For your entry source, drag API Event to the Journey Builder.

- In the API Event, select Create an event.

- Select Select Data Extension. Locate and select the data extension that BrazeAI Decisioning Studio™ Go will be writing recommendations to.
- Select Summary to save your changes.
- Select Done to save the API event.

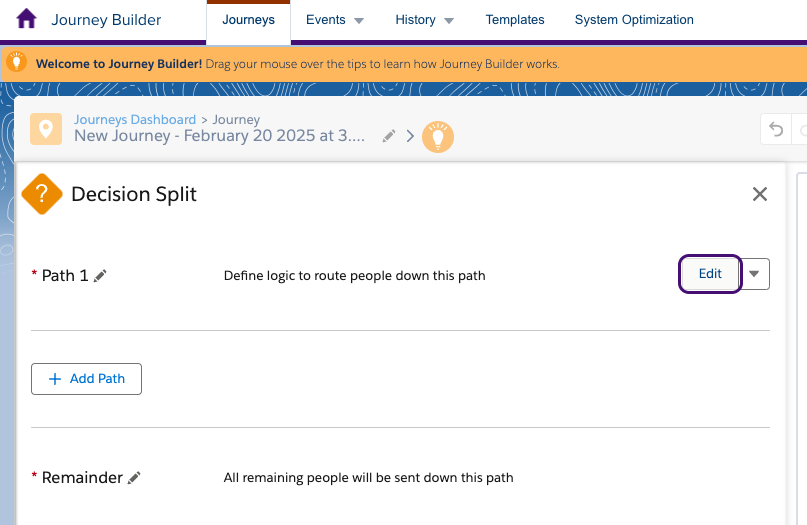
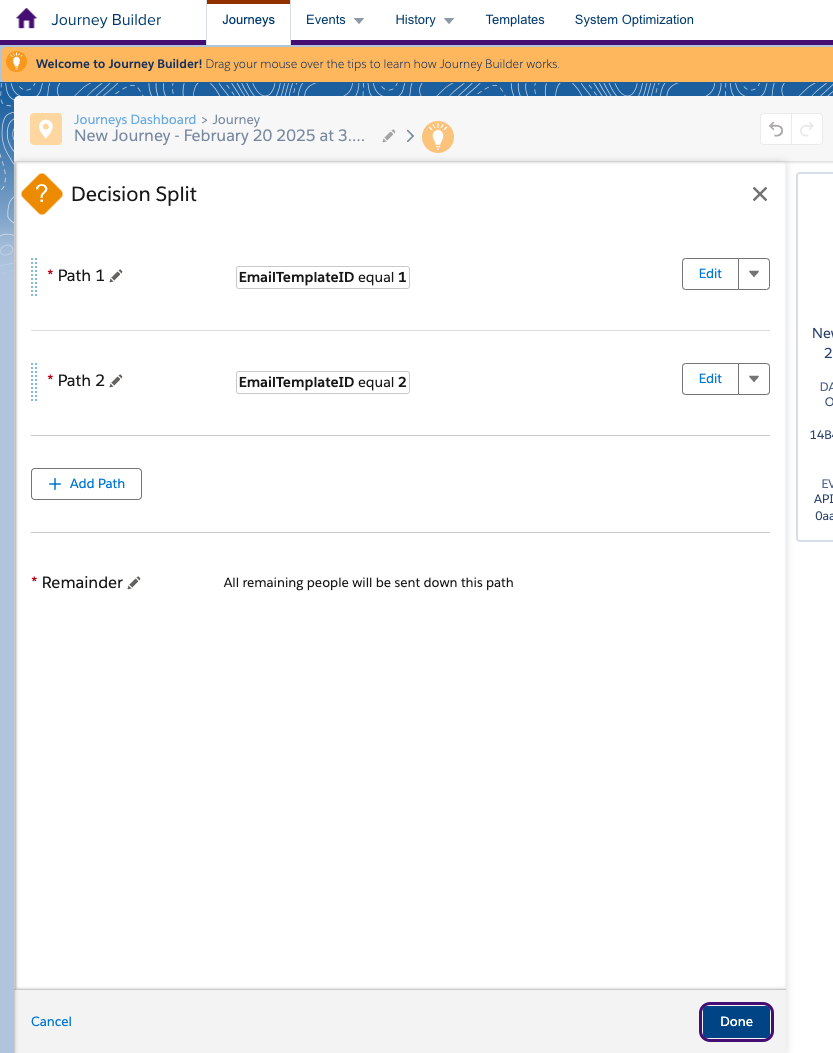
Add a Decision Split:
- Drag and drop a Decision Split after the API Entry Event.
- In the Decision Split details, select Edit for the first path.
- Update the Decision Split to use the template ID passed in by the recommendations data extension. Locate the appropriate field under Journey Data.

- Select your entry event and locate the desired template ID field, then drag it into the workspace.
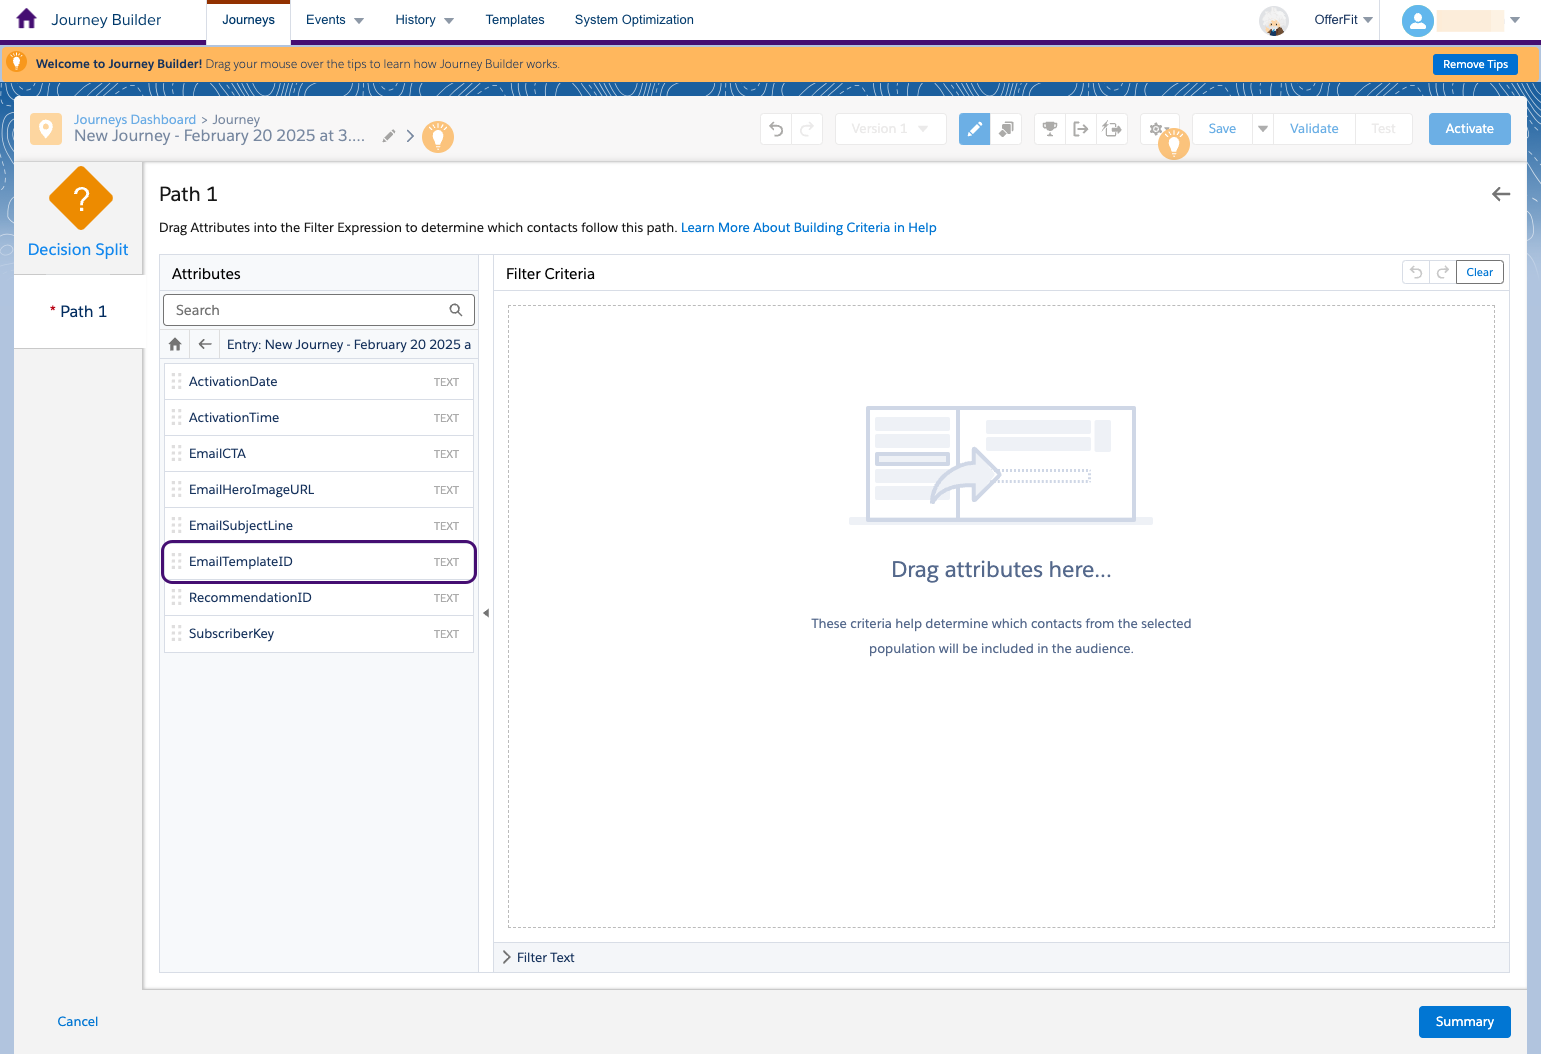
- Enter the template ID of your first email template, then select Done.
- Select Summary to save this path.
- Add a path for each of your email templates, then repeat steps 4-6 above to set the filter criteria so that the template ID matches the ID value of each template.
- Select Done to save the Decision Split node.
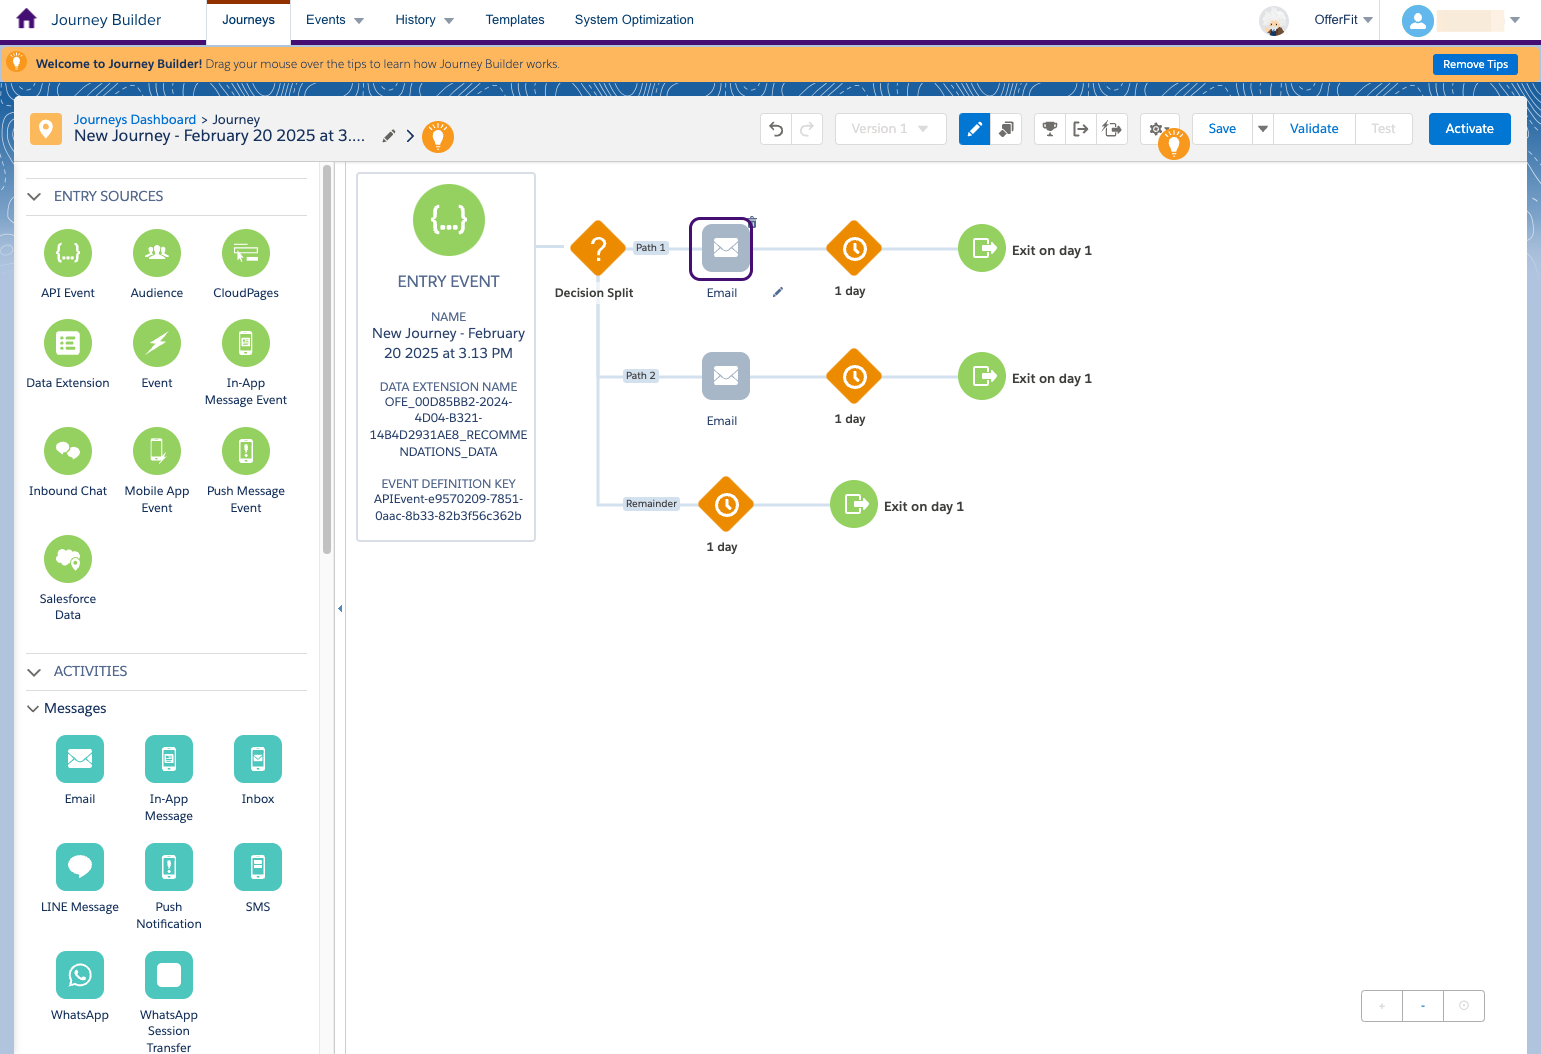
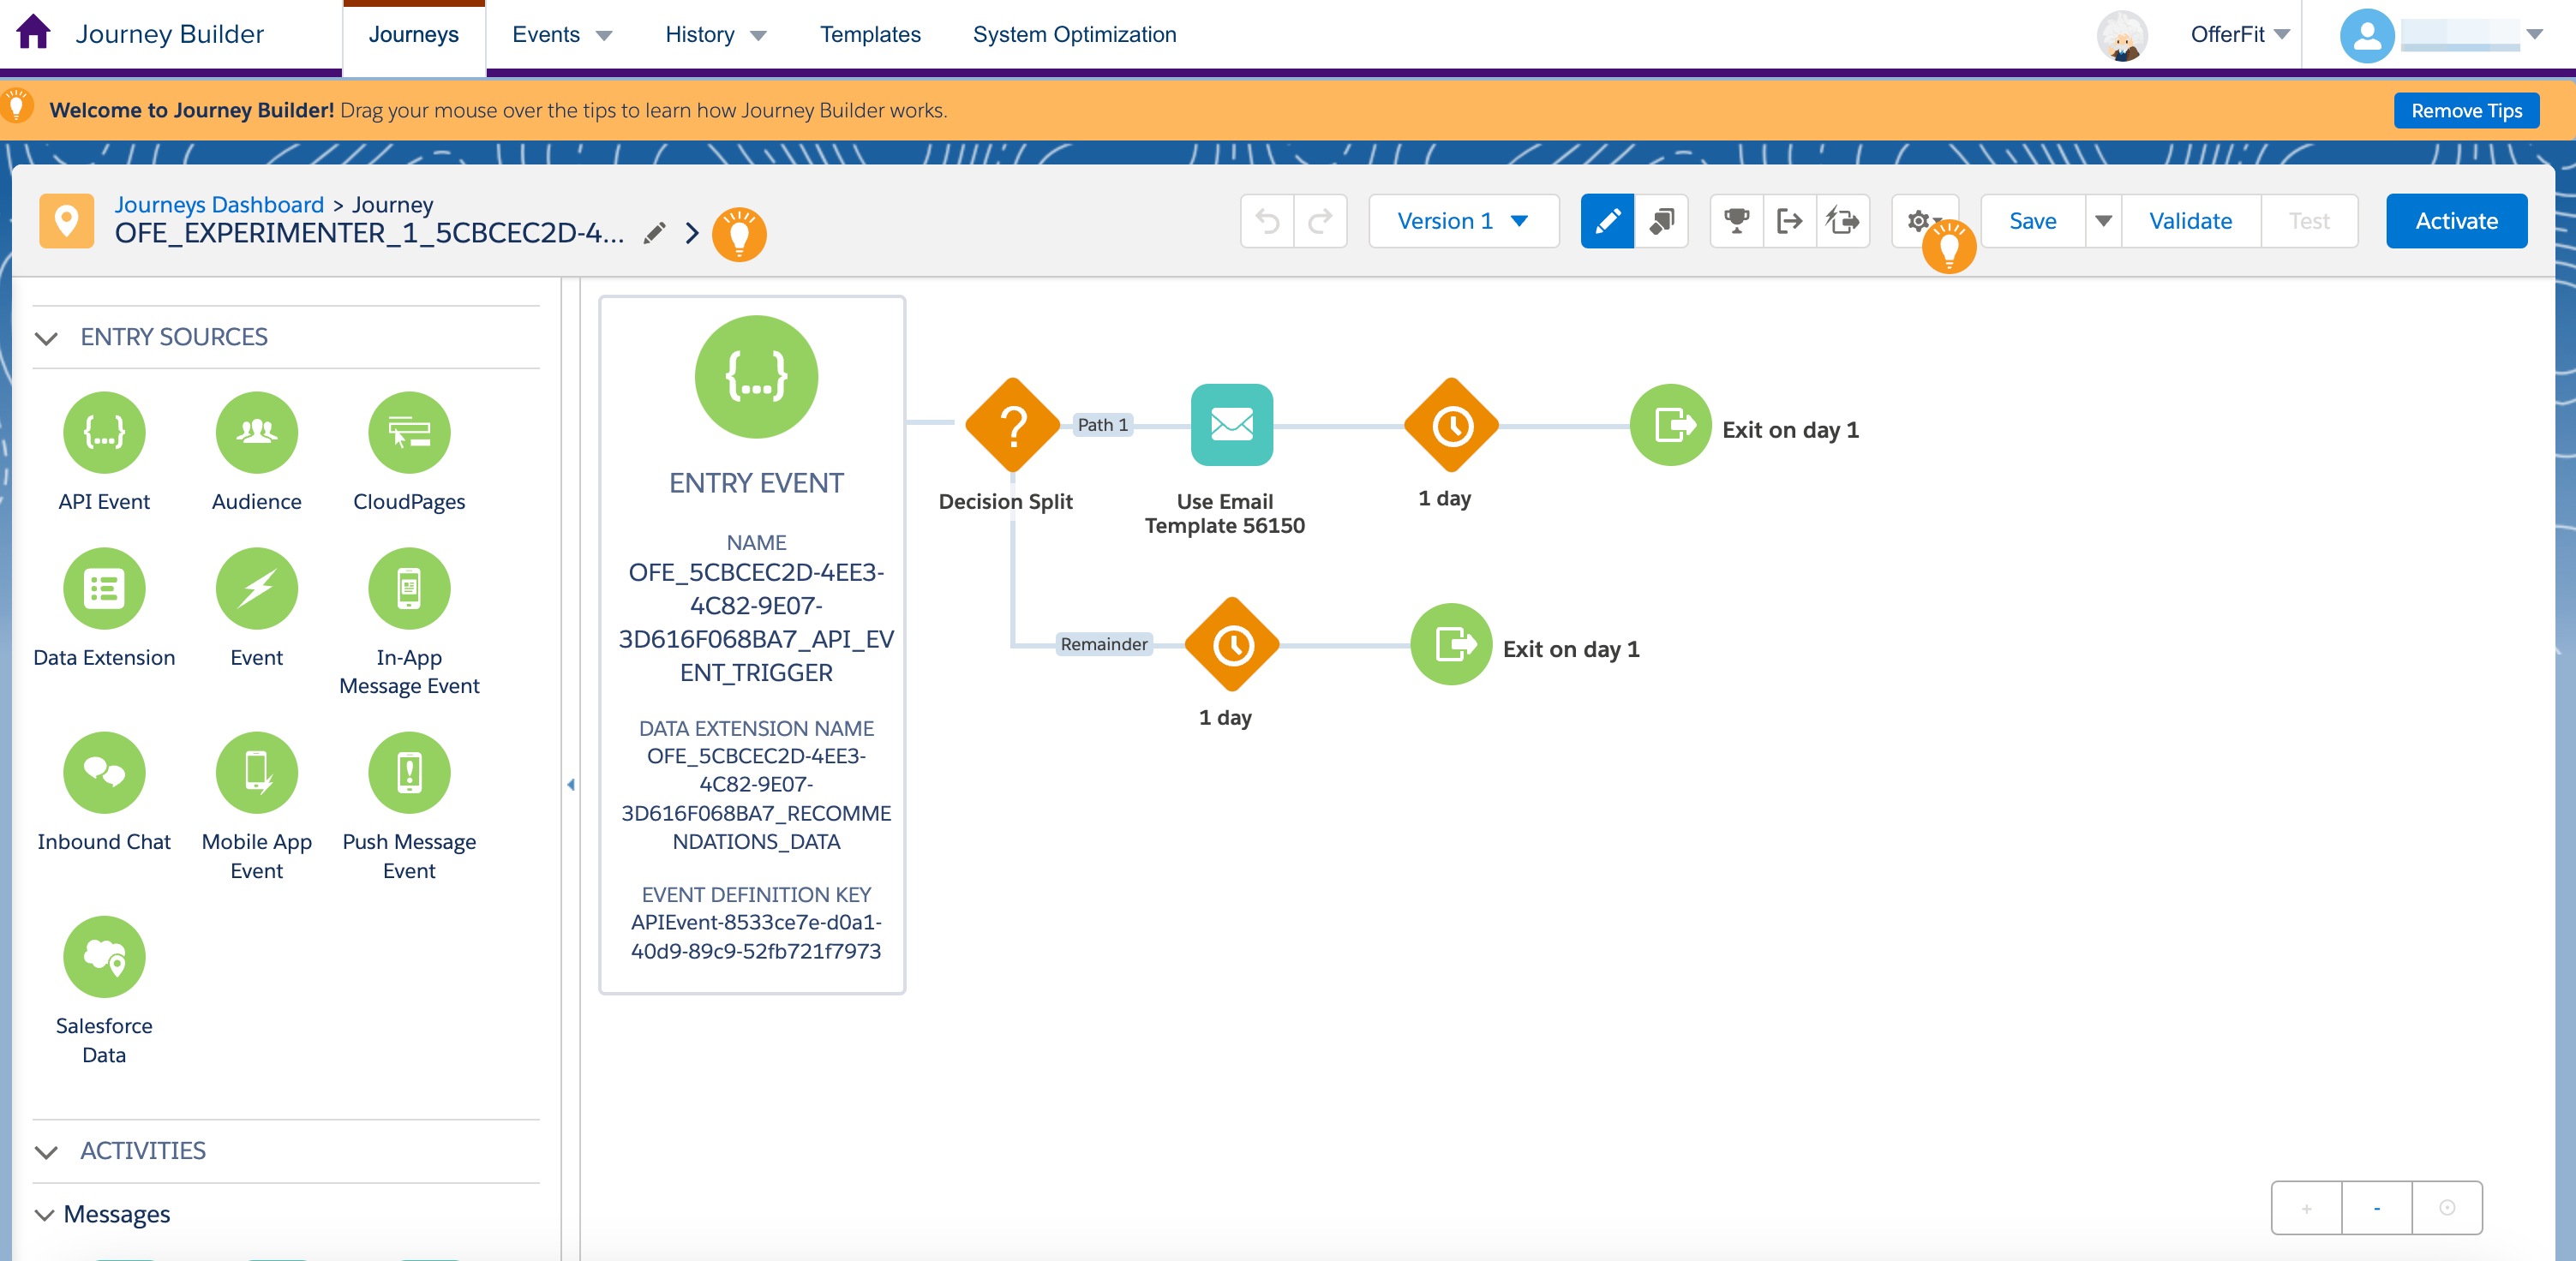
Add an Email for each Decision Split:
- Drag an Email node into each path of the Decision Split.
- Select Email, then select the appropriate template that should go in each Path (meaning the template with the ID value should match the logic in your Decision Split).
Step 3: Activate the Journey
After setting up your Journey, activate it and share the following details with the BrazeAI Decisioning Studio™ Go team:
- Journey ID
- Journey name
- API event definition key
- Recommendations data extension external key
The BrazeAI Decisioning Studio™ Go portal shows you the SFMC automation it provisioned to export the subscribers and engagement data once daily. If you open this automation in SFMC, make sure to unpause and turn it back to live.
- In the BrazeAI Decisioning Studio™ Go portal, copy the Journey name.
- Next, in Salesforce Marketing Cloud Journey Builder, paste the Journey name into the search bar.
- Select the Journey name. Note that the Journey is currently in Draft status.
- Select Validate.
- Then, review the validation results and select Activate.
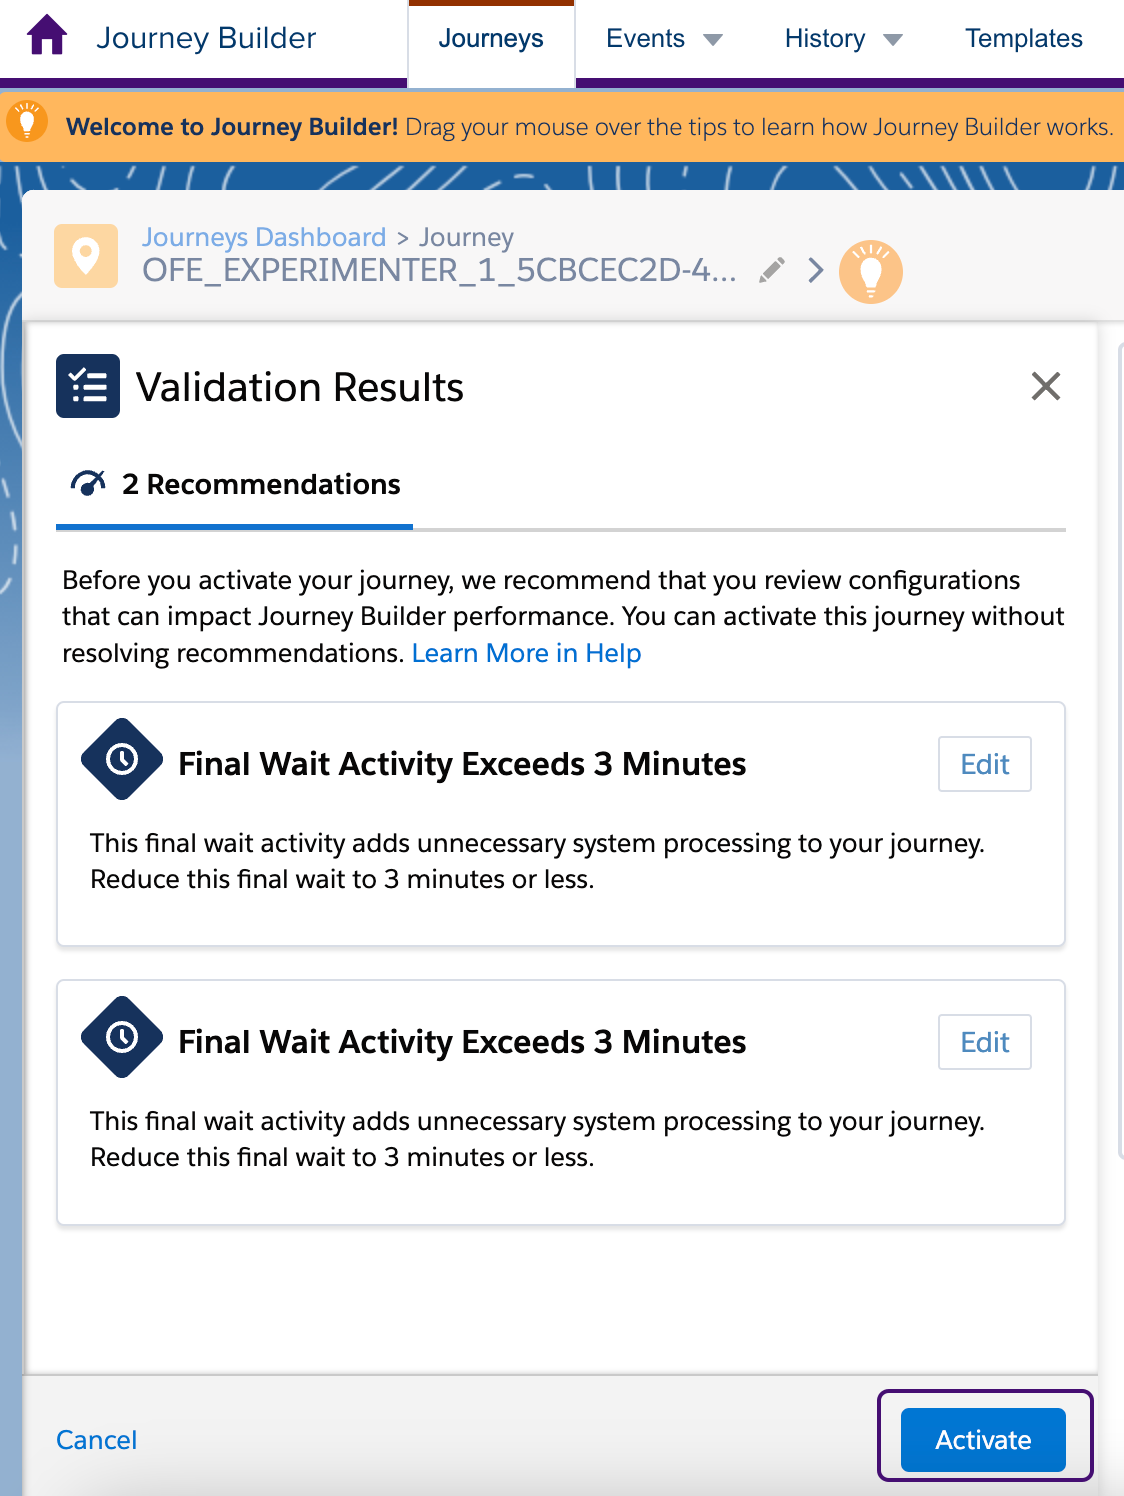
- In the Activate Journey summary, select Activate again.

You’re all set! You can now begin triggering sends through BrazeAI Decisioning Studio™ Go.
Next steps
Now that you’ve set up orchestration, proceed to design your agent:
 Edit this page on GitHub