File storage integrations
This article covers how to set up Cloud Data Ingestion support and sync relevant data from S3 to Braze.
You can use Cloud Data Ingestion (CDI) for S3 to directly integrate one or more S3 buckets in your AWS account with Braze. When new files are published to S3, a message is posted to SQS, and Braze Cloud Data Ingestion takes in those new files.
Cloud Data Ingestion supports JSON, CSV, and Parquet files, and attributes, event, purchase, and user delete data.
The integration requires the following resources:
- S3 bucket for data storage
- SQS queue for new file notifications
- IAM role for Braze access
AWS definitions
First, let’s just define some of the terms used during this task.
| Word | Definition |
|---|---|
| Amazon Resource Name (ARN) | The ARN is a unique identifier for AWS resources. |
| Identity and Access Management (IAM) | IAM is a web service that lets you securely control access to AWS resources. In this tutorial, you will create an IAM policy and assign it to an IAM role to integrate your S3 bucket with Braze Cloud Data Ingestion. |
| Amazon Simple Queue Service (SQS) | SQS is a hosted queue that lets you integrate distributed software systems and components. |
Setting up Cloud Data Ingestion in AWS
Step 1: Create a source bucket
Create a general purpose S3 bucket with default settings in your AWS account.
The default settings are:
- ACLs Disabled
- Block all public access
- Disable bucket versioning
- SSE-S3 encryption
Take note of the region you’ve created the bucket in, as you will create an SQS queue in the same region in the next step.
Step 2: Create SQS queue
Create an SQS queue to track when objects are added to the bucket you’ve created. Use the default configuration settings for now.
Be sure to create this SQS in the same region you created the bucket in.
Be sure to take note of the ARN and the URL of the SQS as you’ll be using it frequently during this configuration.

Step 3: Set up access policy
To set up the access policy, choose Advanced options.
Append the following statement to the queue’s access policy, being careful to replace YOUR-BUCKET-NAME-HERE with your bucket name, and YOUR-SQS-ARN with your SQS queue ARN, and YOUR-AWS-ACCOUNT-ID with your AWS account ID:
1
2
3
4
5
6
7
8
9
10
11
12
13
14
15
16
17
{
  "Sid": "braze-cdi-s3-sqs-publish",
  "Effect": "Allow",
  "Principal": {
    "Service": "s3.amazonaws.com"
  },
  "Action": "SQS:SendMessage",
  "Resource": "YOUR-SQS-ARN",
  "Condition": {
    "StringEquals": {
      "aws:SourceAccount": "YOUR-AWS-ACCOUNT-ID"
    },
    "ArnLike": {
      "aws:SourceArn": "arn:aws:s3:::YOUR-BUCKET-NAME-HERE"
    }
  }
}
Step 4: Add an event notification to the S3 bucket
-
In the bucket created in step 1, go to Properties > Event notifications.
-
Give the configuration a name. Optionally, specify a prefix or suffix to target if you only want a subset of files to be ingested by Braze.
-
Under Destination select SQS queue and provide the ARN of the SQS you created in step 2.
Step 5: Create an IAM policy
Create an IAM policy to allow Braze to interact with your source bucket. To get started, sign in to the AWS management console as an account administrator.
-
Go to the IAM section of the AWS Console, select Policies in the navigation bar, then select Create Policy.

-
Open the JSON tab and input the following code snippet into the Policy Document section, taking care to replace
YOUR-BUCKET-NAME-HEREwith your bucket name, andYOUR-SQS-ARN-HEREwith your SQS queue name:
1
2
3
4
5
6
7
8
9
10
11
12
13
14
15
16
17
18
19
20
21
22
23
24
25
26
{
    "Version": "2012-10-17",
    "Statement": [
        {
            "Effect": "Allow",
            "Action": ["s3:ListBucket", "s3:GetObjectAttributes", "s3:GetObject"],
            "Resource": ["arn:aws:s3:::YOUR-BUCKET-NAME-HERE"]
        },
        {
            "Effect": "Allow",
            "Action": ["s3:ListBucket", "s3:GetObjectAttributes", "s3:GetObject"],
            "Resource": ["arn:aws:s3:::YOUR-BUCKET-NAME-HERE/*"]
        },
        {
            "Effect": "Allow",
            "Action": [
                "sqs:DeleteMessage",
                "sqs:GetQueueUrl",
                "sqs:ReceiveMessage",
                "sqs:GetQueueAttributes"
            ],
            "Resource": "YOUR-SQS-ARN-HERE"
        }
    ]
}
-
Select Review Policy when you’re finished.
-
Give the policy a name and description and select Create Policy.


Step 6: Create an IAM role
To complete the setup on AWS, you will create an IAM role and attach the IAM policy from step 4 to it.
-
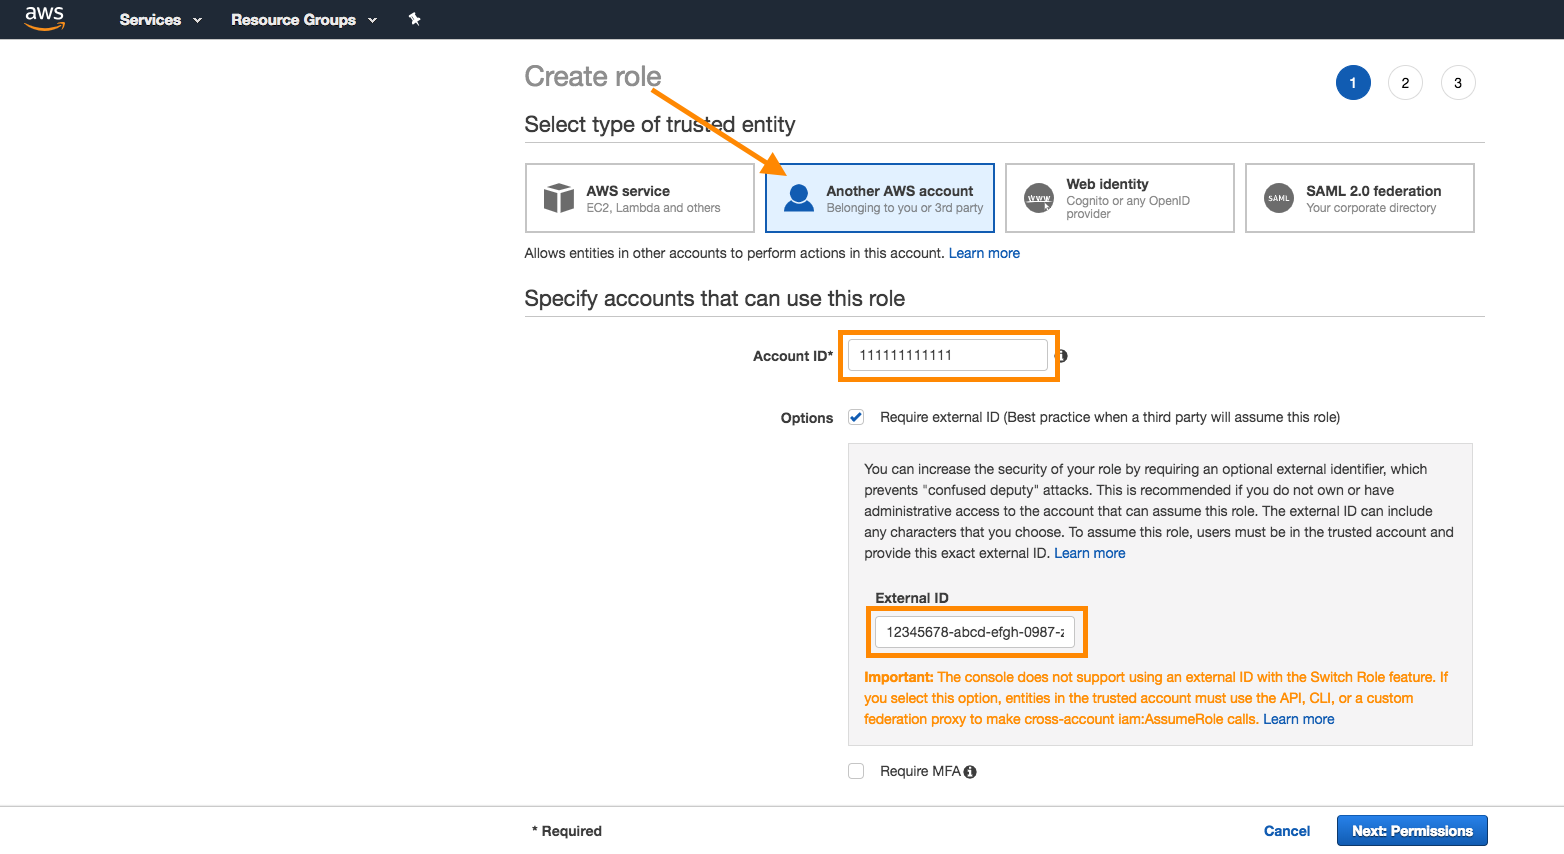
Within the same IAM section of the console where you created the IAM policy, go to Roles > Create Role.

-
Copy the Braze AWS account ID from your Braze dashboard. Go to Cloud Data Ingestion, click Create New Data Sync and select S3 Import.

-
In AWS, select Another AWS Account as the trusted entity selector type. Provide your Braze account ID, select the Require external ID checkbox, and enter an external ID for Braze to use. Select Next when complete.

-
Attach the policy created in step 4 to the role. Search for the policy in the search bar, and select a checkmark next to the policy to attach it. Select Next when complete.

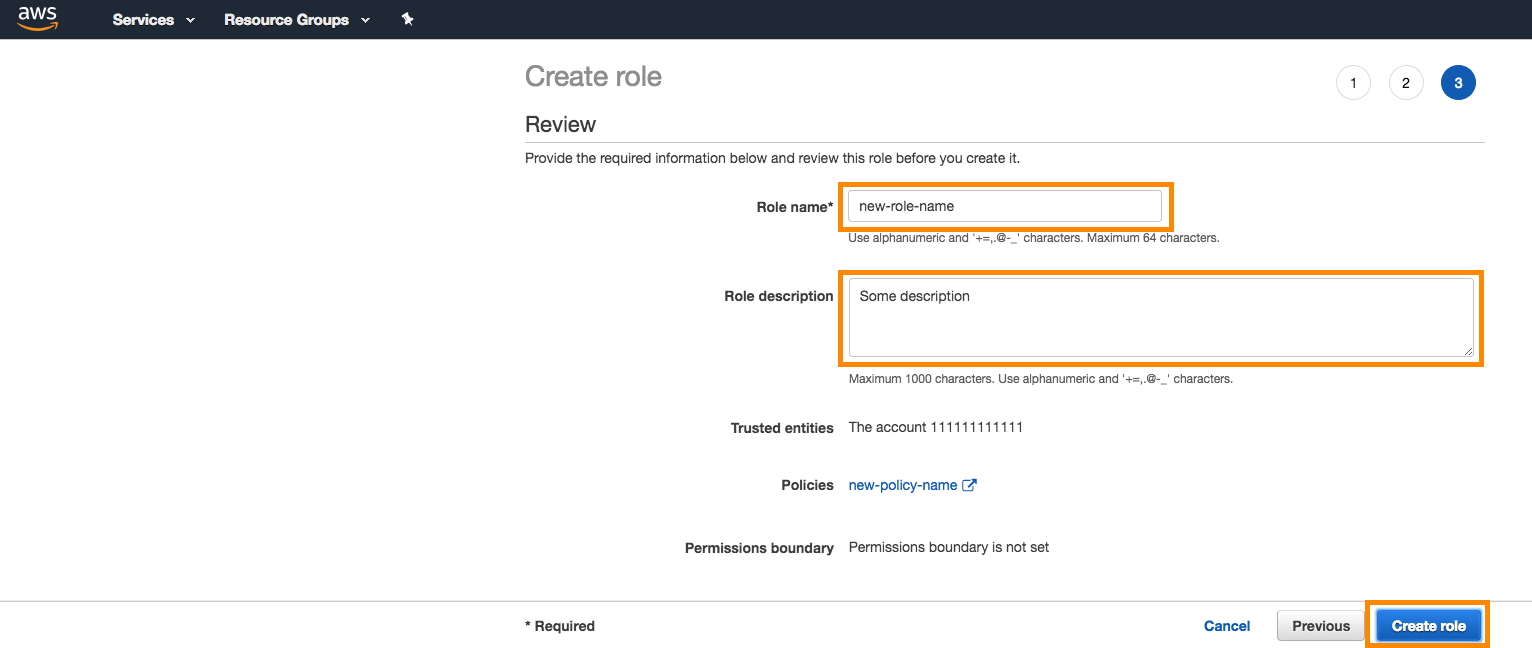
Give the role a name and a description, and click Create Role.
- Take note of the ARN of the role you just created and the external-id you generated, as you’ll use them to create the Cloud Data Ingestion integration.
Setting up Cloud Data Ingestion in Braze
-
To create a new integration, go to Data Settings > Cloud Data Ingestion, select Create New Data Sync, and select S3 Import from the file sources section.
-
Input the information from the AWS setup process to create a new sync. Specify the following:
- Role ARN
- External ID
- SQS URL (must be unique for each new integration)
- Bucket Name
- Folder Path (optional)
- Region

-
Give your integration a name, and select the data type for this integration.

-
Add a contact email for notifications if the sync breaks because of access or permissions issues. Optionally, turn on notifications for user-level errors and sync successes.

- Finally, test the connection and save the sync.

Required file formats
Cloud Data Ingestion supports JSON, CSV, and Parquet files. Each file must contain one or more of the supported identifier columns, and a payload column as a JSON string.
- User identifiers. Your source file may contain one or more user identifier columns or keys. Each row should only contain one identifier, but a source file may have multiple identifier types.
EXTERNAL_ID- This identifies the user you want to update. This should match theexternal_idvalue used in Braze.ALIAS_NAMEandALIAS_LABEL- These two columns create a user alias object.alias_nameshould be a unique identifier, andalias_labelspecifies the type of alias. Users may have multiple aliases with different labels but only onealias_nameperalias_label.BRAZE_ID- The Braze user identifier. This is generated by the Braze SDK, and new users cannot be created using a Braze ID through Cloud Data Ingestion. To create new users, specify an external user ID or user alias.EMAIL- The user’s email address. If multiple profiles with the same email address exist, the most recently updated profile will be prioritized for updates. If you include both email and phone, we will use the email as the primary identifier.PHONE- The user’s phone number. If multiple profiles with the same phone number exist, the most recently updated profile will be prioritized for updates.
PAYLOAD- This is a JSON string of the fields you want to sync to the user in Braze.
Unlike with data warehouse sources, the UPDATED_AT column is not required nor supported.
Files added to the S3 source bucket should not exceed 512MB. Files larger than 512MB will result in an error and will not be synced to Braze.
1
2
3
4
5
6
7
{"external_id":"s3-qa-0","payload":"{\"name\": \"GT896\", \"age\": 74, \"subscriber\": true, \"retention\": {\"previous_purchases\": 21, \"vip\": false}, \"last_visit\": \"2023-08-08T16:03:26.600803\"}"}
{"external_id":"s3-qa-1","payload":"{\"name\": \"HSCJC\", \"age\": 86, \"subscriber\": false, \"retention\": {\"previous_purchases\": 0, \"vip\": false}, \"last_visit\": \"2023-08-08T16:03:26.600824\"}"}
{"external_id":"s3-qa-2","payload":"{\"name\": \"YTMQZ\", \"age\": 43, \"subscriber\": false, \"retention\": {\"previous_purchases\": 23, \"vip\": true}, \"last_visit\": \"2023-08-08T16:03:26.600831\"}"}
{"external_id":"s3-qa-3","payload":"{\"name\": \"5P44M\", \"age\": 15, \"subscriber\": true, \"retention\": {\"previous_purchases\": 7, \"vip\": true}, \"last_visit\": \"2023-08-08T16:03:26.600838\"}"}
{"external_id":"s3-qa-4","payload":"{\"name\": \"WMYS7\", \"age\": 11, \"subscriber\": true, \"retention\": {\"previous_purchases\": 0, \"vip\": false}, \"last_visit\": \"2023-08-08T16:03:26.600844\"}"}
{"external_id":"s3-qa-5","payload":"{\"name\": \"KCBLK\", \"age\": 47, \"subscriber\": true, \"retention\": {\"previous_purchases\": 11, \"vip\": true}, \"last_visit\": \"2023-08-08T16:03:26.600850\"}"}
{"external_id":"s3-qa-6","payload":"{\"name\": \"T93MJ\", \"age\": 47, \"subscriber\": true, \"retention\": {\"previous_purchases\": 10, \"vip\": false}, \"last_visit\": \"2023-08-08T16:03:26.600856\"}"}
Every line in your source file must contain valid JSON, or the file will be skipped.
1
2
{"external_id":"s3-qa-0","payload":"{\"app_id\": \"YOUR_APP_ID\", \"name\": \"view-206\", \"time\": \"2024-04-02T14:34:08\", \"properties\": {\"bool_value\": false, \"preceding_event\": \"unsubscribe\", \"important_number\": 206}}"}
{"external_id":"s3-qa-1","payload":"{\"app_id\": \"YOUR_APP_ID\", \"name\": \"view-206\", \"time\": \"2024-04-02T14:34:08\", \"properties\": {\"bool_value\": false, \"preceding_event\": \"unsubscribe\", \"important_number\": 206}}"}
Every line in your source file must contain valid JSON, or the file will be skipped.
1
2
{"external_id":"s3-qa-0","payload":"{\"app_id\": \"YOUR_APP_ID\", \"product_id\": \"product-11\", \"currency\": \"BSD\", \"price\": 8.511527858335066, \"time\": \"2024-04-02T14:34:08\", \"quantity\": 19, \"properties\": {\"is_a_boolean\": true, \"important_number\": 40, \"preceding_event\": \"click\"}}"}
{"external_id":"s3-qa-1","payload":"{\"app_id\": \"YOUR_APP_ID\", \"product_id\": \"product-11\", \"currency\": \"BSD\", \"price\": 8.511527858335066, \"time\": \"2024-04-02T14:34:08\", \"quantity\": 19, \"properties\": {\"is_a_boolean\": true, \"important_number\": 40, \"preceding_event\": \"click\"}}"}
Every line in your source file must contain valid JSON, or the file will be skipped.
external_id,payload
s3-qa-load-0-d0daa196-cdf5-4a69-84ae-4797303aee75,"{""name"": ""SNXIM"", ""age"": 54, ""subscriber"": true, ""retention"": {""previous_purchases"": 19, ""vip"": true}, ""last_visit"": ""2023-08-08T16:03:26.598806""}"
s3-qa-load-1-d0daa196-cdf5-4a69-84ae-4797303aee75,"{""name"": ""0J747"", ""age"": 73, ""subscriber"": false, ""retention"": {""previous_purchases"": 22, ""vip"": false}, ""last_visit"": ""2023-08-08T16:03:26.598816""}"
s3-qa-load-2-d0daa196-cdf5-4a69-84ae-4797303aee75,"{""name"": ""EP1U0"", ""age"": 99, ""subscriber"": false, ""retention"": {""previous_purchases"": 23, ""vip"": false}, ""last_visit"": ""2023-08-08T16:03:26.598822""}"
For examples of all supported file types, please see the sample files in braze-examples.
 Edit this page on GitHub