 Looker
Looker, a business intelligence and big-data analytics platform, enables you to explore, analyze, and share real-time business analytics seamlessly.
The Braze and Looker integration allows Braze users to leverage first-party Looker Blocks and Looker Actions user flagging via the REST API. These flagged users can be added to segments to target future Braze campaigns or Canvases. To use Looker with Braze, we recommend sending your Braze data to a data warehouse using Braze currents, then use Braze’s Looker Blocks to quickly model and visualize your Braze data in Looker.
Prerequisites
| Requirement | Description |
|---|---|
| Looker account | A Looker account is required to take advantage of this partnership. |
| Braze REST API key | A Braze REST API key with users.track permissions. This can be created in the Braze dashboard from Settings > API Keys. |
| Braze REST endpoint | Your REST endpoint URL. Your endpoint will depend on the Braze URL for your instance. |
Limitations
- This process only works with data that has not been pivoted.
- The API processes a maximum of 100,000 rows at a time.
- The final count of a user’s flag may be lower due to duplicates or non-users.
Integration
Looker Blocks
Our Looker Blocks help Braze customers quickly access a view of granular data we offer via Currents. Our blocks provide pre-made visualizations and modeling for Currents data so Braze customers can easily implement analytic patterns like retention, evaluate message deliverability, take a more detailed look at user behavior, and more.
To implement the Looker Blocks, follow the instructions in the README files of the GitHub code.
Both integrations assume that your initial Braze integration, as well as your Braze integration with a Looker-compatible data warehouse, is appropriately configured to capture and send necessary data.
Braze has built our Looker Blocks using Snowflake as our data warehouse. While we aim for our Blocks to work with as many data warehouses as possible, some SQL functions may differ in availability, syntax, or behavior across dialects.
Be aware of different naming conventions! Custom names can cause incongruities in data unless you change all corresponding names. If you’ve customized any View/table or model names, rename each in the LookML to the name you’ve selected.
Available Blocks
| Block | Description |
|---|---|
| Message engagement analytics block | This block includes data around push, email, in-app messages, webhook, News Feed, conversion, Canvas entry, and campaign control group enrollment events. Learn more about this Looker Block, or check out the GitHub code. |
| User behavior analytics block | This block includes data around custom events, purchases, sessions, location events, and uninstalls. Learn more about this Looker Block, or check out the GitHub code. |
Looker Actions
Looker Actions allow you to flag users within Braze via the REST API endpoint from a Looker Look. Actions require that a dimension is tagged with braze_id. The Action will append the flagged value to the user’s looker_export custom attribute.
Only existing users will be flagged. You cannot use pivoted Looks when flagging data in Braze.
Step 1: Set up a Braze Looker action
Set up a Braze Looker Action with your Braze REST API key and REST endpoint.

Step 2: Set up Looker Develop
Within Looker Develop, select the appropriate views. Add braze_id to the dimensions tag and commit the changes.
This braze_id tag is use to determine which field is the unique key.
1
2
3
4
5
6
dimension: external_id {
    type: string
    primary_key: yes
    sql: ${TABLE}.external_id ;;
    tags: ["braze_id"]
}
Make sure to commit the changes. Looker Action will only work with production settings.
Step 3: Set user attributes in tags
Optionally, any attribute can be set using a braze[] tag with the attribute name in the brackets. For example, if you wanted a custom attribute user_segment to be sent, the tag would be braze[user_segment].
Note the following limitations:
- Attributes will only be sent if it’s included as a field within the look.
- Supported types are
Strings,Boolean,Numbers, andDates. - Attribute names are case-sensitive.
- Standard attributes can also be set as long as they match the standard user profile names exactly.
- The full tag should be formatted within quotes. For example,
tags: ["braze[first_name]"]. Other tags can also be assigned but will be ignored. - Additional information can be found on GitHub.
Step 4: Send the Looker action
- Within a Look with a
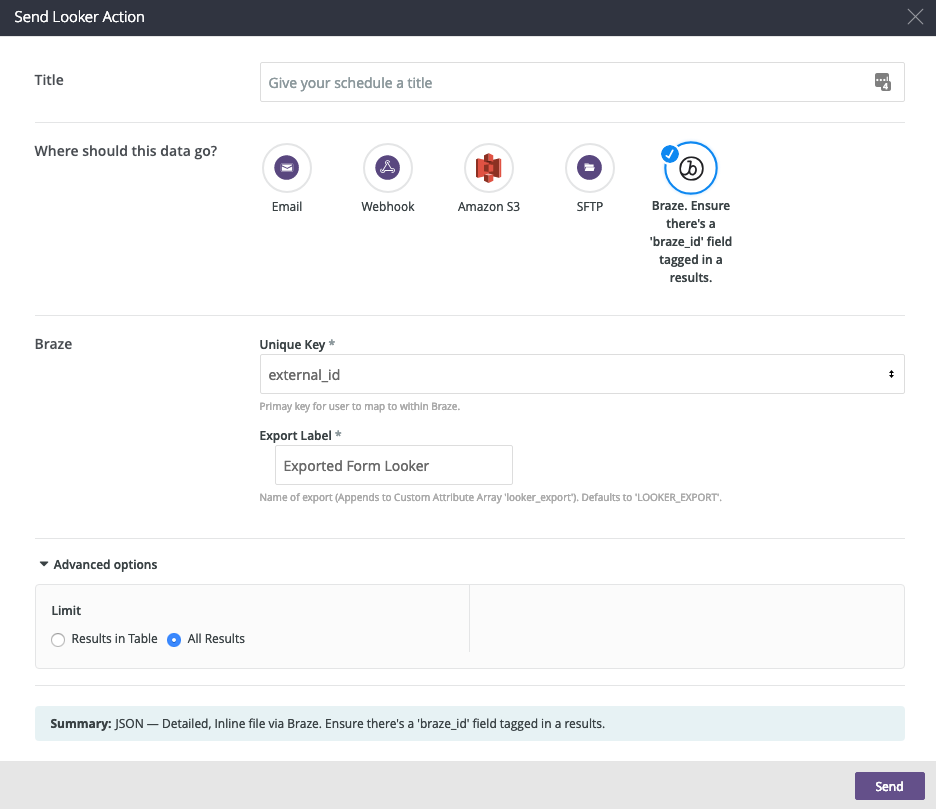
braze_iddimension selected, click the settings gear ( ) on the upper right, and select Send…. - Select the custom Braze Action.
- Under Unique Key, provide the primary user mapping key for the Braze account (
external_idorbraze_id). - Give the export a name. If none is provided,
LOOKER_EXPORTwill be used. - Under Advanced Options, select Results in Table or All Results and then Send.

If the export was correctly sent, thenLOOKER_EXPORTshould appear in the user’s profile as a custom attribute with the value you entered in the action.
Example outgoing API
The following is an example of an outgoing API call, which will be sent to the /users/track/ endpoint.
Header
1
Authorization: Bearer [API_KEY]
Body
1
2
3
4
5
6
7
8
9
10
11
12
13
14
15
16
17
18
19
20
{
   "attributes" : [
      {
        "external_id" : "user_01",
        "_update_existing_only" : true,
        "looker_export" : { "add" : ["LOOKER"] }
      },
      {
        "external_id" : "user_02",
        "_update_existing_only" : true,
        "looker_export" : { "add" : ["LOOKER"] }
      },
      {
        "external_id" : "user_03",
        "_update_existing_only" : true,
        "looker_export" : { "add" : ["LOOKER"] }
      },
      .....
   ]
}
Segment users in Braze
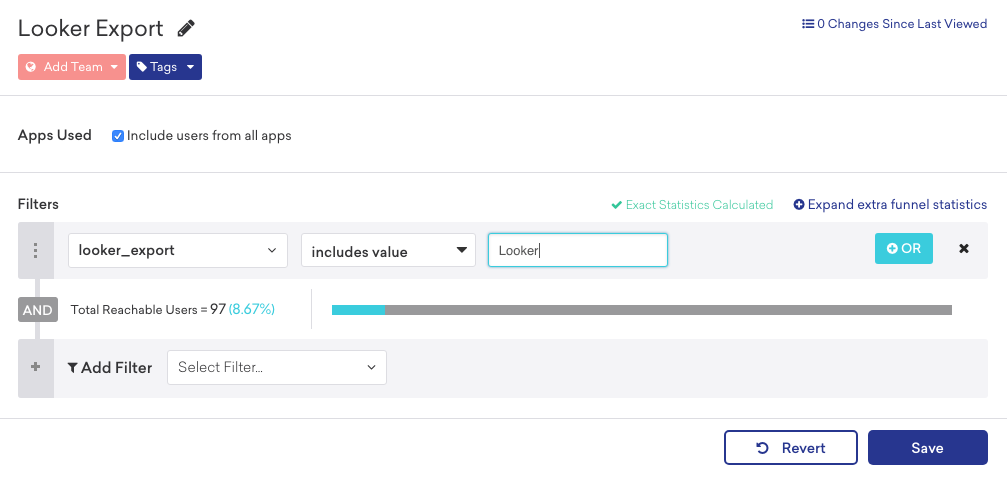
In Braze, to create a segment of these flagged users, navigate to Segments under Engagement, name your segment, and select Looker_Export as the filter. Next, use the “includes value” option and provide the custom attribute flag you assigned in Looker.

Once saved, you can reference this segment during Canvas or campaign creation in the targeting users step.
Troubleshooting
If you’re having issues with the Looker Action, add a test user to internal groups and check that the following:
- The API key has the
users.trackpermissions. - The correct REST endpoint is entered, such as
https://rest.iad-01.braze.com. - A
braze_idtag is set in the dimension view. - Your query includes the Id dimension or attribute as a column.
- Looker results are not pivoted.
- The unique key is correctly selected. Usually the
external_id. braze_idin the dimension is different then thebraze_idin the api.braze_idin the dimension is use to indicated that it’s theidfield for the Braze API. For most purposes, upon sendexternal_idis the primary key.- The
external_iduser exist in the Braze platform. - The
looker_exportfield is set asAutomatically DetectunderBraze Platform > Settings > Manage Settings > Custom Attributes. - The changes are commit to production. Looker Action works on production settings.
 Edit this page on GitHub